GraphQL UI
Use the Gloo Gateway UI to review the health and configuration of your GraphQL APIs, test out your GraphQL API functionality, and create new GraphQL APIs.
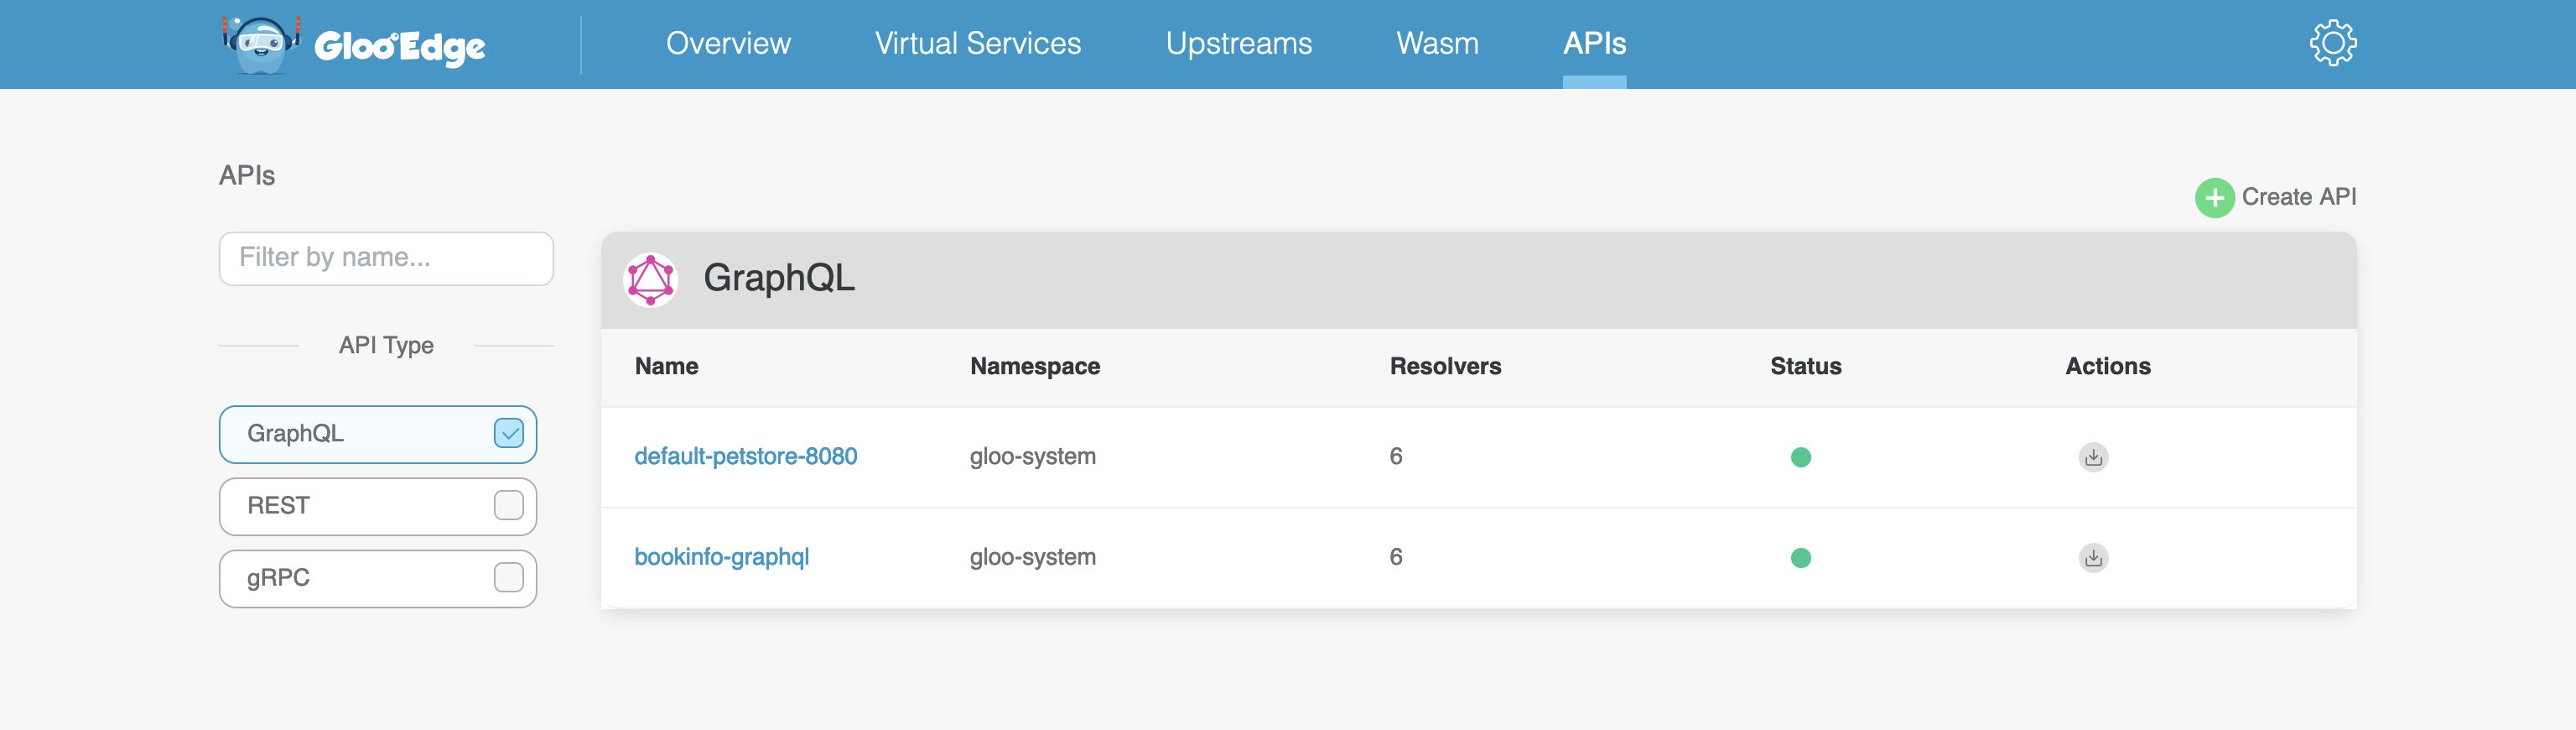
List GraphQL APIs in the Gloo Gateway UI
The Gloo Gateway UI is served from the gloo-fed-console service on port 8090. For more information about how to use the UI, see the UI documentation.
- Open the Gloo Gateway UI.
glooctl: For more information, see the CLI documentation.glooctl dashboardkubectl: Enable port forwarding thegloo-fed-consoleservice on port 8090.kubectl port-forward svc/gloo-fed-console -n gloo-system 8090:8090
- Open your browser and connect to http://localhost:8090.
- Optional: If authentication is enabled, sign in.
- In the navigation bar, click APIs. The GraphQL, REST, and gRPC APIs in your Gloo Gateway environment are listed.
- Under API Type, select the GraphQL filter.
- Review the overview details for each API, such as the namespace it is deployed in, the number of resolvers defined in the API, and the current status of the API.
- In the Actions column, you can optionally download the configuration files for the API, or delete the API configuration from your environment.
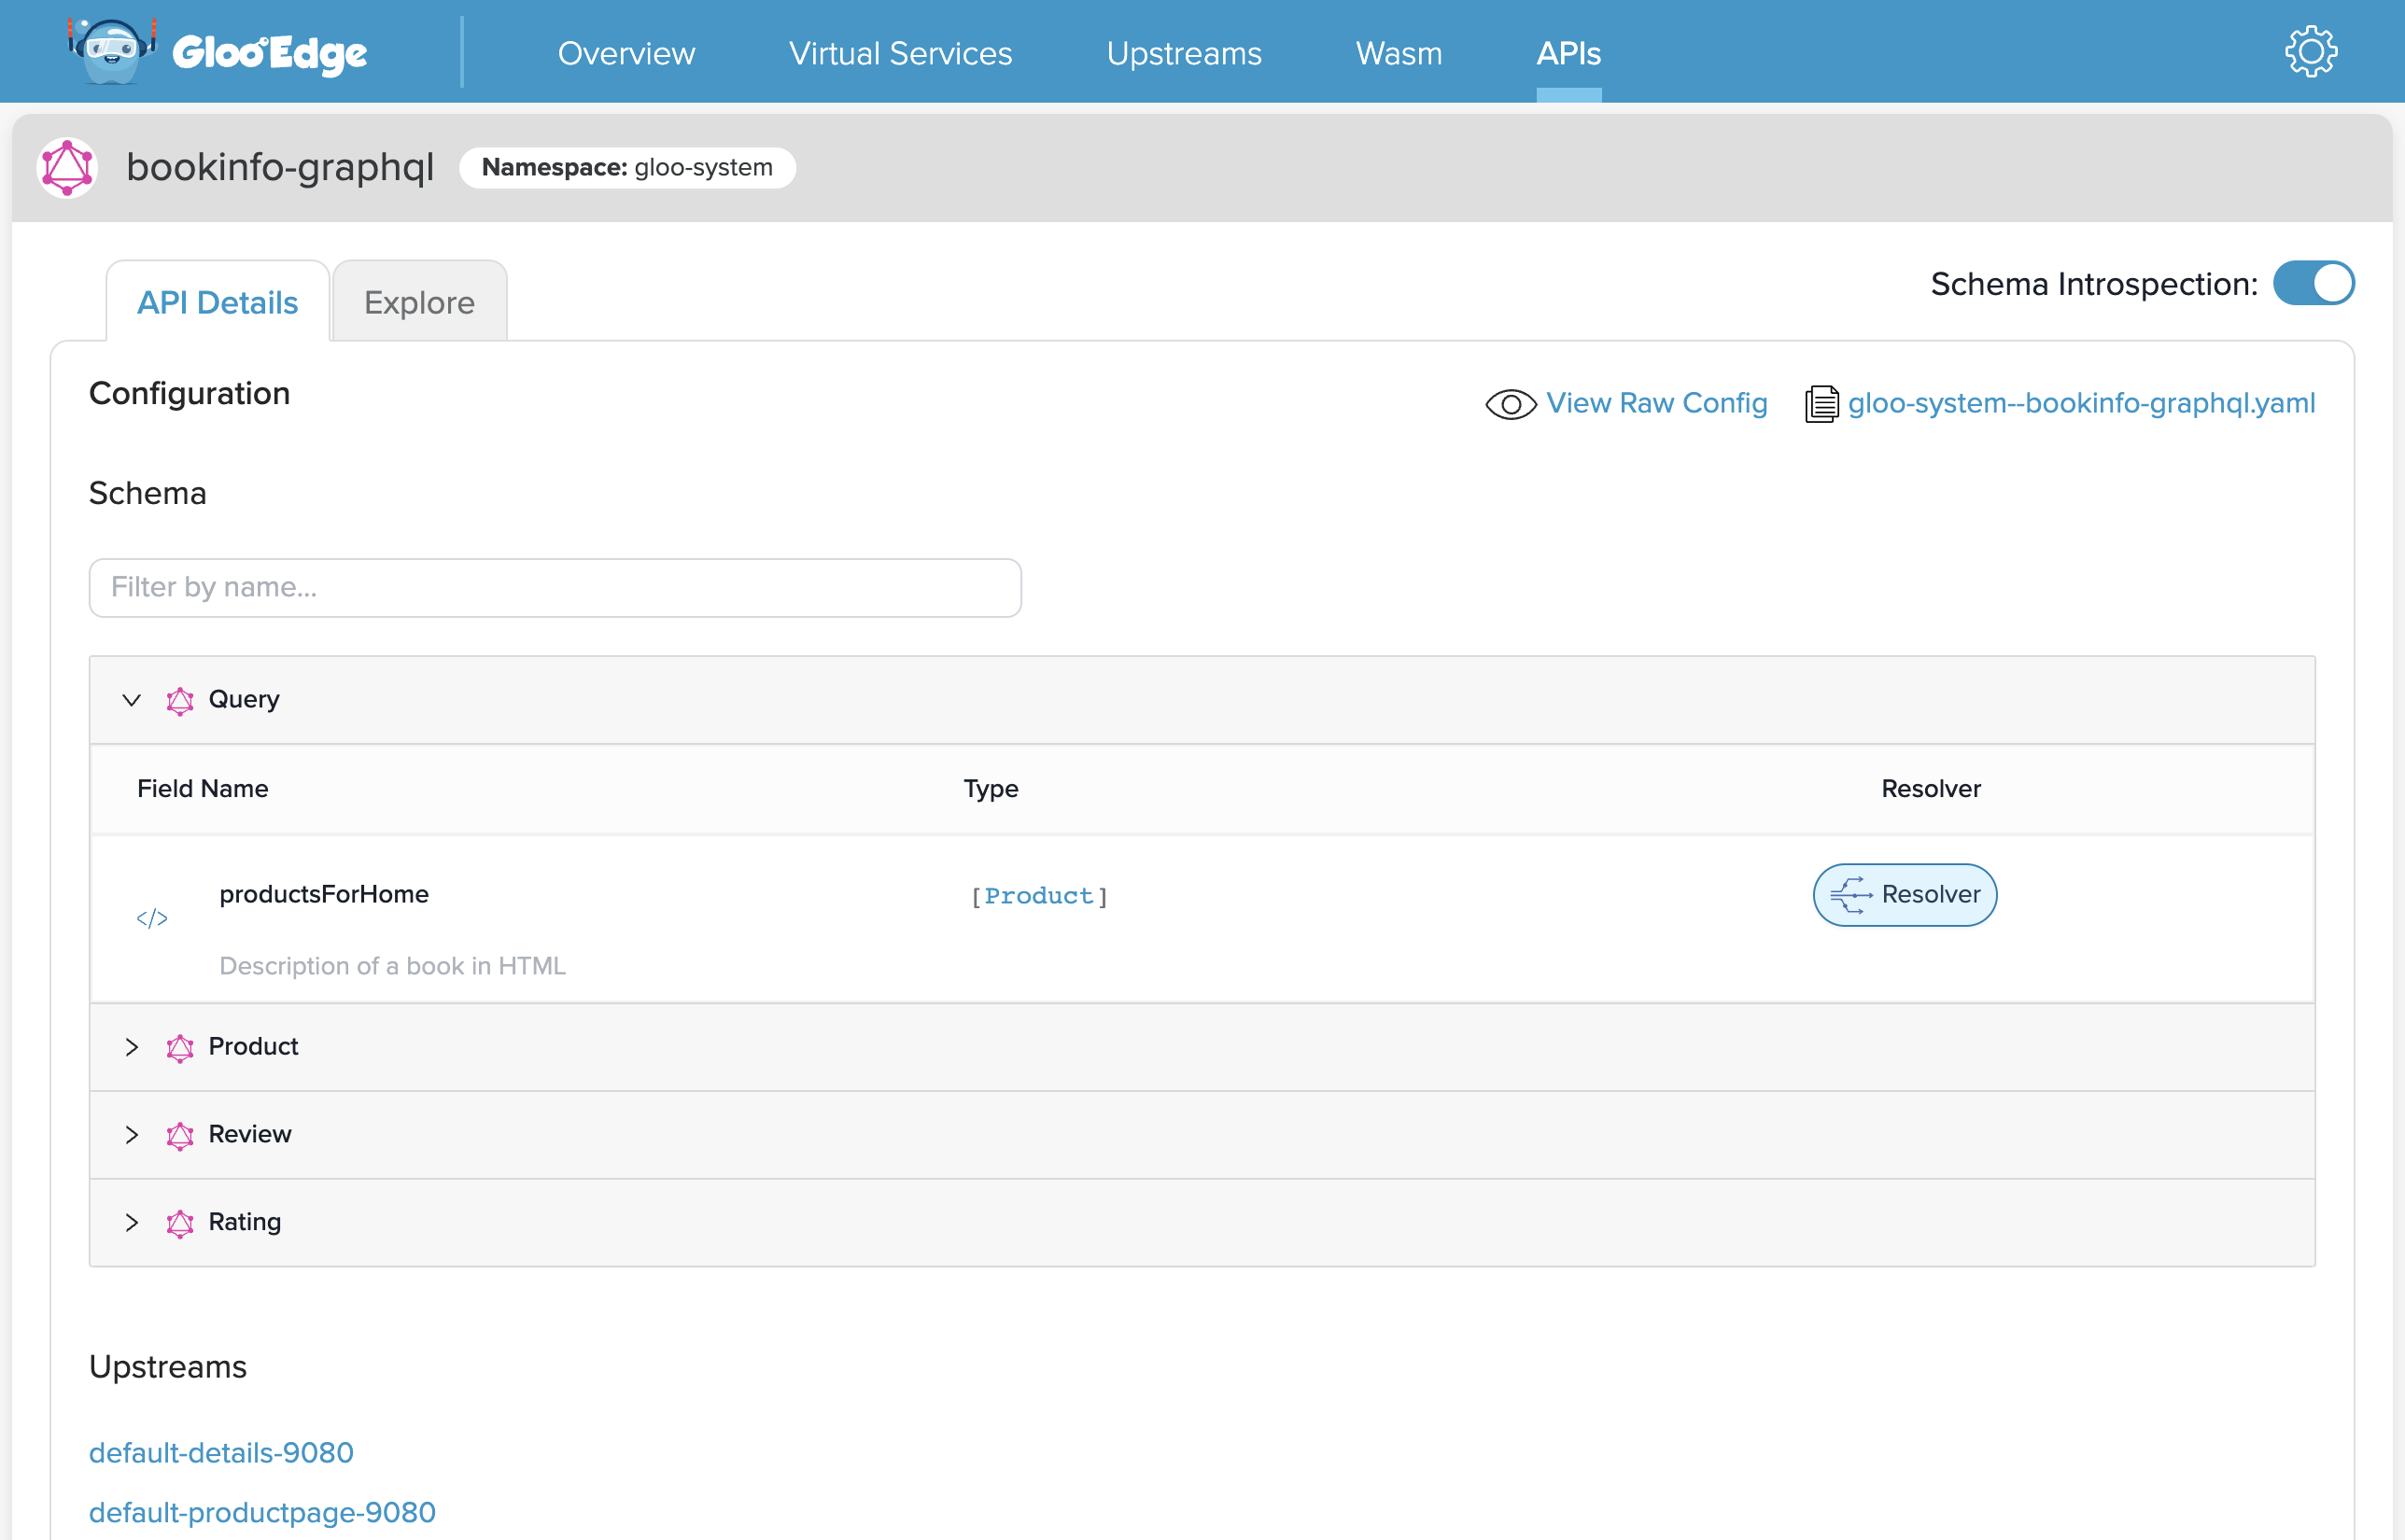
Review GraphQL API details
Review the details of a GraphQL API, including its configuration, the resolvers for each query, and more.
- From the list of GraphQL APIs, click the name of a GraphQL API schema.
- In the API Details tab, you can view the raw configuration files, or explore the details of the Configuration, Schema, and Upstreams for the API.
- Configuration: Click the View Raw Config button to view the raw configuration in the UI, and the <file-name>.yaml button to download the configuration YAML file.
- Schema: To review the defined fields and values, click to expand each section. For example, you can expand the Query section to review the field names that are defined in the GraphQL query, the type of data returned by each field, and the resolver that processes the request and returns the data. Additionally, you can filter the displayed fields by using the search bar.
- Upstreams: To review the upstream services that the GraphQL server exposes, click the name of one of the listed services. The Upstreams page for the service opens. For more information about the upstream services page, see Exploring Virtual Services and Upstreams.
Test GraphQL API functionality
Explore the functionality of an API by sending sample queries.
- From the APIs overview page, click the name of a GraphQL API schema.
- Click the Explore tab.
- In the GraphiQL panel, you can specify example requests to send to the GraphQL API. The GraphiQL interface includes an autocomplete feature that helps populate sample GraphQL queries based on the fields that are defined in the API configuration. For example, you might select one of your defined queries, and the fields within the query that you want data for.
- Click Run, which sends the request, and returns the response in the middle panel.
- You can also explore the documentation for the API by clicking the < Docs button to expand the Documentation Explorer panel.
Create a GraphQL API
Define a new GraphQL API by using the UI.
- From the APIs overview page, click Create API.
- Enter a name for the API.
- Select an excecutable API, such as for REST or gRPC services, or a stitched API for combined GraphQL APIs.
- Click Upload Schema to add a
.gqlconfiguration file.
- Click Create API. The details page for the API opens.
- If no resolvers are defined, you might see a warning. To define a resolver:
- In the API Details tab, expand a configuration Schema section. For example, you might start with the section for the top-level query.
- In the Resolver column, click Resolver.
- For the Resolver Type, choose a REST or gRPC resolver.
- For the Upstream, choose a service for the upstream reference. The drop-down list is populated by the upstream services that are currently defined in your Gloo Gateway environment.
- For the Resolver Config, fill out values for the provided fields. Note that you might not require all provided fields. Additionally, you can choose an existing resolver configuration that you already created from the drop-down list to modify for this field. For more information about how to configure each type of resolver, see Manual schema configuration.
- Click Submit.
- You can optionally click the View Raw Config button to verify that the resolver was added to your configuration.
- Repeat these steps to define a resolver for each configuration field.
- To apply changes to your API configuration, toggle Schema Introspection, and click Update.
