Self-Service User Registration with Okta
Gloo Portal users often ask if there is a way to configure self-service registration for new portal users. In this guide we will implement one approach to achieve this using the popular identity management platform Okta. Okta supports the OpenID Connect (OIDC) standard and allows users to configure their applications for self-service registration.
In this post, we’ll walk step-by-step through the process of building out a Petstore Portal with public APIs that allow users to register themselves. We’ll walk through the configuration of both the Portal itself and our Okta application, and then we’ll test it out in our Portal sandbox.
Prerequisites
You will need these things in place to follow the guide:
curlkubectl- A compatible Kubernetes cluster setup (1.16 or higher), to which you can connect via
kubectl - The Gloo Edge Enterprise Gateway installed to your cluster, version 1.5.0-beta9 or higher
- The Gloo Portal installed to your cluster. Please refer to the setup guide for detailed installation instructions.
You'll also need an API Product, Environment, and Portal configured.
Please refer to the Getting Started guide to configure these components. (The third section, Customize your Portal, is not a prerequisite for this guide.)
Alternatively, if you’ve built basic Gloo Portal configurations in the past, you can skip the Getting Started guide and arrive at the same configuration using the commands below. (Note that if the Gateway is listening on a port other than 80, you'll need to modify your Environment and/or Portal domains accordingly.)
kubectl apply -n default -f https://raw.githubusercontent.com/solo-io/gloo/v1.9.0-beta8/example/petstore/petstore.yaml
kubectl -n default rollout status deployment petstore
kubectl apply -f https://raw.githubusercontent.com/jameshbarton/solo-resources/main/portal-self-reg/0-apidoc-prod-envt-portal.yaml
Either approach will build the following components:
- the example Petstore application,
- an APIDoc to wrap the OpenAPI interface of the Petstore application,
- an APIProduct to expose those endpoints and package them for distribution,
- an Environment to declare which APIProducts will be deployed to which compute environments, and
- a Portal to manage the specifics of how the generated web user interface will be presented to users.
Setting up DNS for the Browser
If you did not already set up DNS in the Getting Started guide, you'll need to do that now. For the purposes of this setup, modifying your local /etc/hosts file with a DNS entry to manually resolve the Environment and Portal domains will be sufficient. See the Getting Started guide for more context on this.
Let's get the address of the Gateway. Choose the option corresponding to your Ingress Service Type:
- Gloo Edge - External Load Balancer
- Gloo Edge - Docker for Desktop / Node port
- Gloo Edge - Kind Cluster with Node Port
export INGRESS_HOST=$(kubectl -n gloo-system get service gateway-proxy -o jsonpath='{.status.loadBalancer.ingress[0].ip}')
export INGRESS_PORT=$(kubectl -n gloo-system get service gateway-proxy -o jsonpath='{.spec.ports[?(@.name=="http")].port}')
export INGRESS_HOST=$(kubectl get po -l gloo=gateway-proxy -n gloo-system -o jsonpath='{.items[0].status.hostIP}')
export INGRESS_PORT=$(kubectl -n gloo-system get service gateway-proxy -o jsonpath='{.spec.ports[?(@.name=="http")].nodePort}')
export INGRESS_HOST=127.0.0.1
export INGRESS_PORT=$(kubectl -n gloo-system get service gateway-proxy -o jsonpath='{.spec.ports[?(@.name=="http")].nodePort}')
Let's add entries for the api.example.com and petstore.example.com domains:
cat <<EOF | sudo tee -a /etc/hosts

# Added for the Solo.io Gloo Portal Guides
${INGRESS_HOST} api.example.com
${INGRESS_HOST} petstore.example.com
EOF
We should now be able to directly curl our currently unsecured API endpoints without needing to set the Host header:
curl "http://api.example.com:${INGRESS_PORT}/api/pets"
We should see the output:
[{"id":1,"name":"Dog","status":"available"},{"id":2,"name":"Cat","status":"pending"}]
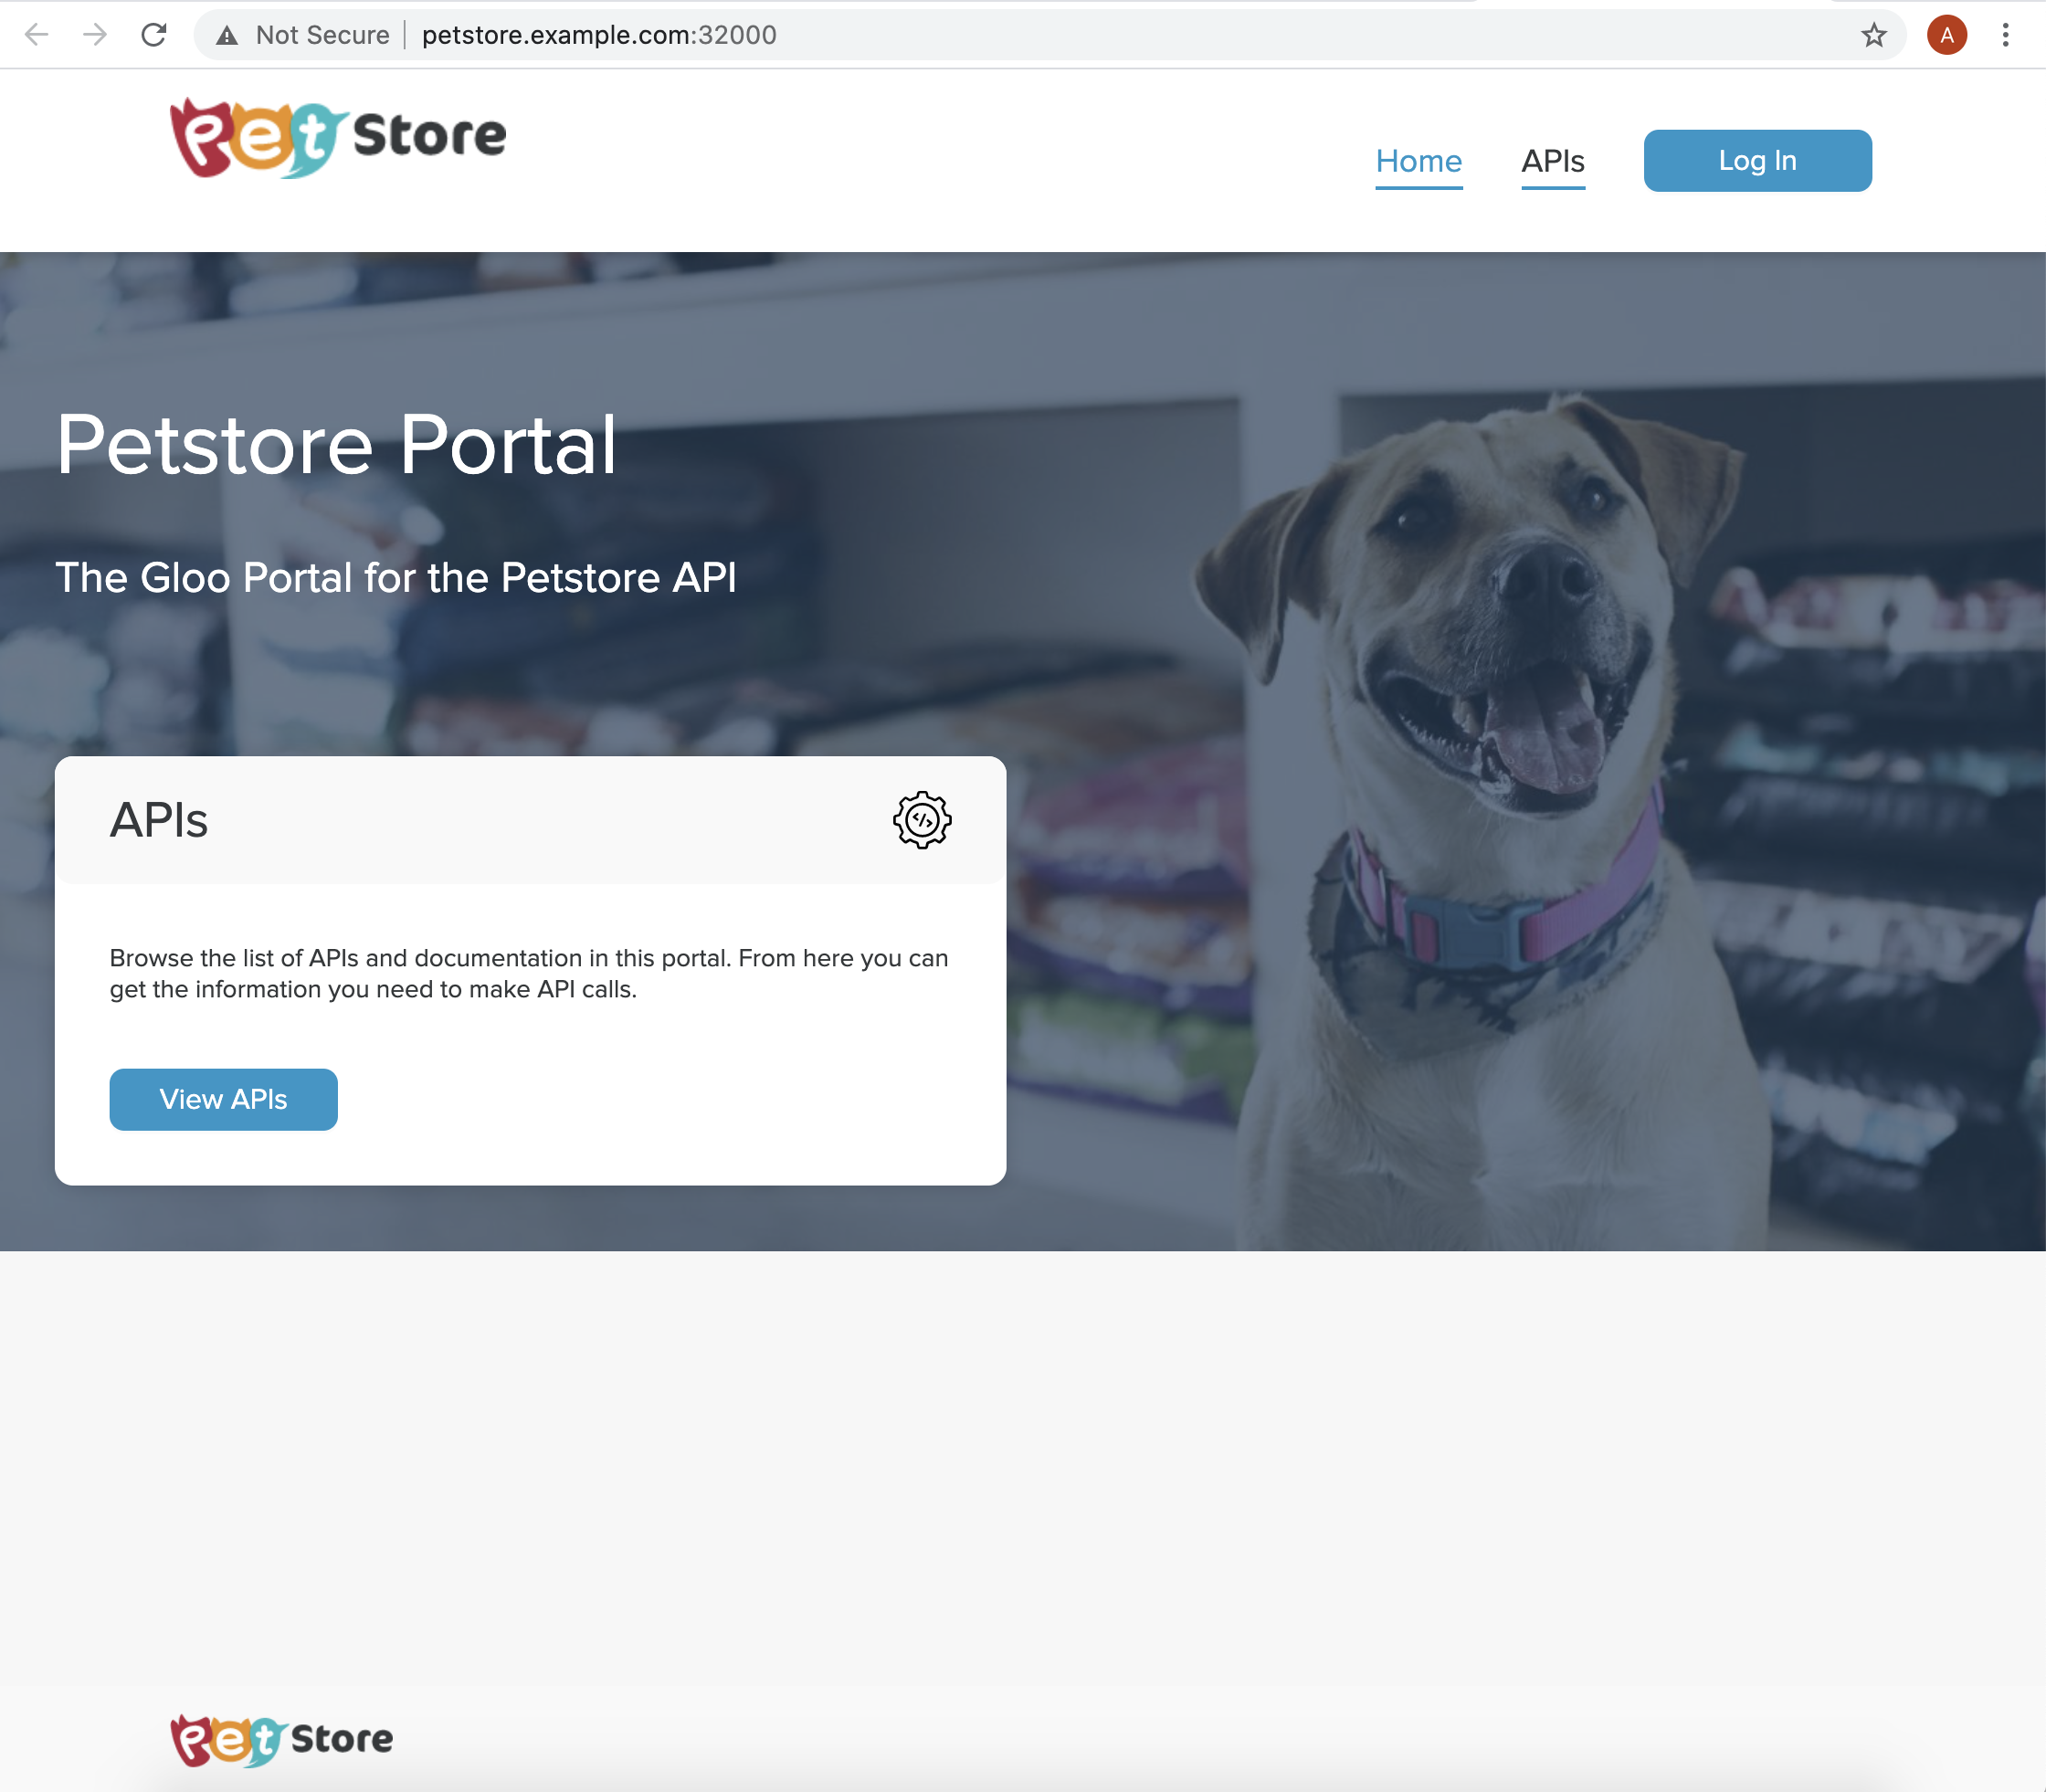
We should also now be able to navigate to our portal in the browser:
open $(echo http://petstore.example.com:${INGRESS_PORT})
Configure Okta for Self-Registration
In this section, we will establish an Okta account and application, and then configure that application for self-registration.
Establish Okta Account
If you are an existing Okta customer, then you can skip over much of this section.
If you are not an established Okta customer, it is easy to establish a free developer account that allows you to complete the integration exercise outlined in this guide.
First, visit the developer signup page and walk through their process.
Okta then provisions a developer account that you can access via a URL like this: https://dev-2933640-admin.okta.com/.
This provides access to an account dashboard and tools to manage Okta applications and users.
Establish Okta Application
You will need to establish an Okta Application to integrate with Gloo Edge. In this guide, we prioritize providing a quick-start for testing over production readiness.
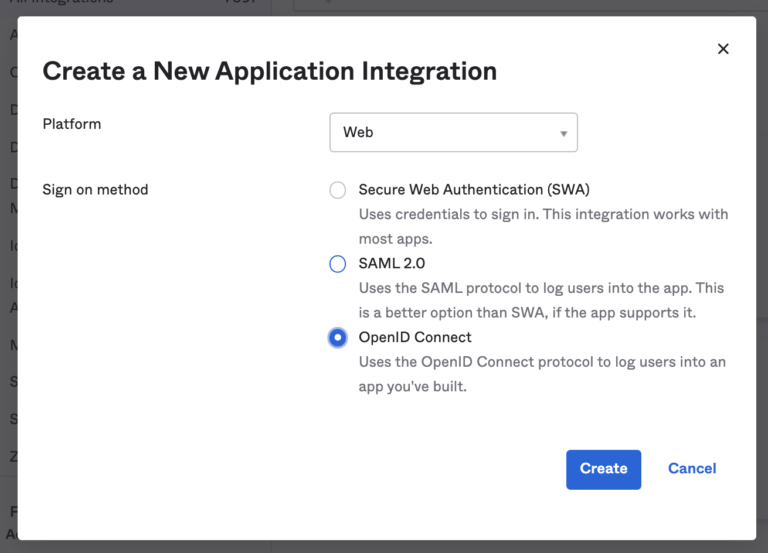
Click on the menu in the upper left-hand corner, then on the “Applications” dropdown and on the “Applications” option. Click “Add Application” on the left, just above the table, and then “Create New App” in the top right.
Define this as a Web Platform and set a Sign on method of OpenID Connect.
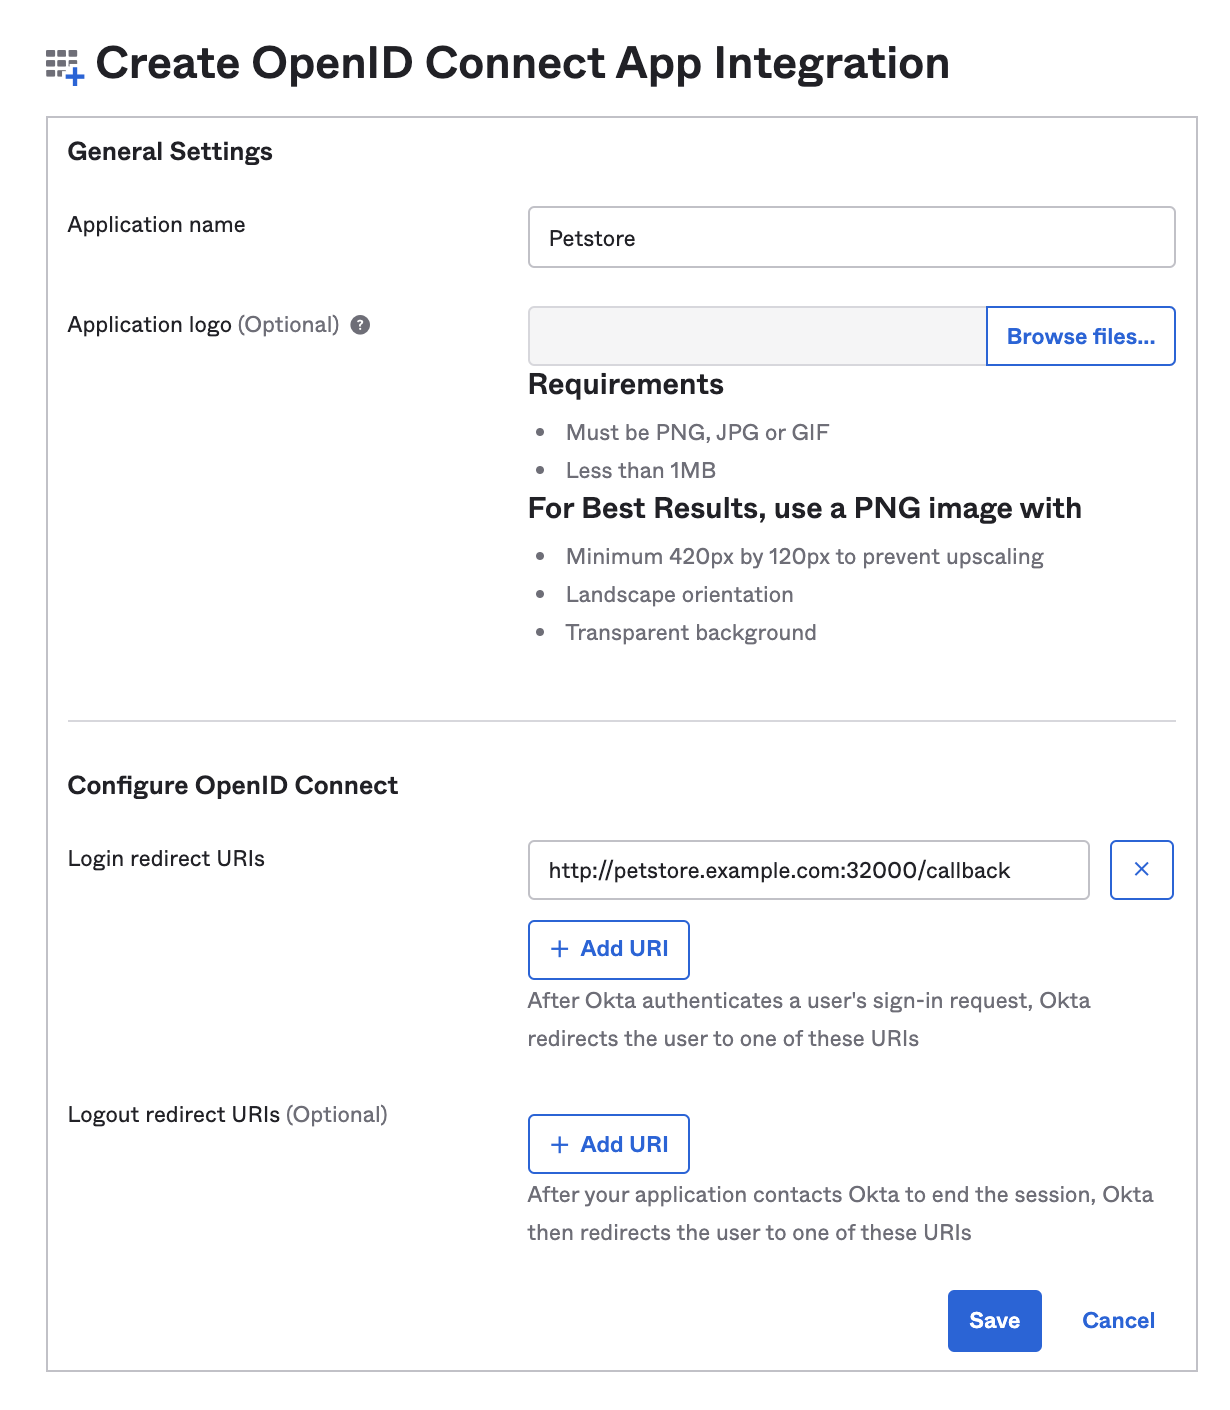
 Give the application the name “Petstore” and add a Login redirect URI of “
http://petstore.example.com:32000/callback”,
replacing “32000” with your ingress port, as determined in the Setting up DNS for the Browser section of this guide.
 For more details on creating Web type application integrations with Okta, we found this guide helpful.
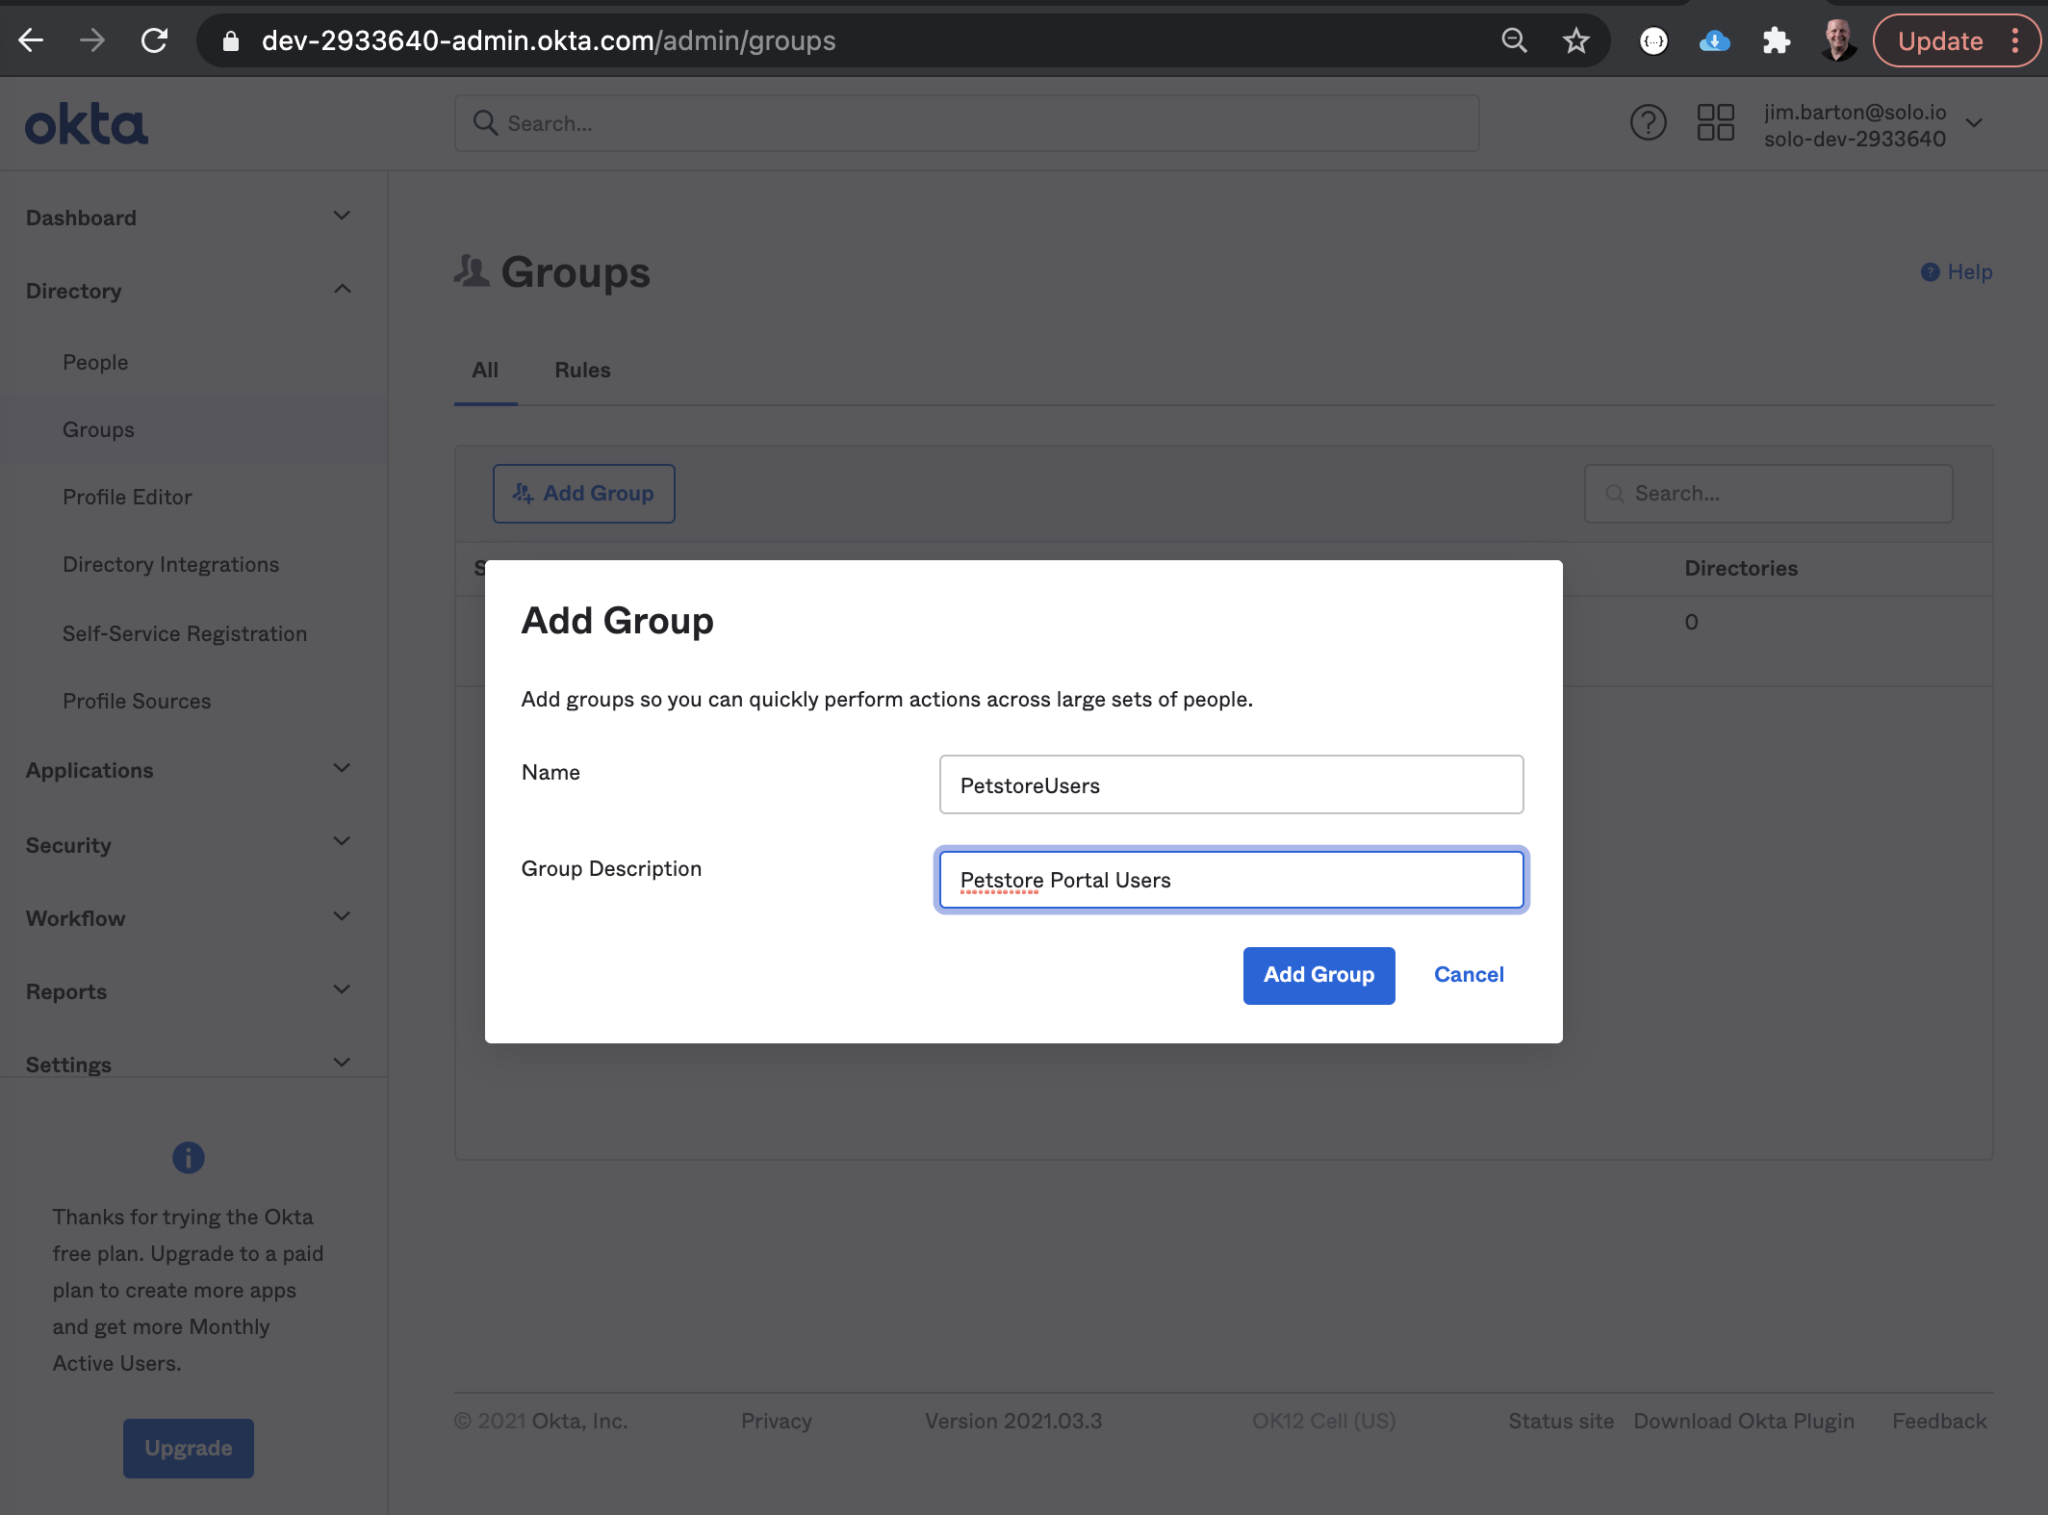
Configure an Okta User Group
When you establish an Okta application, you get one user group for free, the Everyone group.
We could use that default group to drive this exercise, but instead let’s make this a bit more realistic by creating a separate group to hold our set of users (including self-registered ones) that will have access to our “public” Petstore API.
Let’s establish a group called PetstoreUsers.
Click on the main menu in the upper left-hand corner again, then on the “Directory” dropdown and on the “Groups” option.
Click “Add Group” in the upper left-hand corner of the table and establish the PetstoreUsers group.
 You may also want to create some Okta Users and assign them to the
 PetstoreUsers Group.
However, soon we’ll be able to create Users dynamically from our web interface using self-service registration.
Configure a Groups Claim from the Petstore Application
Gloo Portal expects there to be a claim presented from the identity provider (IdP) as part of an ID token in the OIDC auth flow that identifies the groups that a particular authorized user is part of. More information on how this works in Okta is presented here.
Okta does not present the groups claim by default, so we need to enable this by specifying a custom groups claim in two different places: the Okta Application configuration and the Authorization Server configuration.
First, let’s tackle the Application configuration.
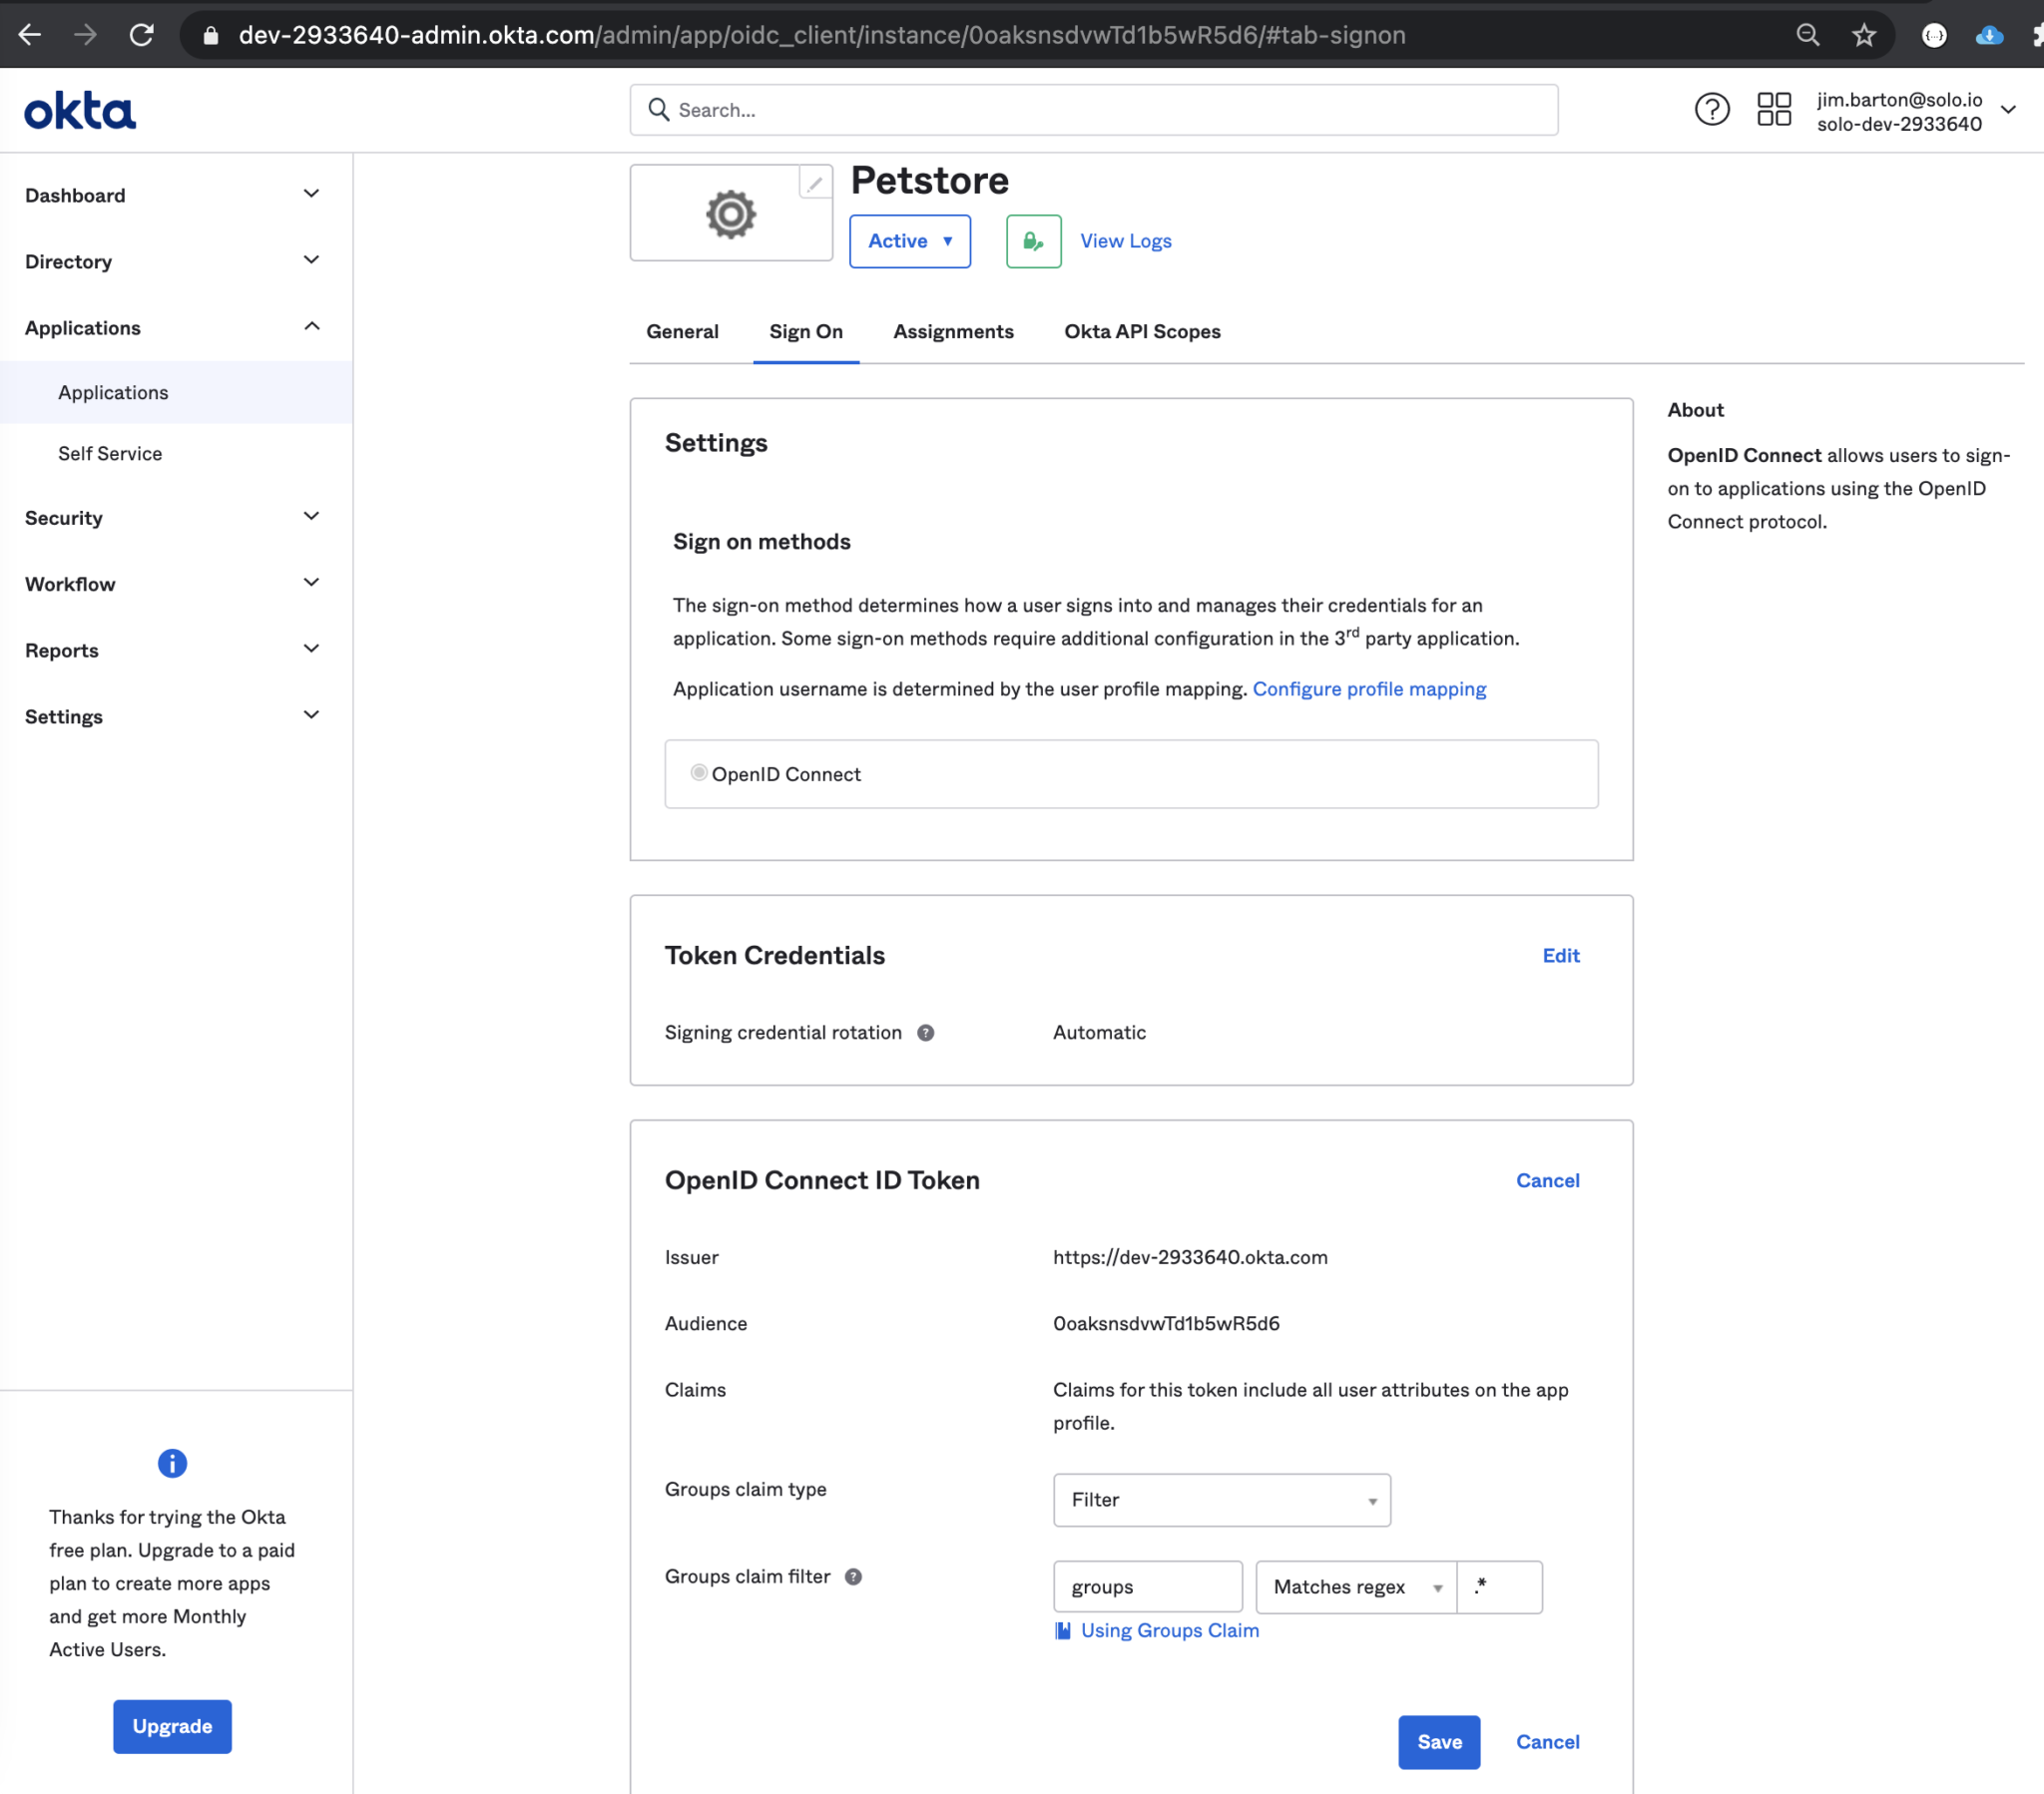
Navigate back to the Applications by clicking on the main menu again, then on the “Applications” dropdown and on the “Applications” option. Click on your Petstore application and switch to the “Sign On” tab
Edit the “OpenID Connect ID Token” section to update the groups claim filter to specify that it should match the regex pattern .*.
In other words, all group names that are part of the application will be passed back to the Portal in the groups claim.
Next, we’ll configure the Authorization Server to pass back the groups claim with just the PetstoreUsers group name. Navigate in the main menu to “Security” > “API” and click through to the default Authorization Server config.
Switch to the “Claims” tab and add a groups claim as shown below by clicking “Add Claim” in the upper left-hand corner of the table.
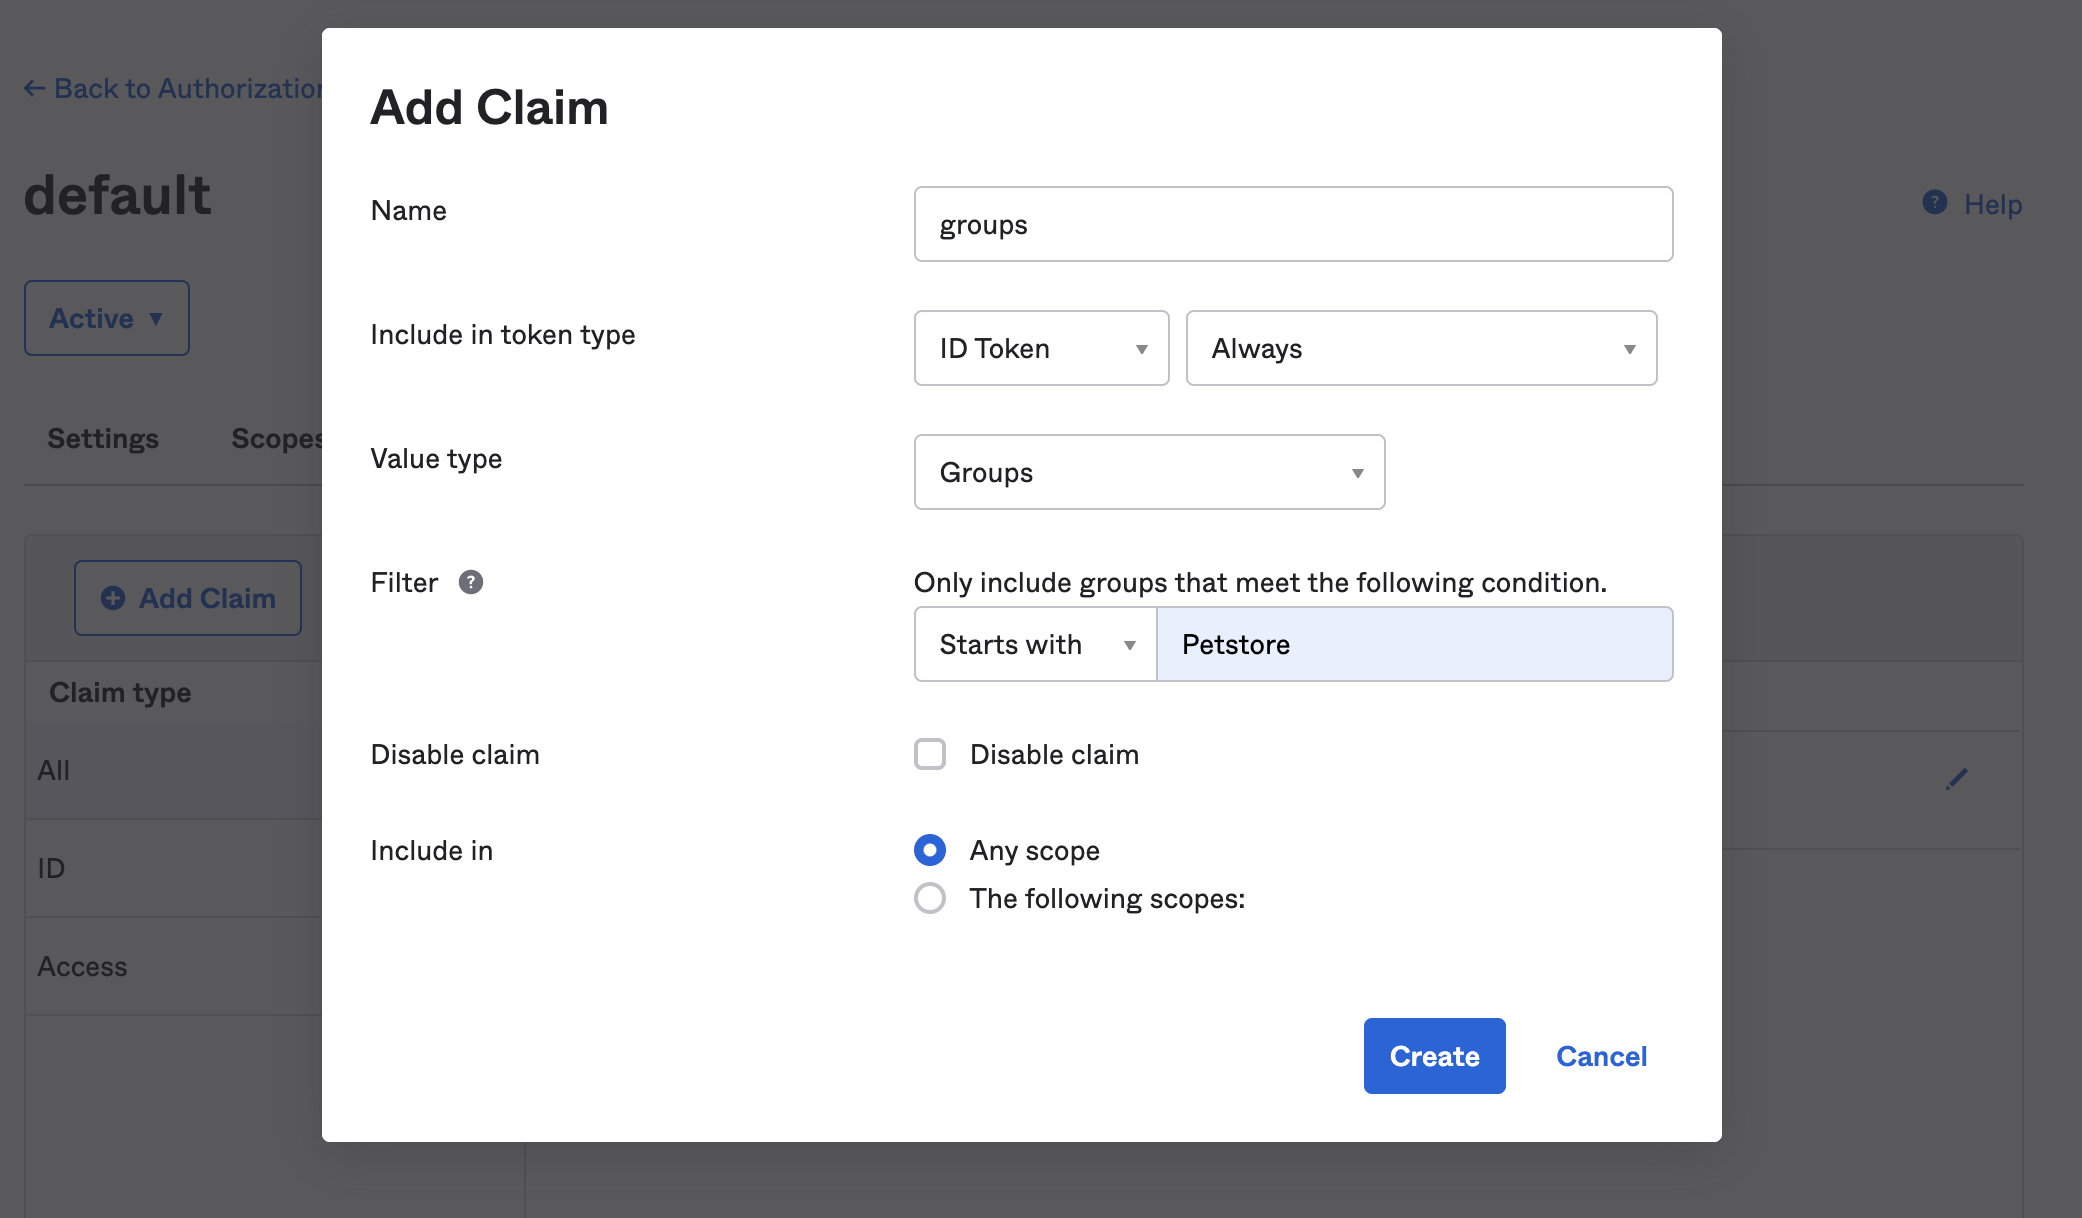 Note that we specified the name of the claim as “groups”, we changed the token type value from the default to “ID Token”,
and we specified a Filter value to only include groups whose names start with the string “Petstore”, which will match our group named PetstoreUsers.
Note that we specified the name of the claim as “groups”, we changed the token type value from the default to “ID Token”,
and we specified a Filter value to only include groups whose names start with the string “Petstore”, which will match our group named PetstoreUsers.
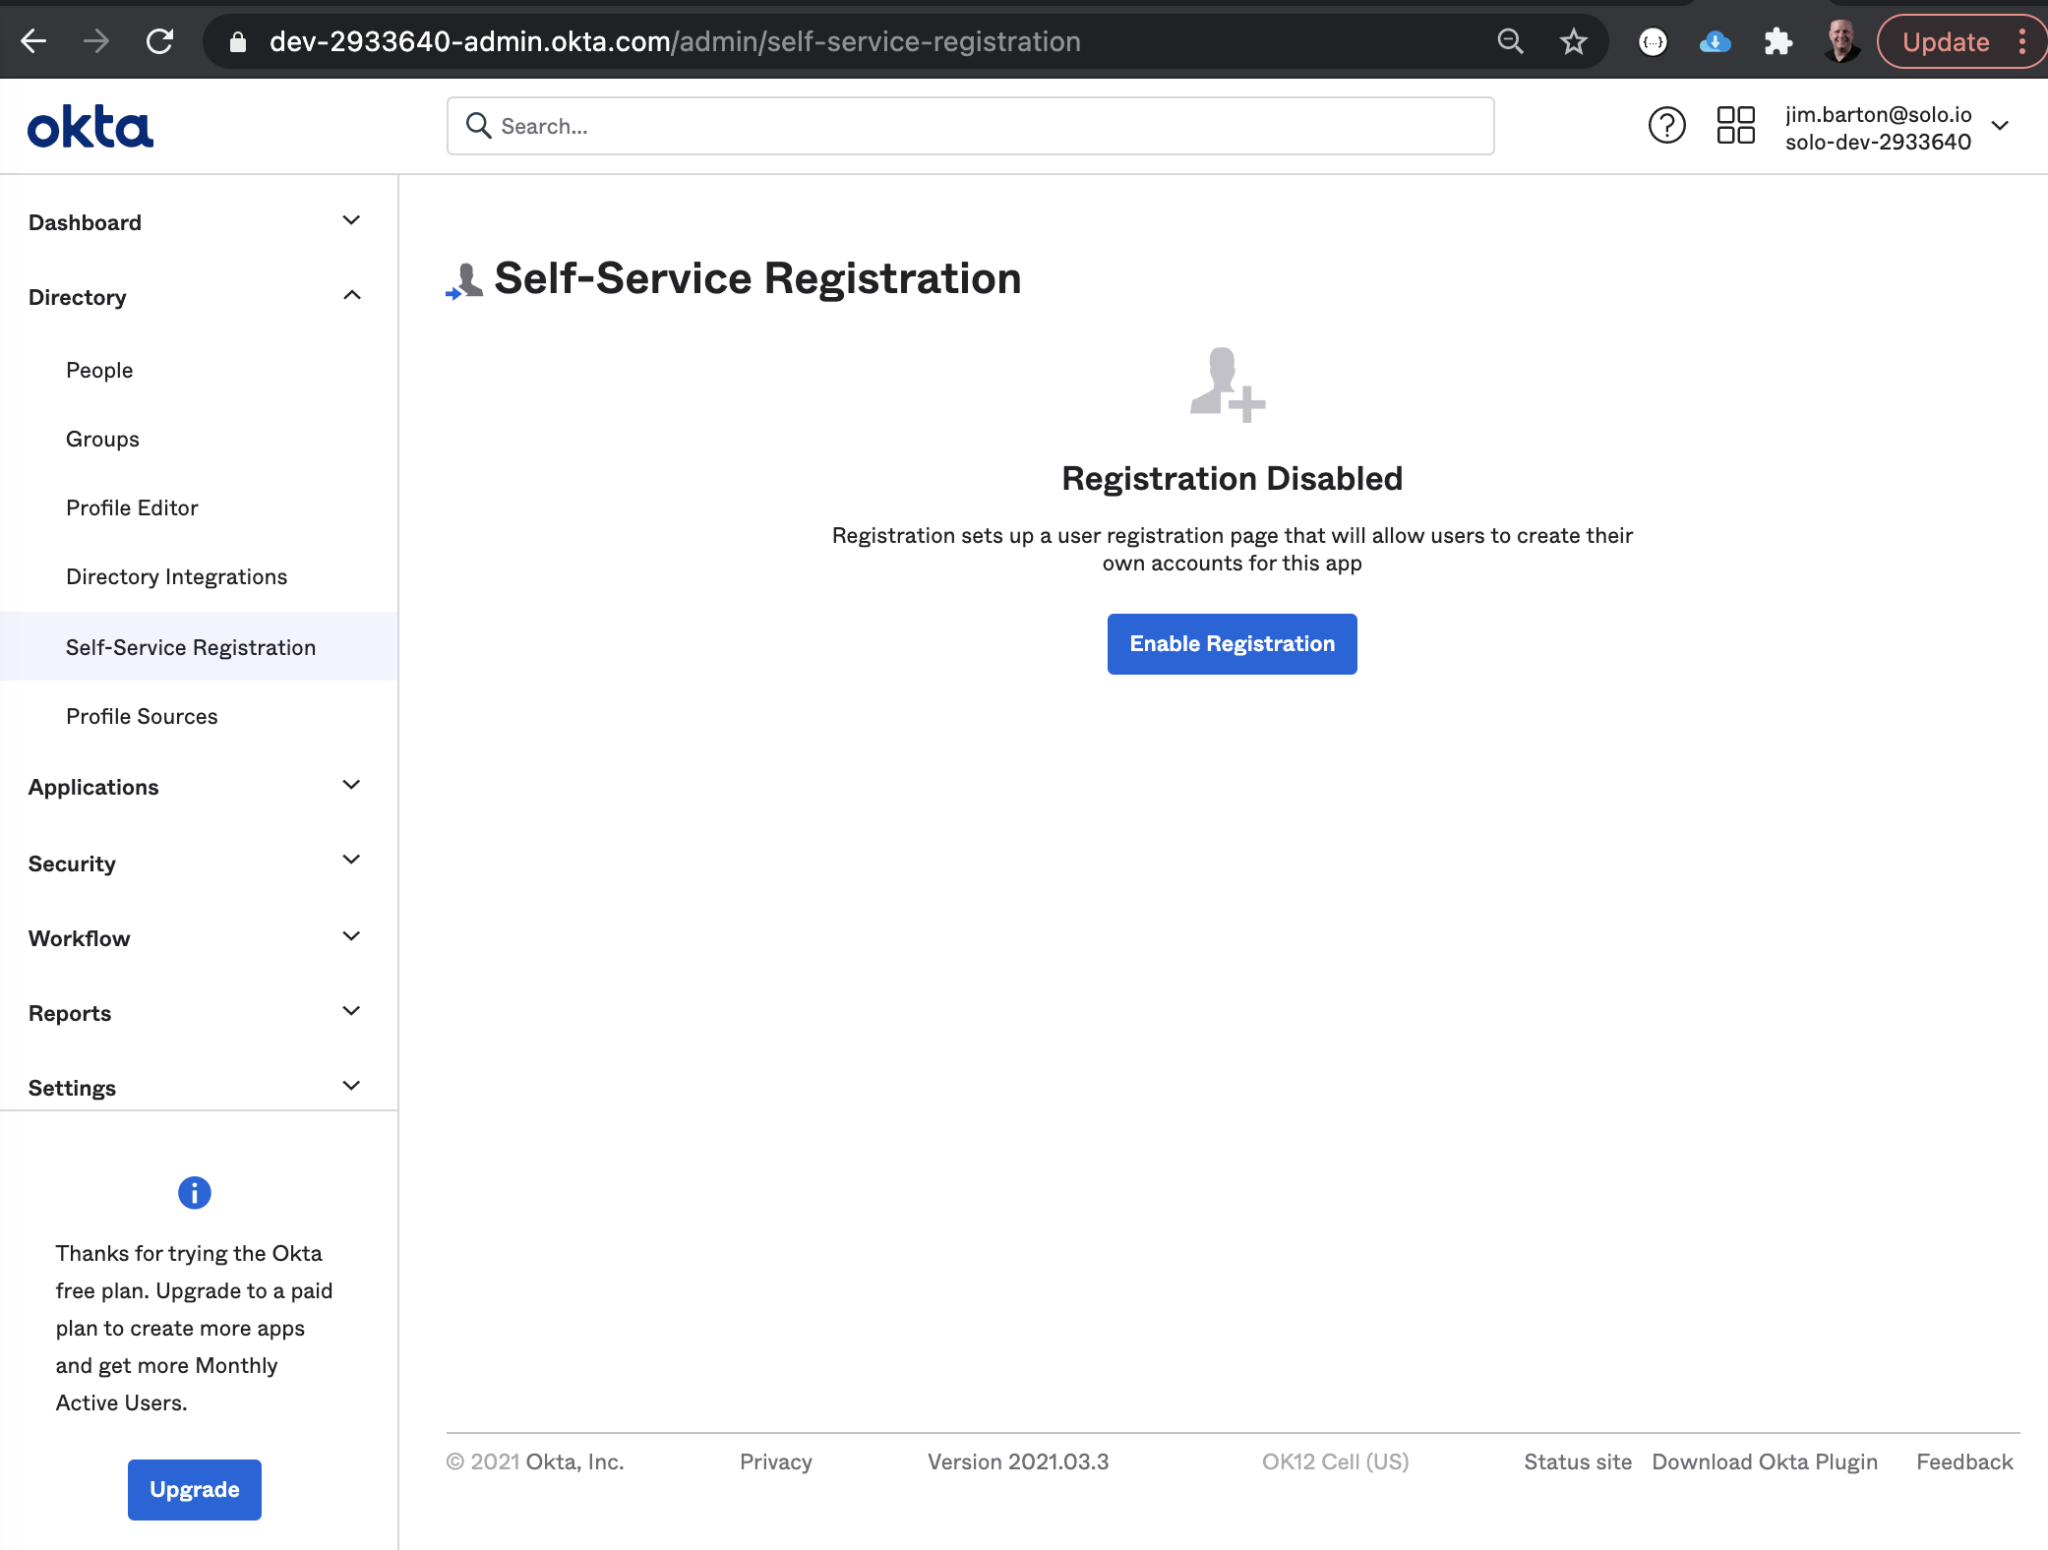
Enable Okta Self-Registration on Account
By default, Okta accounts are not enabled for self-service registration (SSR). In this section, we will walk through the steps to configure this. For more details, this Okta guide to managing self-registration settings is quite helpful.
First, navigate in the main menu to “Directory” > “Self-Service Registration” and “Enable Registration”.
After enabling SSR, we need to customize the settings for our application.
We specify the “Assign to group” as PetstoreUsers, the user group we created earlier in this exercise, so that any users created by SSR will automatically be placed into the group that we will configure to have access to the Petstore API.
Just to save a bit of time for this exercise, we will also turn off the default setting that the user must verify their email address in order to be activated as a member of the group.
Okta will still send a confirmation email to the specified address, but it will not require any action from the newly registered user in response.

Enable Okta SSR on Petstore Application
Not only is self-service registration disabled by default on Okta accounts, it is also disabled by default on the Applications that comprise those accounts. In this section, we will walk through the process of enabling and configuring SSR on the Okta Petstore Application.
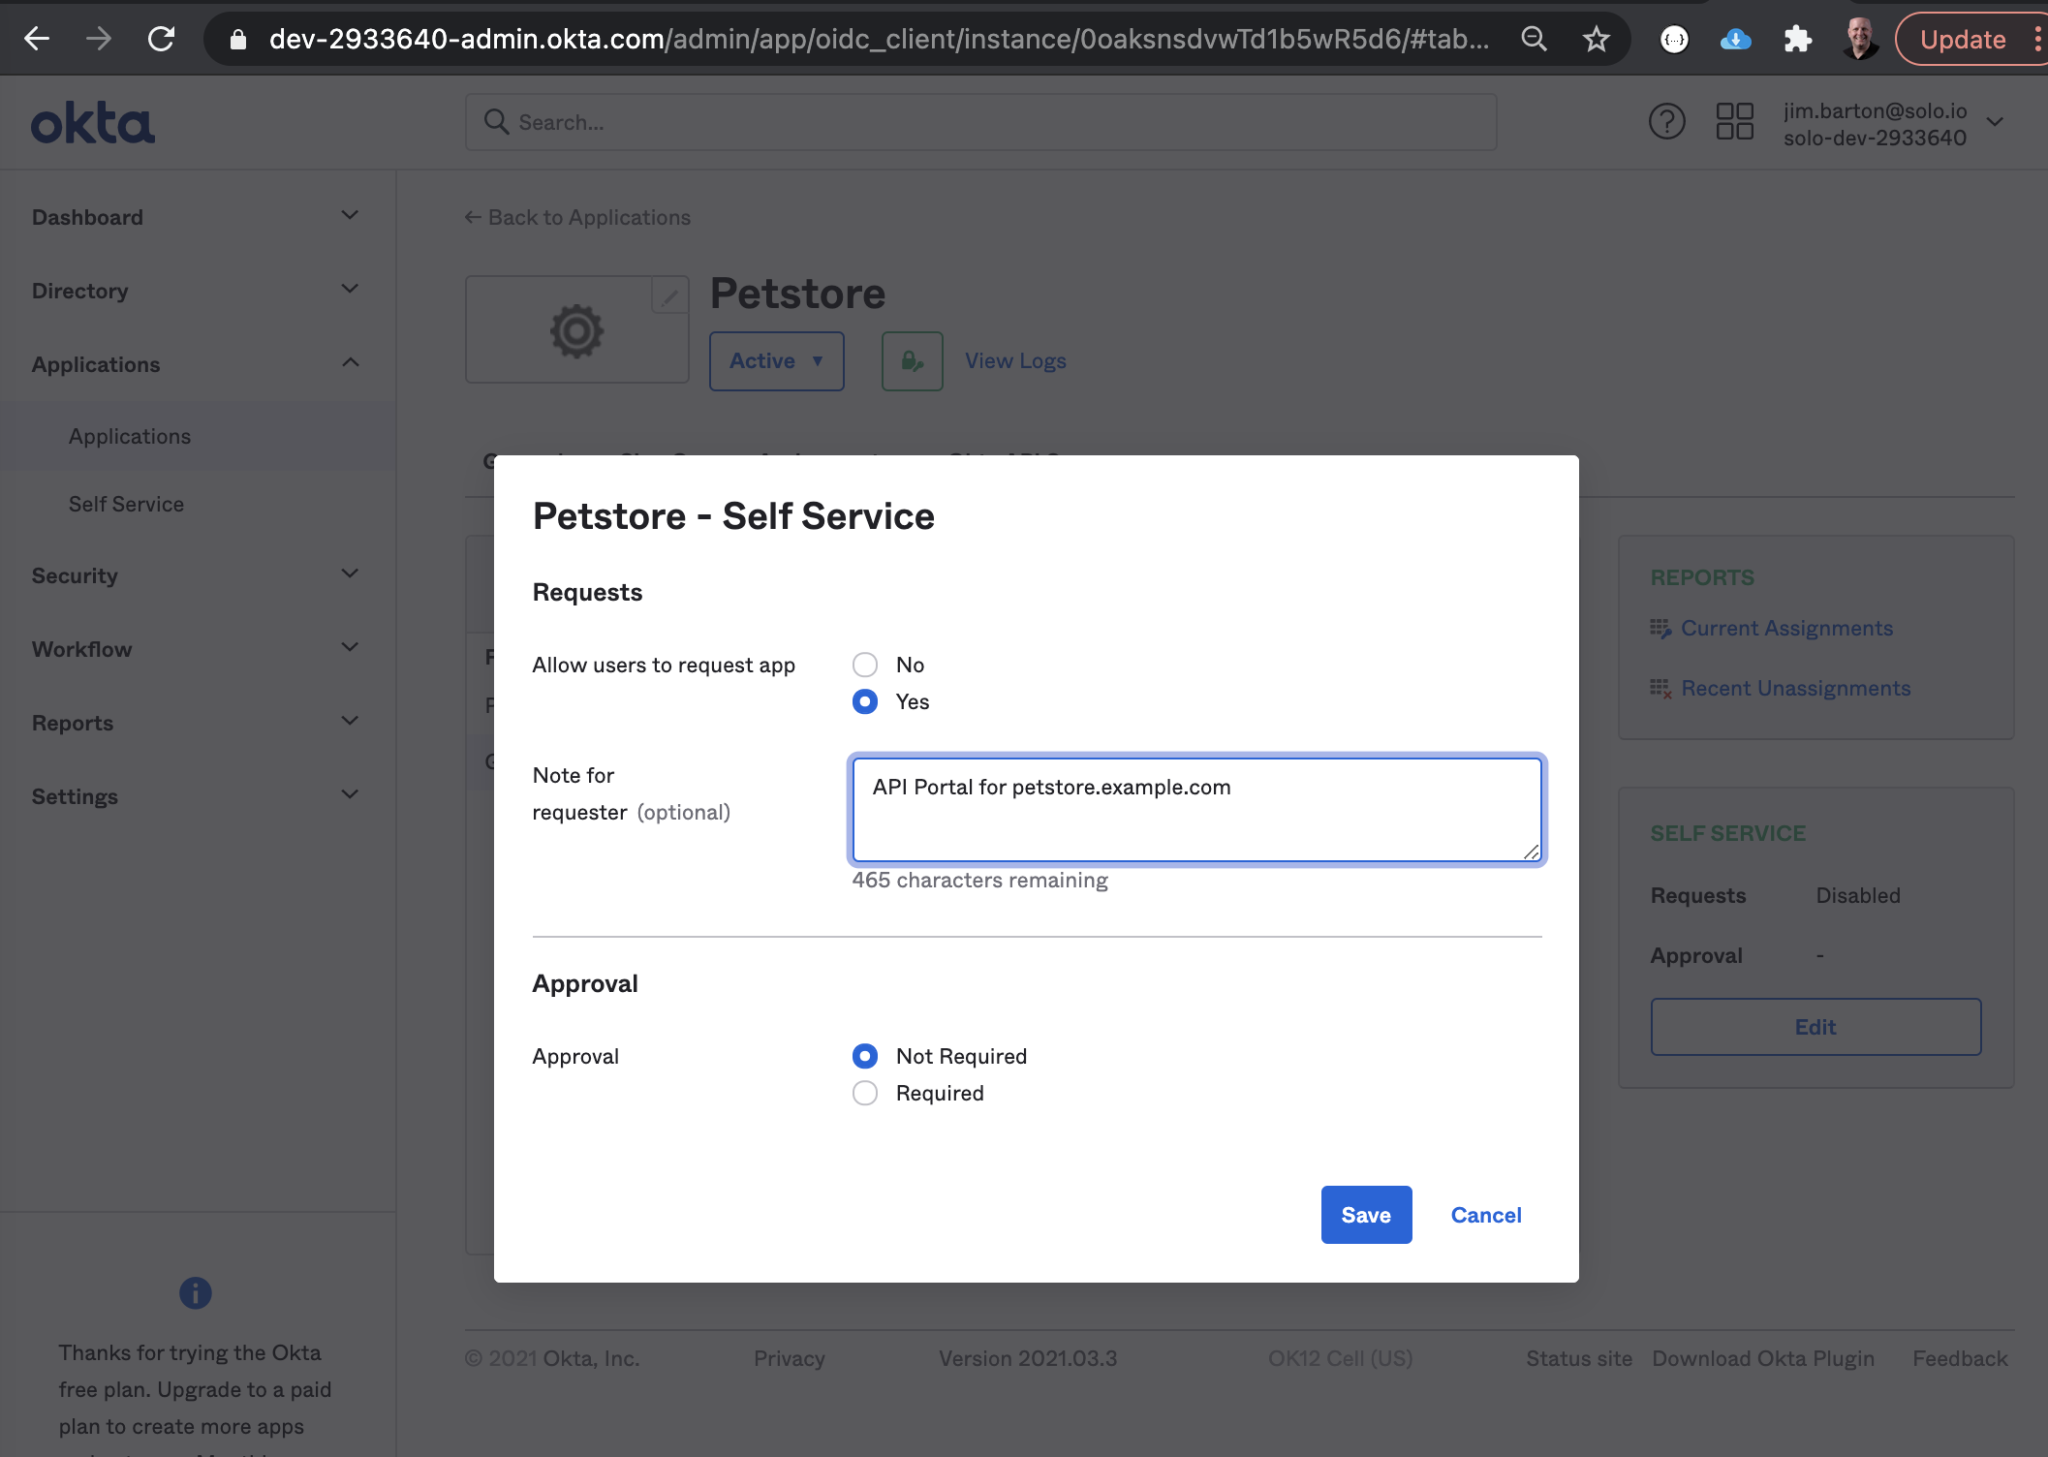
First, navigate back to the Petstore application and switch to the “Assignments” tab.
You'll notice that the “SELF SERVICE” panel is marked “Disabled”.
“Edit” those settings to allow users to request access to the application, and to mark administrator approval as “Not Required”.
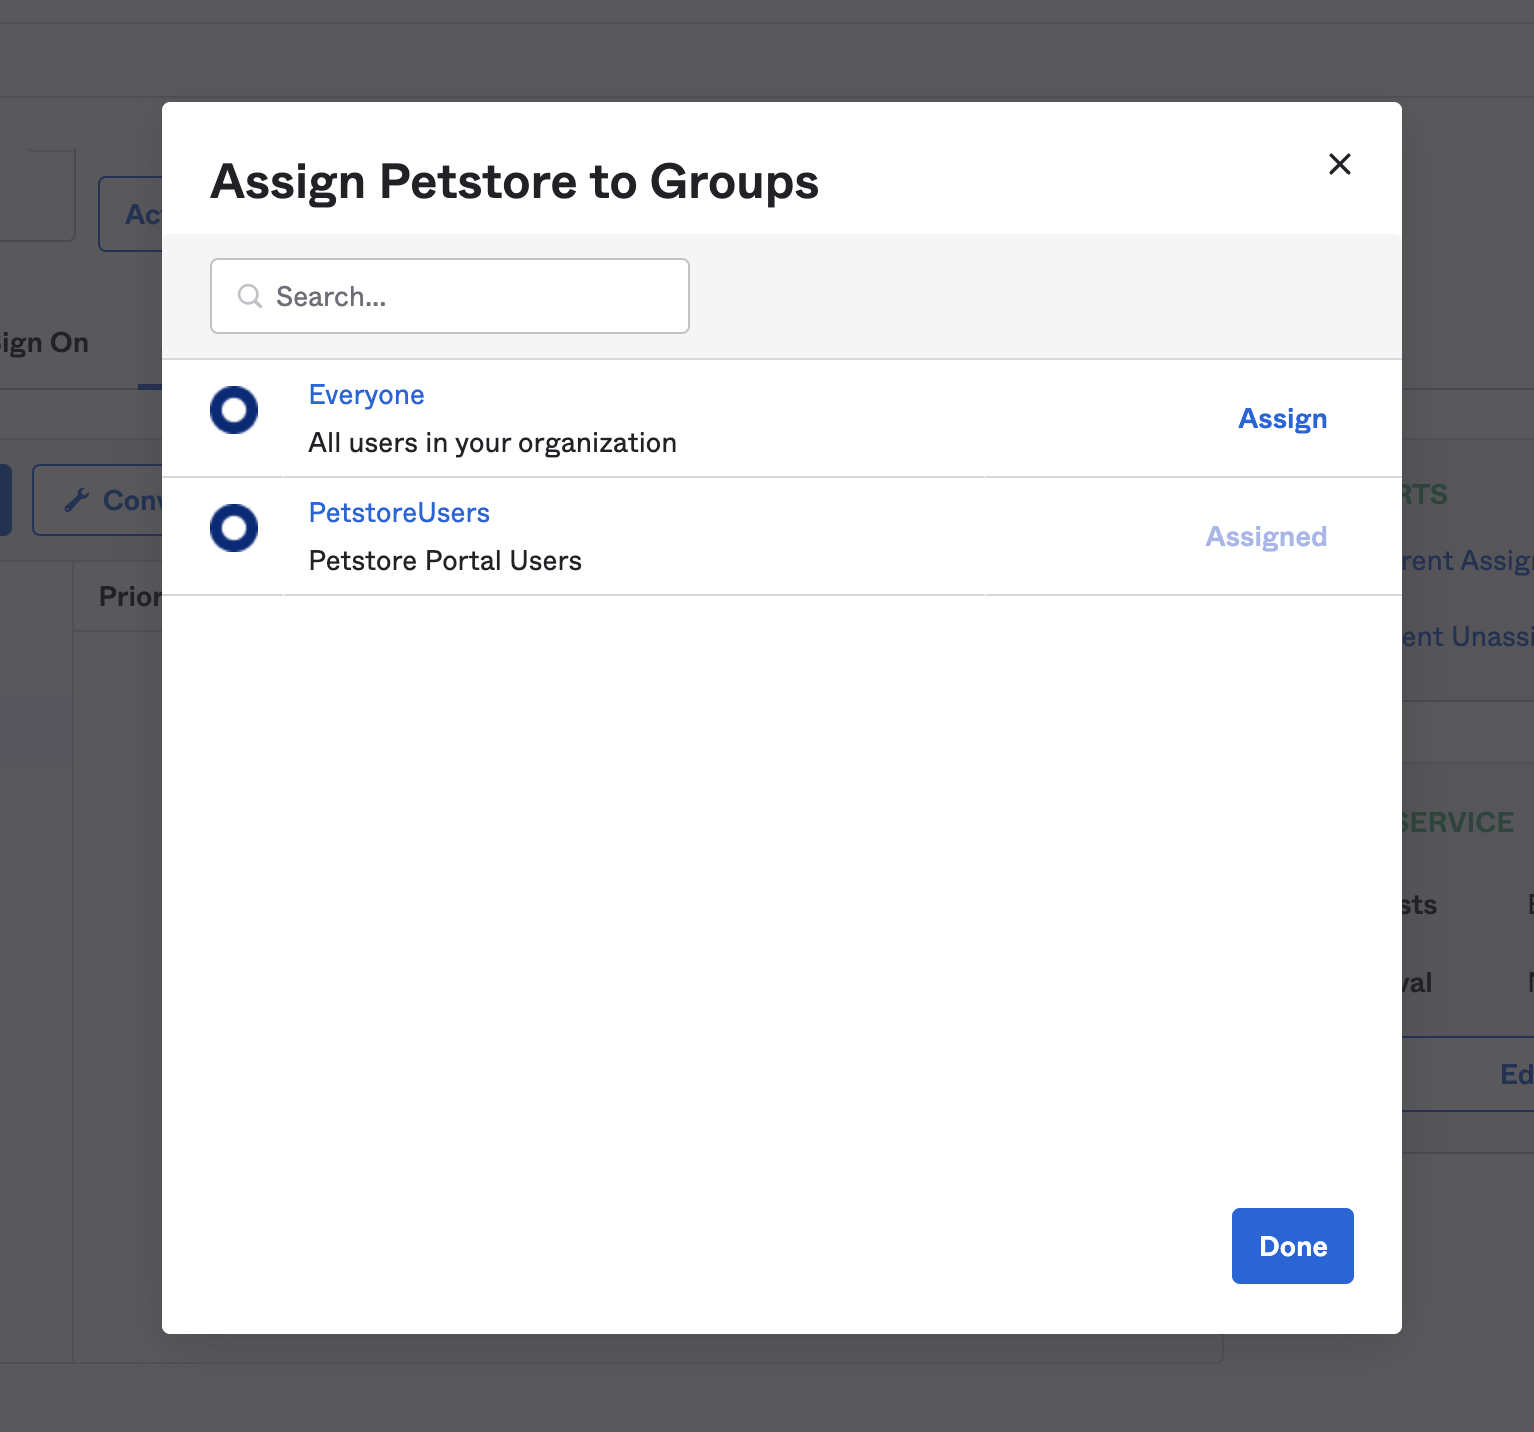
Also on the “Assignments” tab, click on the “Assign” dropdown in the top left and select “Assign to Groups”.
Assign the PetstoreUsers group that we created earlier to this application.
The configuration for your Okta account and application is all set!
Integrate Petstore Portal with Okta
In this section, we’ll walk through the steps for configuring the portal for OIDC integration with Okta, which will allow us to delegate auth decisions to the IdP.
Establish Client Secret
The OIDC standard specifies two bits of credentials that an OIDC client needs to present to its provider, a client ID and a client secret.
Okta provides this information in the “General” tab of the Application details.
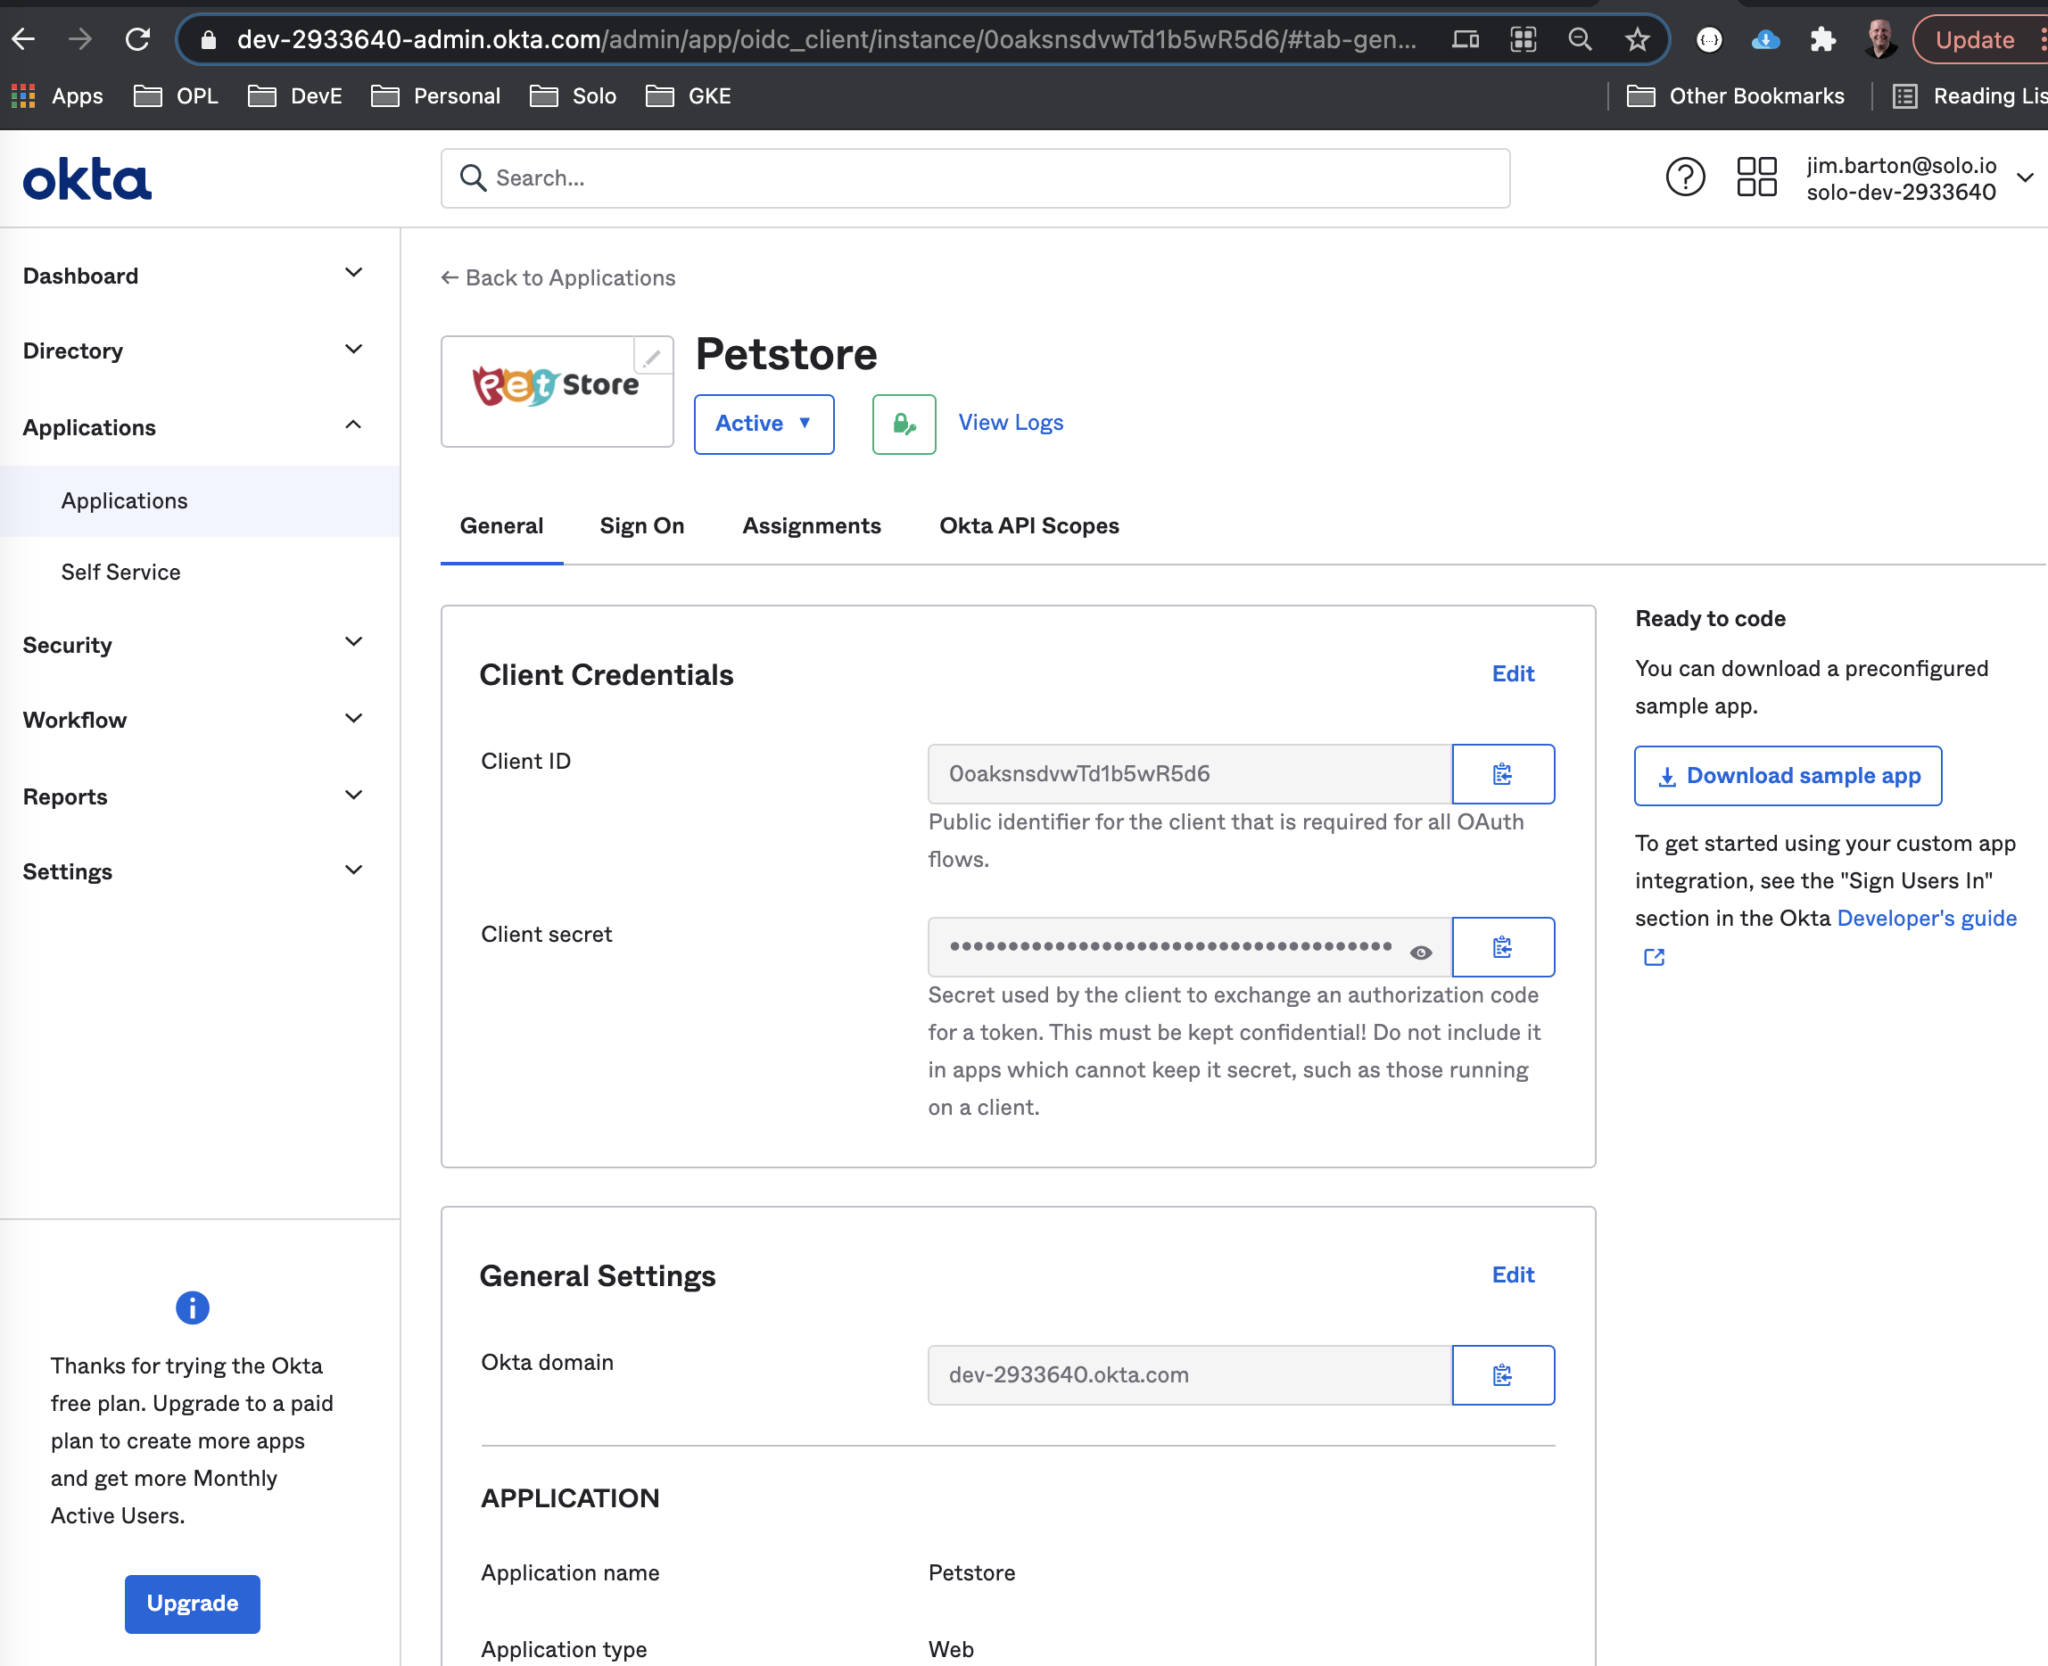
We will use the client secret from Okta to configure a corresponding Kubernetes Secret, which we will apply to our Portal config as part of the OIDC integration.
export CLIENT_SECRET=your-oidc-client-secret-here
cat <<EOF | kubectl apply -f -
apiVersion: v1
kind: Secret
metadata:
  name: petstore-portaloidc-secret
  namespace: default
data:
  client_secret: "$(echo $CLIENT_SECRET | base64)"
EOF
Configure Portal for Okta Auth Delegation
Our initial Portal has no authorization configured at all. There is an internal HTTP basic auth mechanism that we could use, but it doesn't support SSR or several other features found in enterprise IdPs like Okta.
Let's add to our Portal configuration an oidcAuth stanza to connect with our Okta application.
You'll need to fill in the client ID shown in Okta and the correct host for your developer account in the issuer URL. Ensure that you include the groups value in the additionalScopes field so that the group claims are included in the request.
cat <<EOF | kubectl apply -f -
apiVersion: portal.gloo.solo.io/v1beta1
kind: Portal
metadata:
  name: petstore-portal
  namespace: default
spec:
  banner:
    fetchUrl: https://raw.githubusercontent.com/solo-io/gloo/main/docs/content/img/portal/banner.png
  customStyling: {}
  description: The Gloo Portal for the Petstore API
  displayName: Petstore Portal
  domains:
  - petstore.example.com
  - petstore.example.com:$INGRESS_PORT
  favicon:
    fetchUrl: https://raw.githubusercontent.com/solo-io/gloo/main/docs/content/img/portal/favicon.png
  primaryLogo:
    fetchUrl: https://raw.githubusercontent.com/solo-io/gloo/main/docs/content/img/portal/primaryLogo.png
  publishedEnvironments:
  - name: dev
    namespace: default
  staticPages: []
  portalUrlPrefix: http://petstore.example.com:$INGRESS_PORT/
  oidcAuth:
    clientId: 0oaksnsdvwTd1b5wR5d6      # uses client ID from Okta application
    clientSecret:
      name: petstore-portaloidc-secret  # uses client secret from Okta application
      namespace: default
      key: client_secret
    groupClaimKey: groups  # reads the "groups" claim we configured to pass with Okta ID token
    # Issuer info available at your Okta's account .well-known OpenId config URL
    # Example: https://dev-2933640.okta.com/oauth2/default/.well-known/openid-configuration
    additionalScopes:
     - groups
    issuer: https://dev-2933640.okta.com/oauth2/default
EOF
Configure Portal Group to Shadow Okta Group
Finally, we will configure a Portal Group Custom Resource to shadow the PetstoreUsers group that we created to hold the users of our public API, including the self-registered ones.
cat <<EOF | kubectl apply -f -
apiVersion: portal.gloo.solo.io/v1beta1
kind: Group
metadata:
  name: oidc-group
  namespace: default
spec:
  accessLevel:
    apis:
    - products:
        names:
        - petstore-product  # identify APIProducts accessible to this group
        namespaces:
        - default
      environments:
        names:
        - dev  # identify Environments in which this APIProduct is accessible to this portal
        namespaces:
        - default
    portals:
    - name: petstore-portal   # identify Portals that will be accessible to this group
      namespace: default
  oidcGroup:
    groupNames:
    - PetstoreUsers  # identifies OIDC group that this group represents
EOF
Test Self-Registration with the Petstore Portal
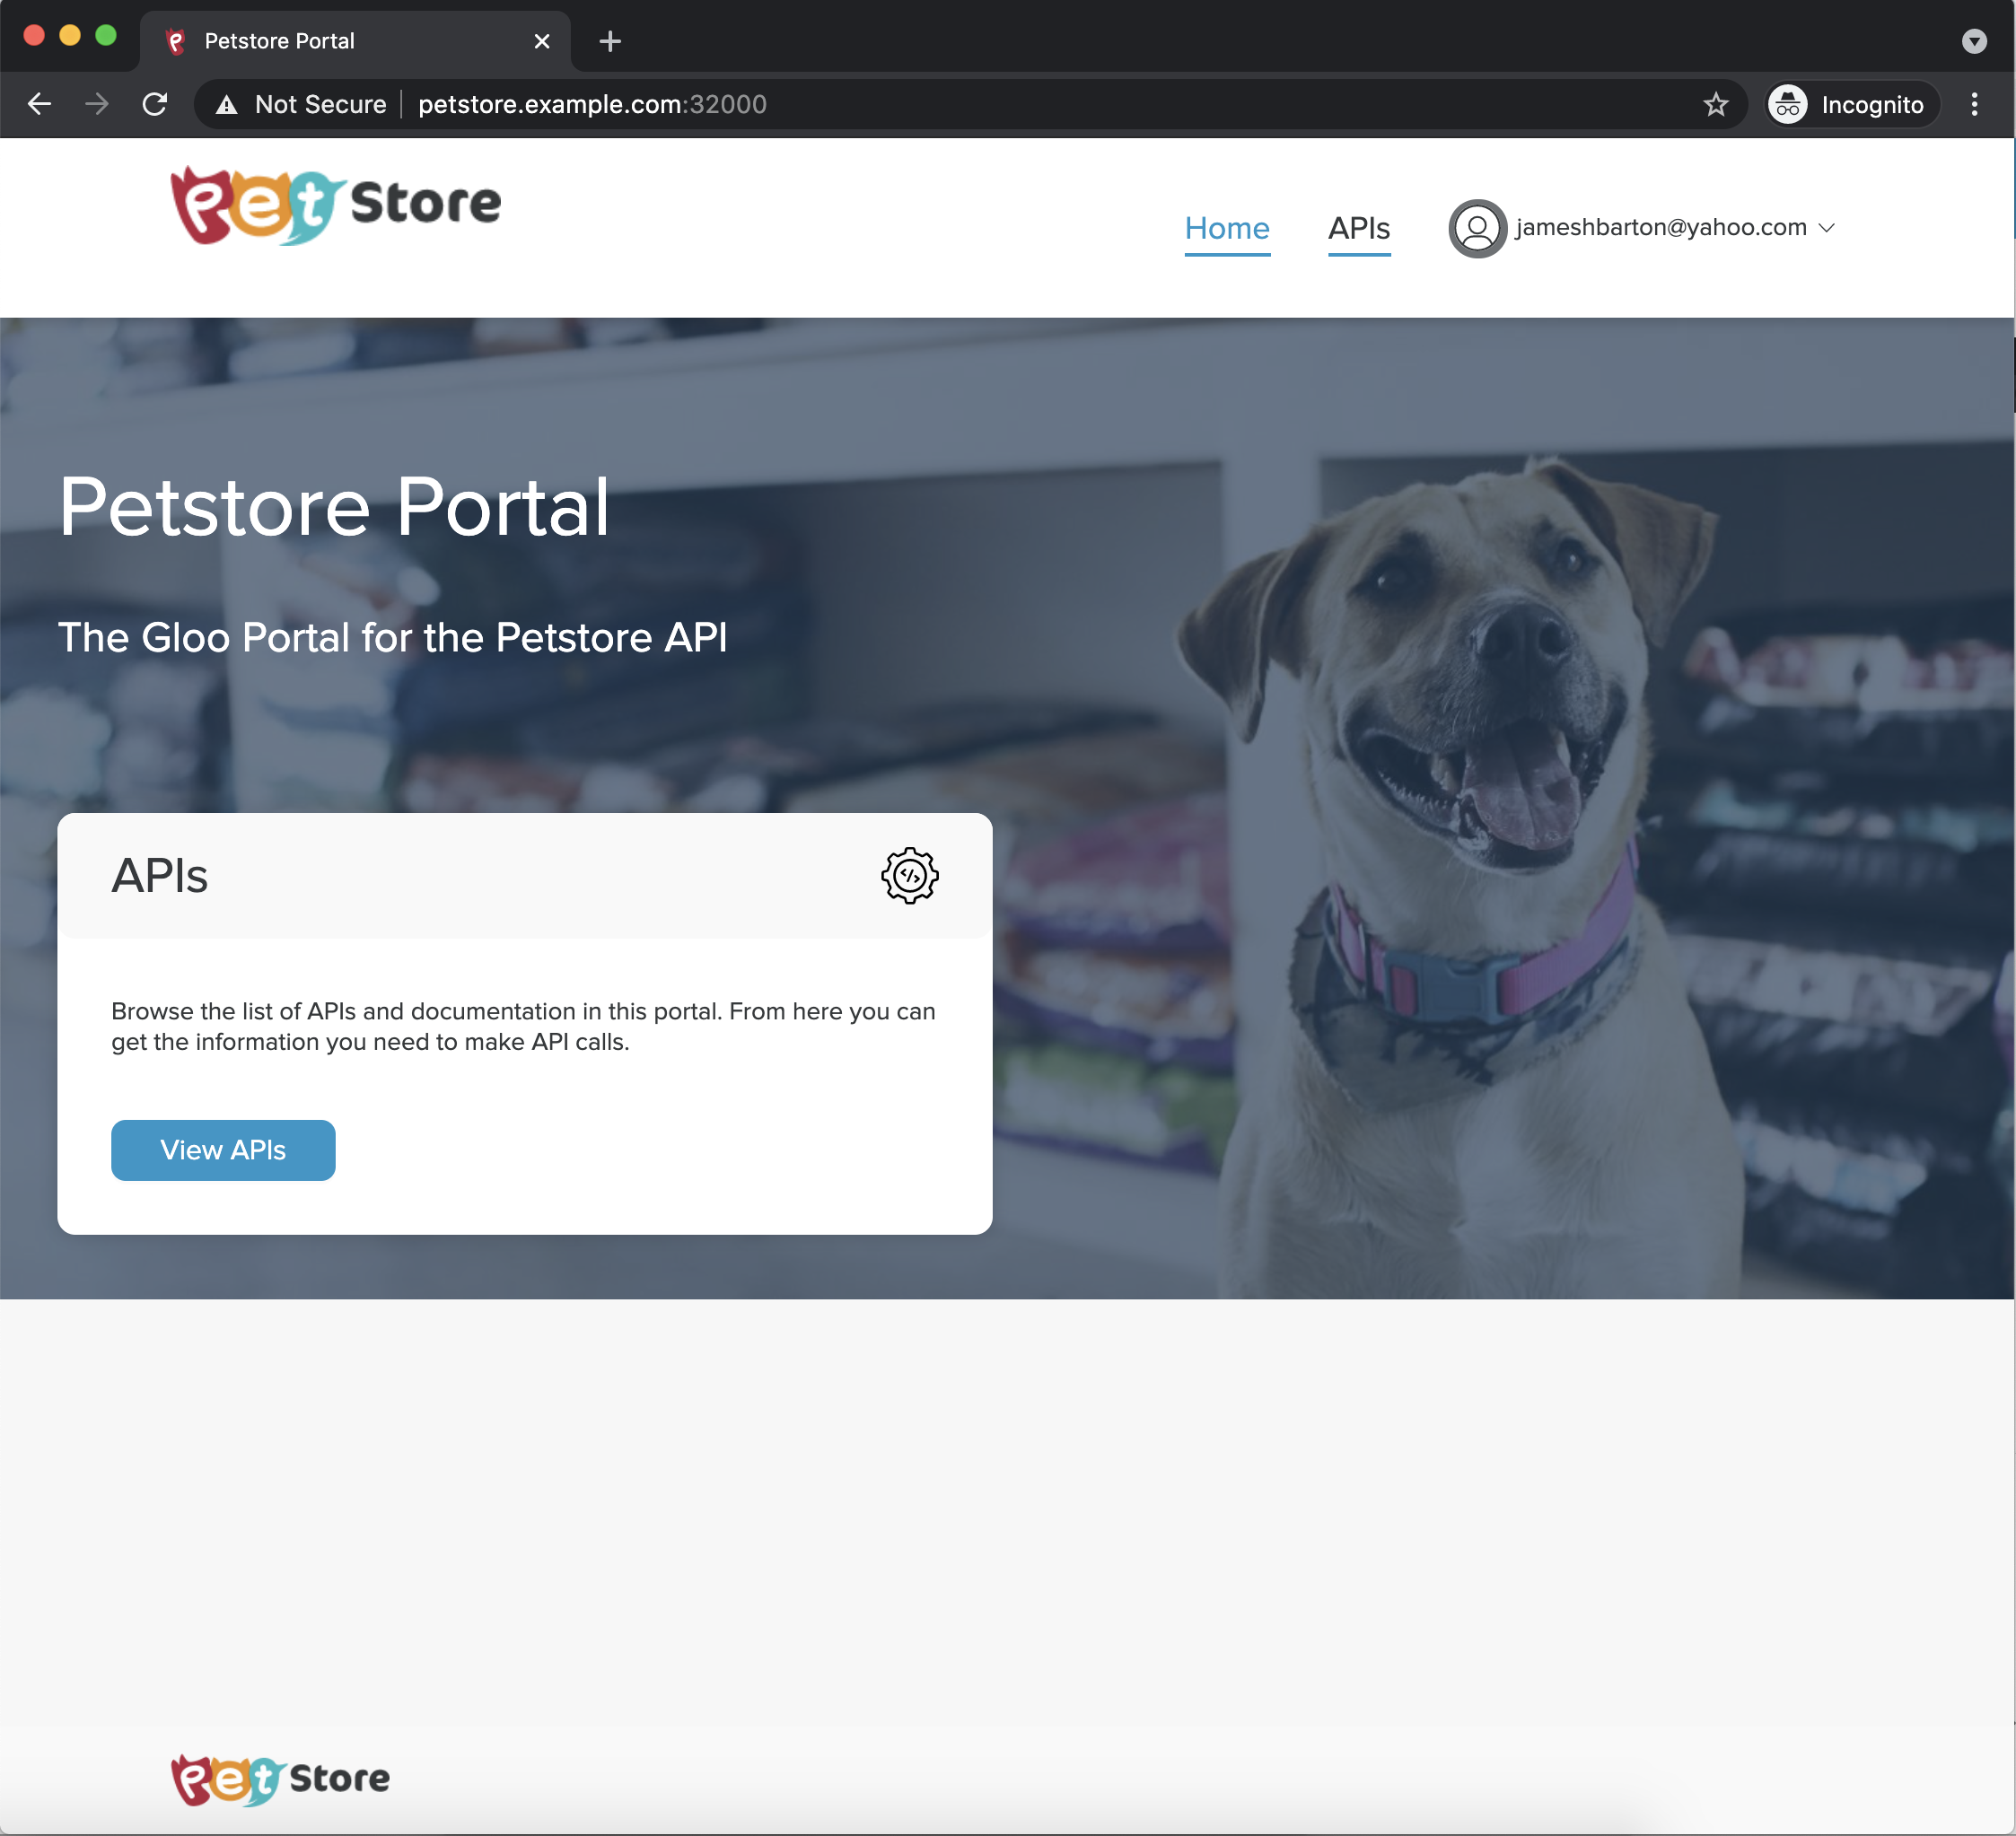
Let’s see how self-registration works in practice by visiting our portal:
open $(echo http://petstore.example.com:${INGRESS_PORT})
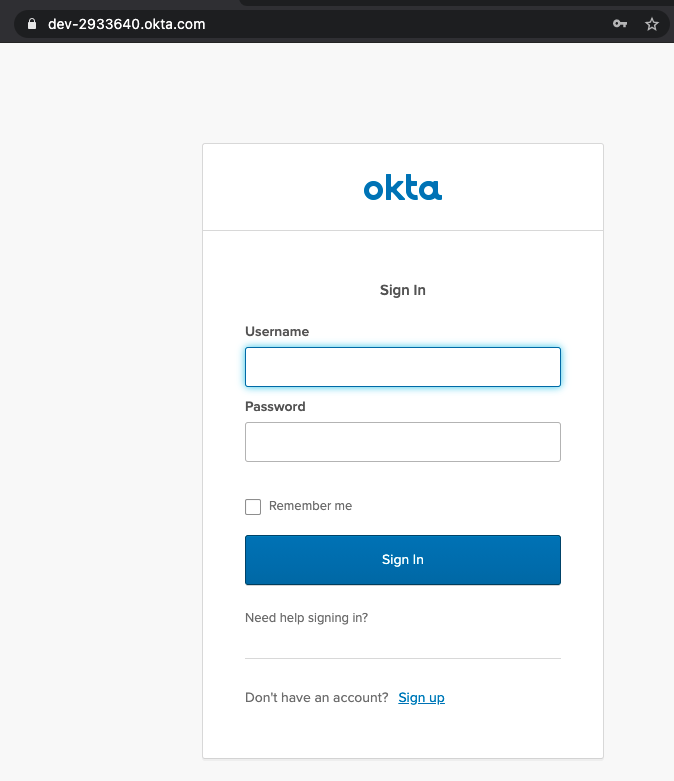
Click on the “Log in” button on the top right, and then on “Log in with OpenID Connect”.
You should be redirected to an Okta login window as shown below.
Note in particular the “Sign up” link at the bottom of the dialog, which is provided because we configured Okta for self-service registration.
(Note: If you instead see a screen like the one shown below, you may have an old session cookie and should try deleting cookies or using an incognito window.)

Click the “Sign up” link, provide the information requested, and click Register.
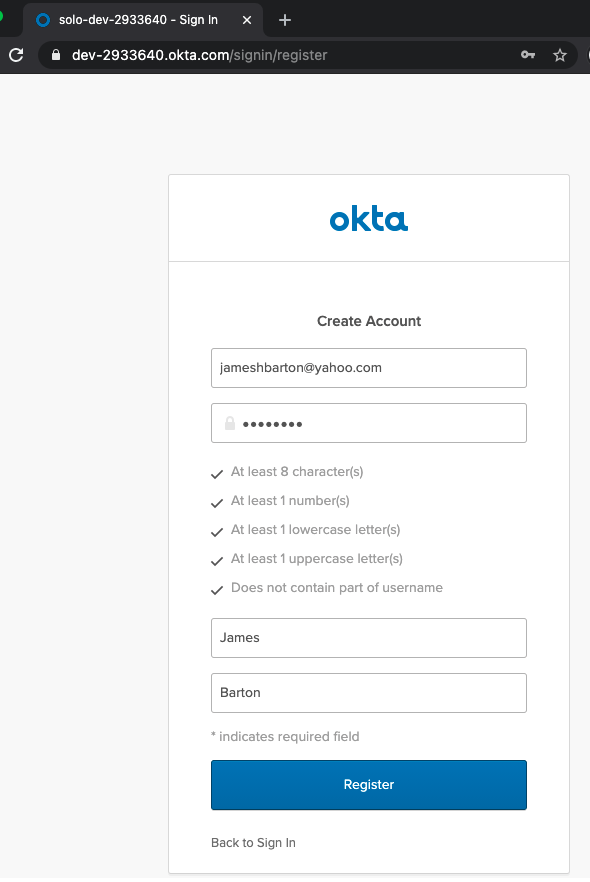
If everything is configured correctly, your self-registered user will be added to the PetstoreUsers group, and you will be redirected back to the portal home,
now signed in to the portal with the email address of the newly registered user.
In addition to being added to the Portal, you should also receive a verification email from Okta. There is a “Verify Account” button in the Okta-generated email, but in order to keep this starter guide simple, we configured SSR in Okta such that we do not require confirmation by the new user before logging into the portal. However, you may want to customize your Okta account and users in a variety of ways, such as requiring user confirmation prior to portal login.
Next steps
We are just scratching the surface of features we could deploy to this portal. For example, we might want our public API users to be rate-limited and require them to generate API Keys so that we can better track and control their usage. Creating a Usage Plan is an easy way to add these capabilities.
Please see the guides section for guides on using other features of Gloo Portal.
Questions
For any questions using Gloo Portal, please visit the Solo.io slack channel at https://slack.solo.io.
If you'd like to report an issue or bug, please see the Gloo Portal Issues Repository on GitHub.