OAuth with JWT
This guide explains how to use Gloo Portal to secure your APIs using OAuth2.0 via JWTs.
This guide assumes that part two of the Getting Started Guide
has been completed and that your Gateway's ingress port is 32000.
Setup OAuth client
In order to secure your API with OAuth, you'll need an OAuth2.0 server.
We will demonstrate an example using Dex on our local cluster.
Write the following file and run the subsequent commands to install Dex with a single client and a single known user:
cat > dex-values.yaml <<EOF
config:
  issuer: http://dex.dex.svc.cluster.local:32000/
  staticClients:
  - id: example-app
    redirectURIs:
    - 'http://petstore.example.com:32000/oauth-redirect'
    name: 'Example App'
    secret: ZXhhbXBsZS1hcHAtc2VjcmV0 # The secret for this client

  # A static list of passwords to login the end user. By identifying here, dex
  # won't look in its underlying storage for passwords.
  staticPasswords:
  - email: "admin@example.com"
    # bcrypt hash of the string "password"
    hash: "\$2a\$10\$2b2cU8CPhOTaGrs1HRQuAueS7JTT5ZHsHSzYiFPm1leZck7Mc8T4W"
    username: "admin"
  userID: "08a8684b-db88-4b73-90a9-3cd1661f5466"
  enablePasswordDB: true
  storage:
    type: memory
envVars:
  - name: KUBERNETES_POD_NAMESPACE
    valueFrom:
      fieldRef:
        fieldPath: metadata.namespace
EOF
Next, we install Dex into the dex namespace:
kubectl create namespace dex
helm repo add dex https://charts.dexidp.io
helm upgrade --install dex --namespace dex --values "dex-values.yaml" dex/dex
kubectl rollout -n dex status deployment dex
Let's add host entries for Dex's cluster service.
Make sure you've got the INGRESS_HOST and INGRESS_PORT environment variables set before continuing.
cat <<EOF | sudo tee -a /etc/hosts

# Added for the Solo.io Gloo Portal Guides
${INGRESS_HOST} dex.dex.svc.cluster.local
EOF
Let's also expose dex on our gateway by creating the following VirtualService:
cat <<EOF | kubectl apply -f -
apiVersion: gateway.solo.io/v1
kind: VirtualService
metadata:
  name: dex-ingress
  namespace: dex
spec:
  virtualHost:
    domains:
      - "dex.dex.svc.cluster.local"
      # If you are using Gloo Edge and the Gateway is listening on a port other than 80, you need to include a port as we do below
      - "dex.dex.svc.cluster.local:${INGRESS_PORT}"
    options:
      cors:
        allowHeaders:
        - api-key
        - authorization
        - x-requested-with
        allowOrigin:
        - "http://petstore.example.com"
        # If you are using Gloo Edge and the Gateway is listening on a port other than 80, you need to include a port as we do below
        - "http://petstore.example.com:${INGRESS_PORT}"
    routes:
      - matchers:
          - prefix: /
        routeAction:
          single:
            upstream:
              name: dex-dex-32000
              namespace: gloo-system
EOF
The Dex service may be bound to a different port depending on your installation. To find the correct port:
- Run
kubectl get deployment -n dex dex -oyaml | grep -i "containerPort" -C 2. - From the ports listed, use the one named
http. - Use
kubectl get us -n gloo-system | grep "dex-<HTTP_PORT>"to find the correct upstream to route to.
cat <<EOF | kubectl apply -f -
apiVersion: networking.istio.io/v1beta1
kind: VirtualService
metadata:
  name: dex-ingress
  namespace: dex
spec:
  gateways:
  - istio-system/istio-ingressgateway
  hosts:
  - dex.dex.svc.cluster.local
  - "dex.dex.svc.cluster.local:${INGRESS_PORT}"
  http:
  - name: dex
    match:
    - uri:
        prefix: /
    route:
    - destination:
        host: dex.dex.svc.cluster.local
        port:
          number: 32000
    corsPolicy:
      allowHeaders:
      - api-key
      - authorization
      - x-requested-with
      allowOrigins:
      - prefix: http://petstore.example.com

---

apiVersion: networking.istio.io/v1alpha3
kind: EnvoyFilter
metadata:
  name: dex-auth-disable
  namespace: istio-system
spec:
  configPatches:
  - applyTo: HTTP_ROUTE
    match:
      context: GATEWAY
      routeConfiguration:
        vhost:
          route:
            action: ROUTE
            name: dex
    patch:
      operation: MERGE
      value:
        typed_per_filter_config:
          envoy.filters.http.ext_authz:
            '@type': type.googleapis.com/envoy.extensions.filters.http.ext_authz.v3.ExtAuthzPerRoute
            disabled: true
EOF
We will need to add a portalURLPrefix to our portal to provide as a callback to the OAuth client. Do so by running:
cat <<EOF | kubectl apply -f -
apiVersion: portal.gloo.solo.io/v1beta1
kind: Portal
metadata:
  name: petstore-portal
  namespace: default
spec:
  displayName: Petstore Portal
  description: The Gloo Portal for the Petstore API
  banner:
    fetchUrl: https://raw.githubusercontent.com/solo-io/gloo/main/docs/content/img/portal/banner.png
  favicon:
    fetchUrl: https://raw.githubusercontent.com/solo-io/gloo/main/docs/content/img/portal/favicon.png
  primaryLogo:
    fetchUrl: https://raw.githubusercontent.com/solo-io/gloo/main/docs/content/img/portal/primaryLogo.png
  customStyling: {}
  staticPages: []

  domains:
    - petstore.example.com:32000
    - petstore.example.com

  # This will include all API product of the environment in the portal
  publishedEnvironments:
    - name: dev
      namespace: default
  portalUrlPrefix: "http://petstore.example.com:32000"
EOF
Create OAuth usage plan
API Products that have been added to an Environment have Usage Plans to determine how users and groups may access and use the API. If there are no plans associated with an API Product, then everyone has unauthenticated and unlimited access. Once a plan is added, unauthenticated access is revoked.
We are going to create an OAuth usage plan for our Petstore API Product. You can also configure a usage plan with the Admin Dashboard.
We will first update the configuration of the Petstore API Product in the Development Environment to include the basic-oauth usage plan:
cat << EOF | kubectl apply -f-
apiVersion: portal.gloo.solo.io/v1beta1
kind: Environment
metadata:
  name: dev
  namespace: default
spec:
  # In our setup, our 'INGRESS_PORT' is set to 32000.
  # In the real world there is generally no need to specify port as it will default to 80
  domains:
  - api.example.com:32000
  displayInfo:
    description: This environment is meant for developers to deploy and test their APIs.
    displayName: Development
  parameters:
    usagePlans:
      basic-oauth:
        authPolicy:
          oauth:
            authorizationUrl: http://dex.dex.svc.cluster.local:32000/auth
            jwtValidation:
              issuer: http://dex.dex.svc.cluster.local:32000/
              remoteJwks:
                refreshInterval: 60s
                # If Dex is bound to a different port, use Dex's port here, so that Gloo Portal can validate the JWT.
                url: http://dex.dex.svc.cluster.local:32000/keys
            scopes:
              openid:
                description: "Example"
            tokenUrl: http://dex.dex.svc.cluster.local:32000/token
  apiProducts:
  - namespaces:
    - "*"
    labels:
    - key: app
      operator: Equals
      values:
      - petstore
    versions:
      tags:
      - stable
    usagePlans:
    - basic-oauth
EOF
We have now created a usage plan that uses the OAuth authentication method with JWT validation.
Assign a user to the OAuth plan
We are going to create a user (dev1) and grant them permission to use our API Product with the basic-oauth plan.
In our example, we will add a user by using kubectl. You can also create a user with the Admin Dashboard.
First we will create and store a password in a Kubernetes Secret. The plaintext password is hashed using a bcrypt function with a cost of 10. We can use the htpasswd function from the apache-utils package to do the same at the command line.
# Install the apache2-utils if you don't already have them
sudo apt install apache2-utils -y

# Generate the bcrypt hash with cost of 10
pass=$(htpasswd -bnBC 10 "" mysecurepassword | tr -d ':\n')

# Store the hash as a Kubernetes Secret
kubectl create secret generic dev1-password \
  -n gloo-portal --type=opaque \
  --from-literal=password=$pass
Next we will create the user by defining a User resource, granting them access to our Portal and API Product via the basic-oauth plan in the dev Environment:
cat << EOF | kubectl apply -f-
apiVersion: portal.gloo.solo.io/v1beta1
kind: User
metadata:
  name: dev1
  namespace: gloo-portal
spec:
  accessLevel:
    apis:
    - products:
        namespaces:
        - "*"
        labels:
        - key: app
          operator: Equals
          values:
          - petstore
      environments:
        namespaces:
        - "*"
      usagePlans:
      - basic-oauth
    portals:
    - name: petstore-portal
      namespace: default
  basicAuth:
    passwordSecretKey: password
    passwordSecretName: dev1-password
    passwordSecretNamespace: gloo-portal
  username: dev1
EOF
We can verify our user was created successfully by running:
kubectl get user dev1 -n gloo-portal -oyaml
The state of the user CR should be Succeeded.
Our user (dev1) should now have access to log into the Petstore portal, procure a JWT, and test the API Product's functionality.
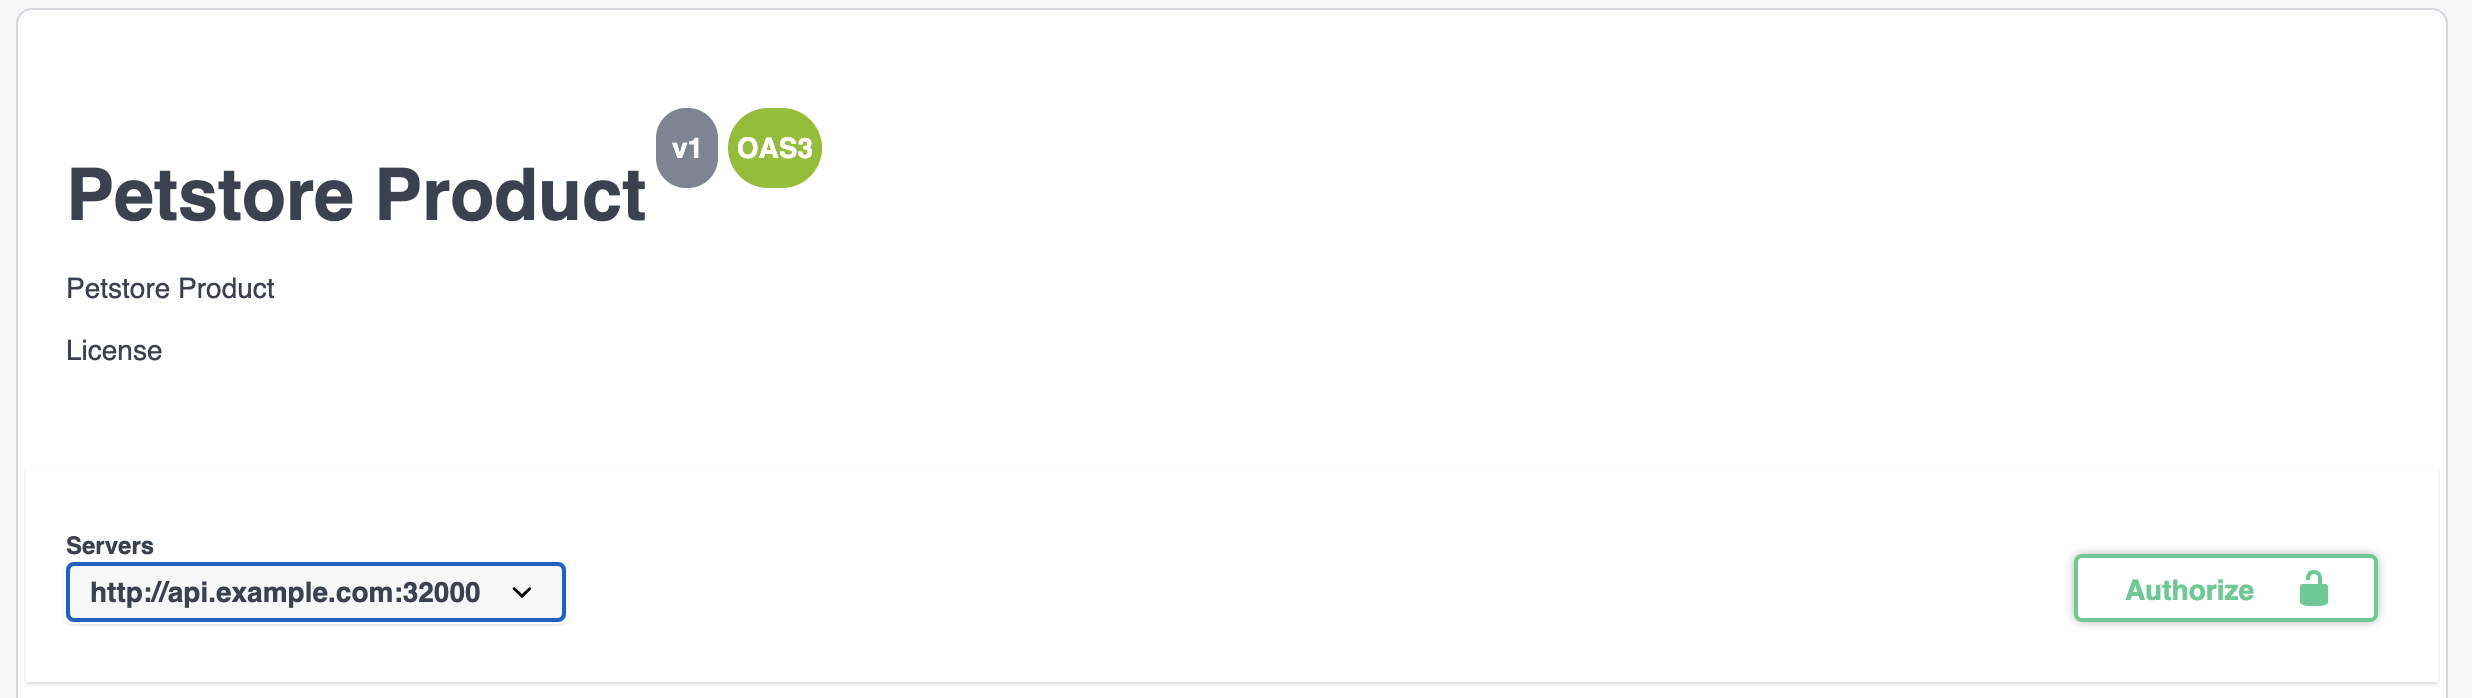
Use Portal to authenticate with OAuth
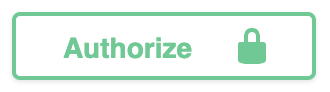
Open the Portal and navigate to your API Product. Select Authorize:
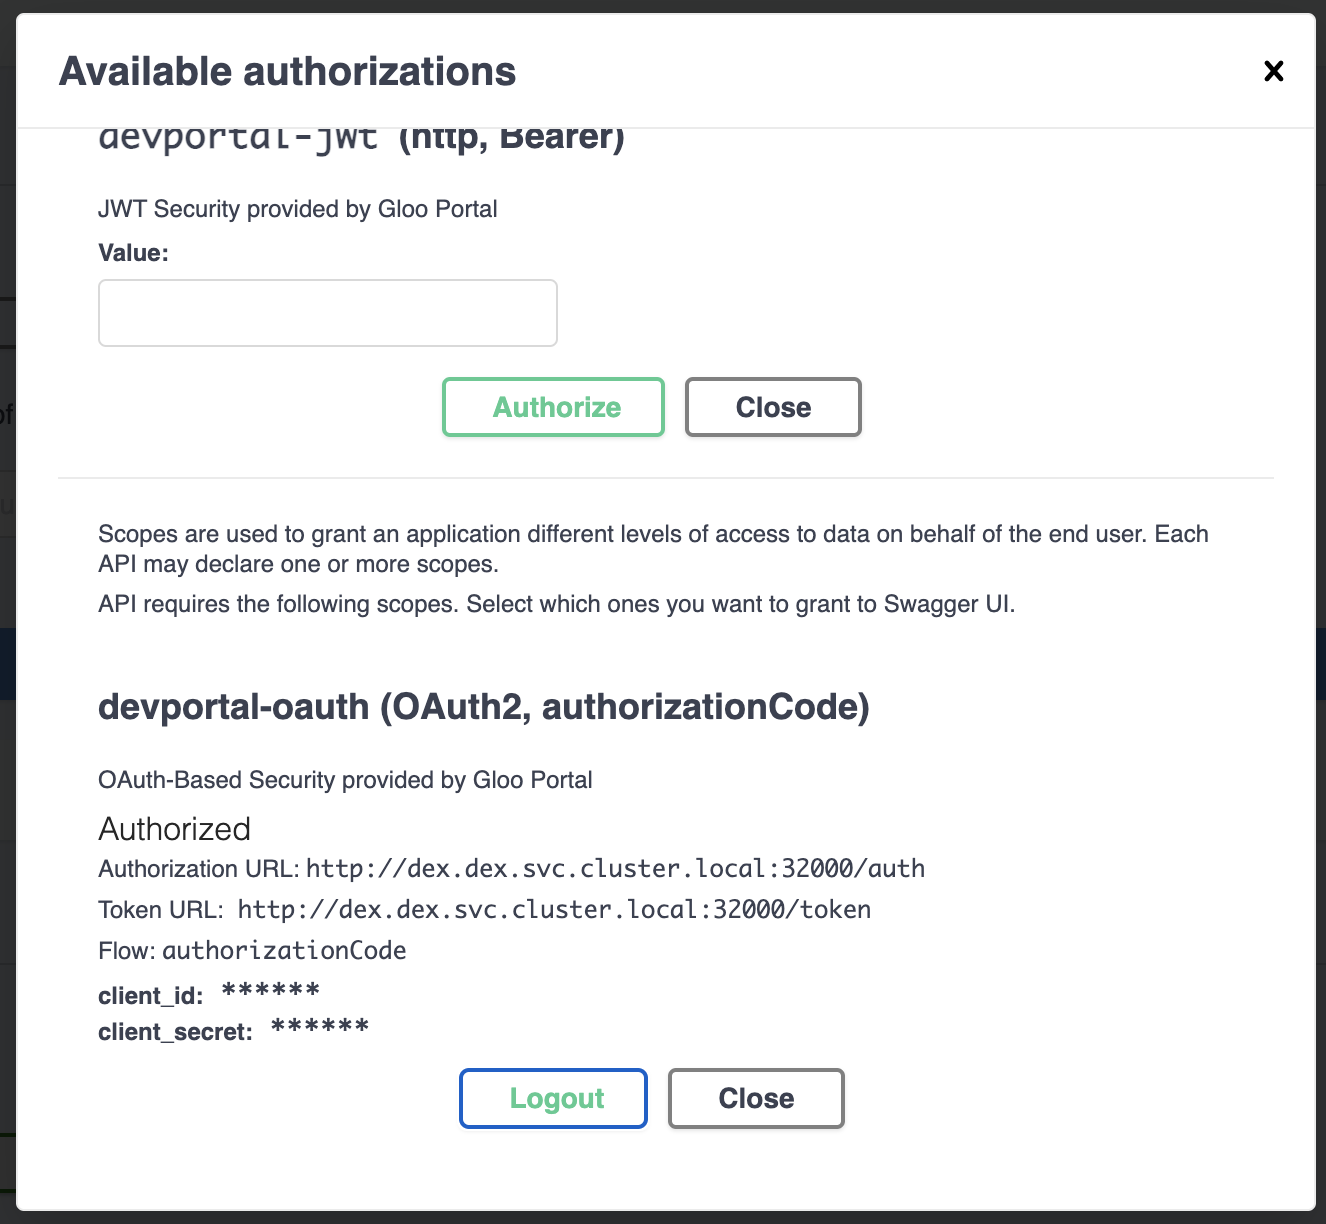
A dialog box will come up with the available authorizations. In this case we have two, devportal-jwt, and devportal-oauth.
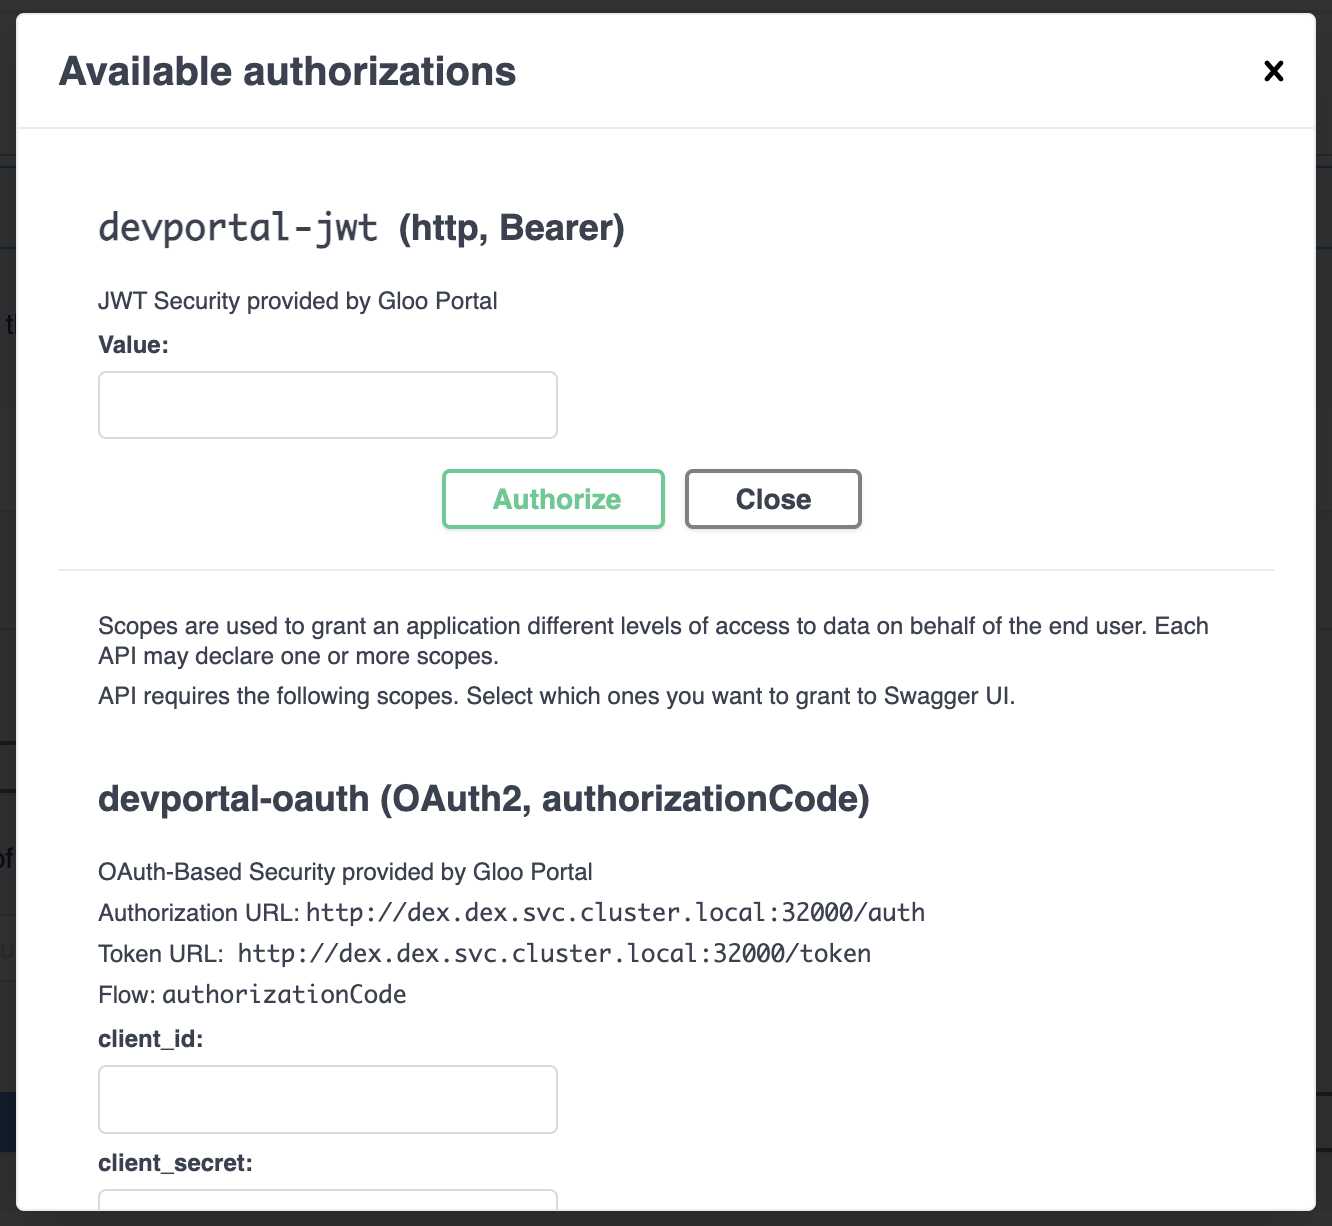
The OAuth option displays with an authorization URL and token URL as specified in the usage plan we added to the Environment.
Enter the client id and client secret. We specified these in the staticClient we instantiated Dex with: example-app and ZXhhbXBsZS1hcHAtc2VjcmV0.
Select the scope(s) to grant authorization to and press Authorize.
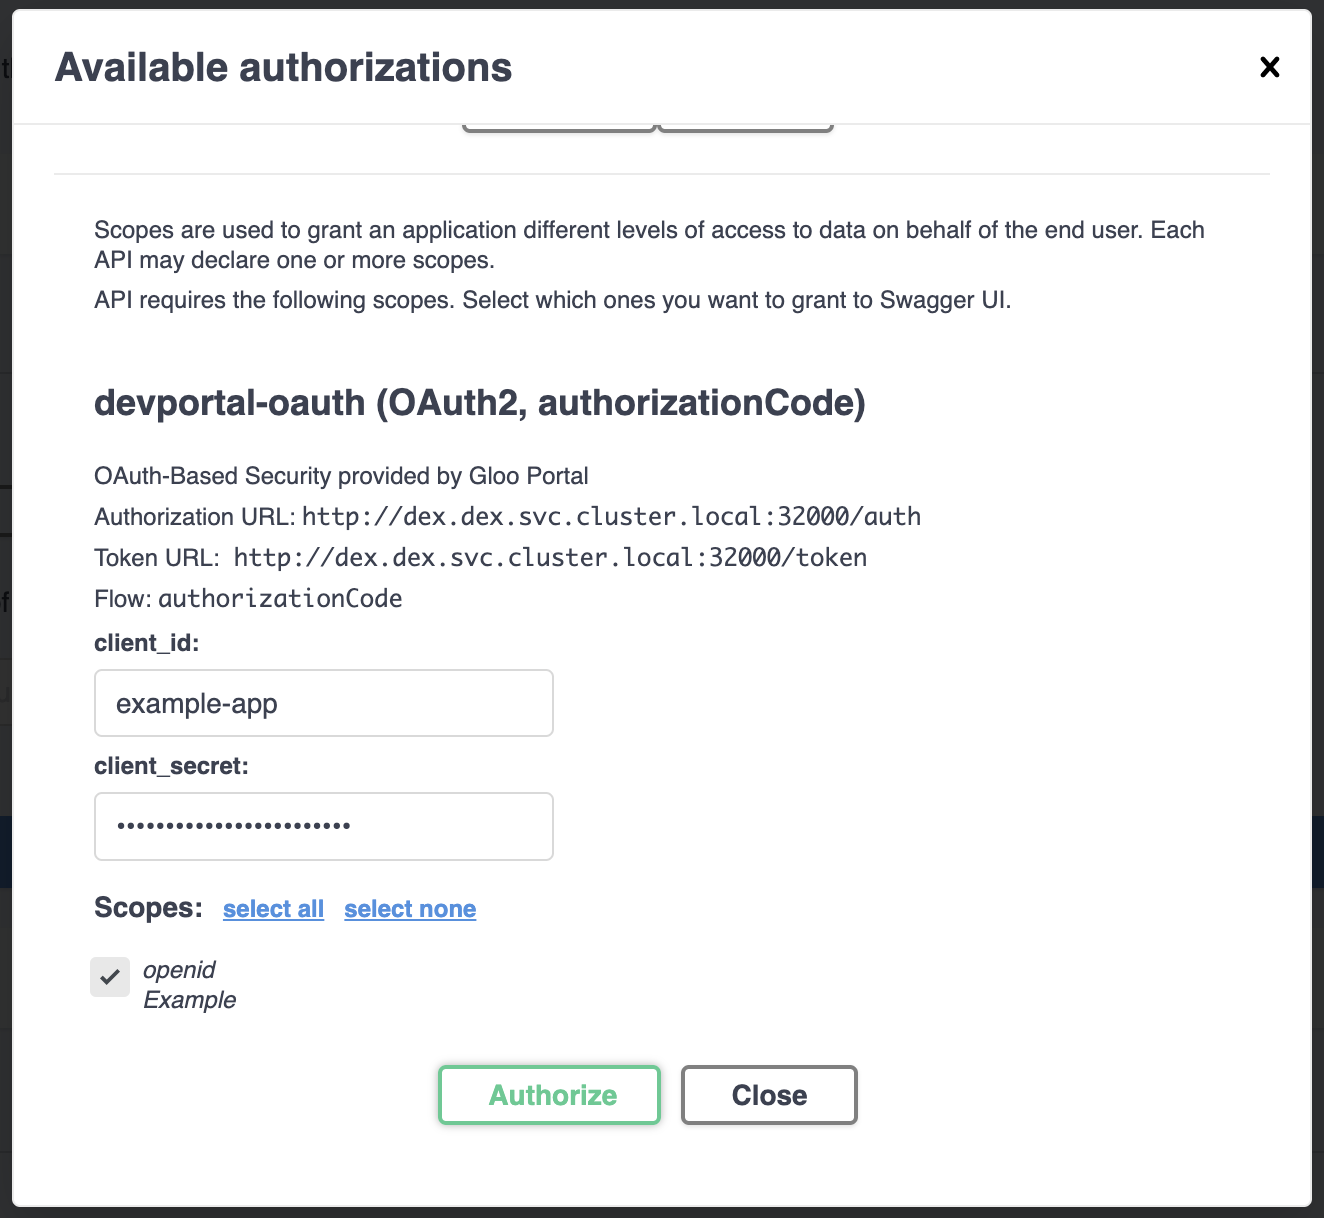
This will redirect you to the OAuth client's login. In our case we're redirected to http://dex.dex.svc.cluster.local:32000/auth/local?req=gdyhfamko6z2rulgpxhtjyhoi where were are presented with a login box.
Enter your credentials and login. We specified these in the staticPassword we instantiated Dex with: admin@example.com and password.
Your OAuth client will then redirect you back to the portal where you'll see that the icon in the Authorize button is now locked:
Clicking on Authorized at this point will show that the devportal-oauth authorization is in the Authorized state and you have the option to Logout.
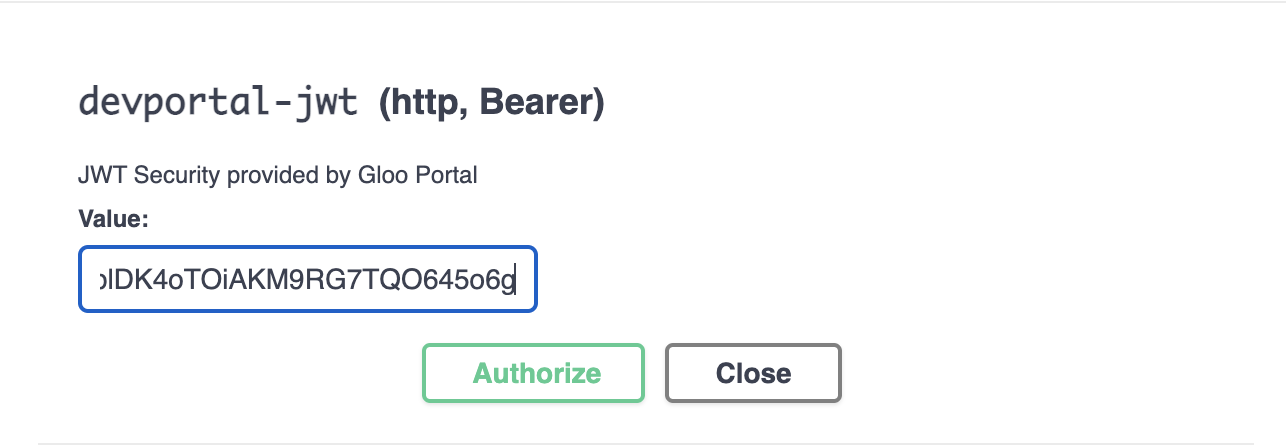
If we already have a JWT token we can use the devportal-jwt option by entering it into the “Value” field.
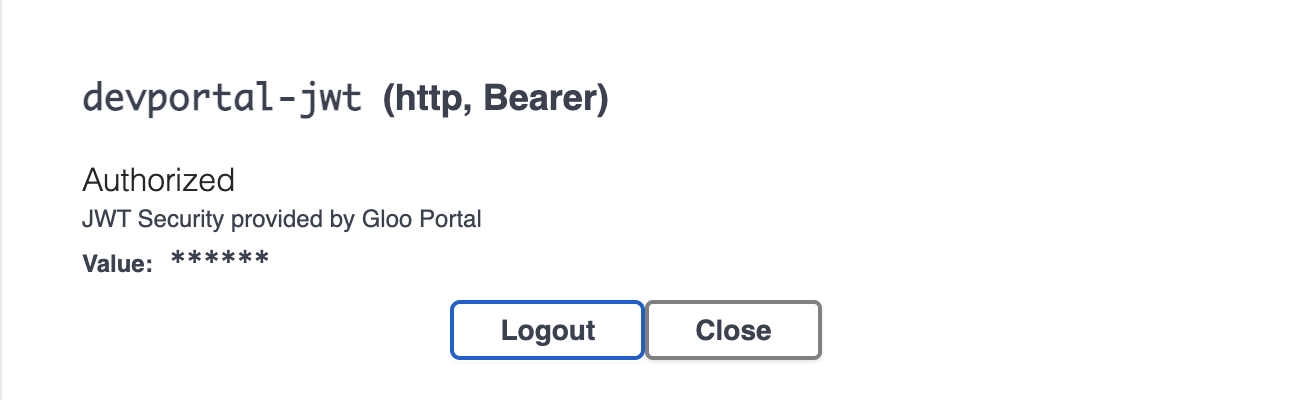
When we click “Authorize” we will immediately be “logged in” and be given the “Logout” option
And when we click out of the dialog box we will see that the Authorize button is now locked:
Make an authenticated request via Portal
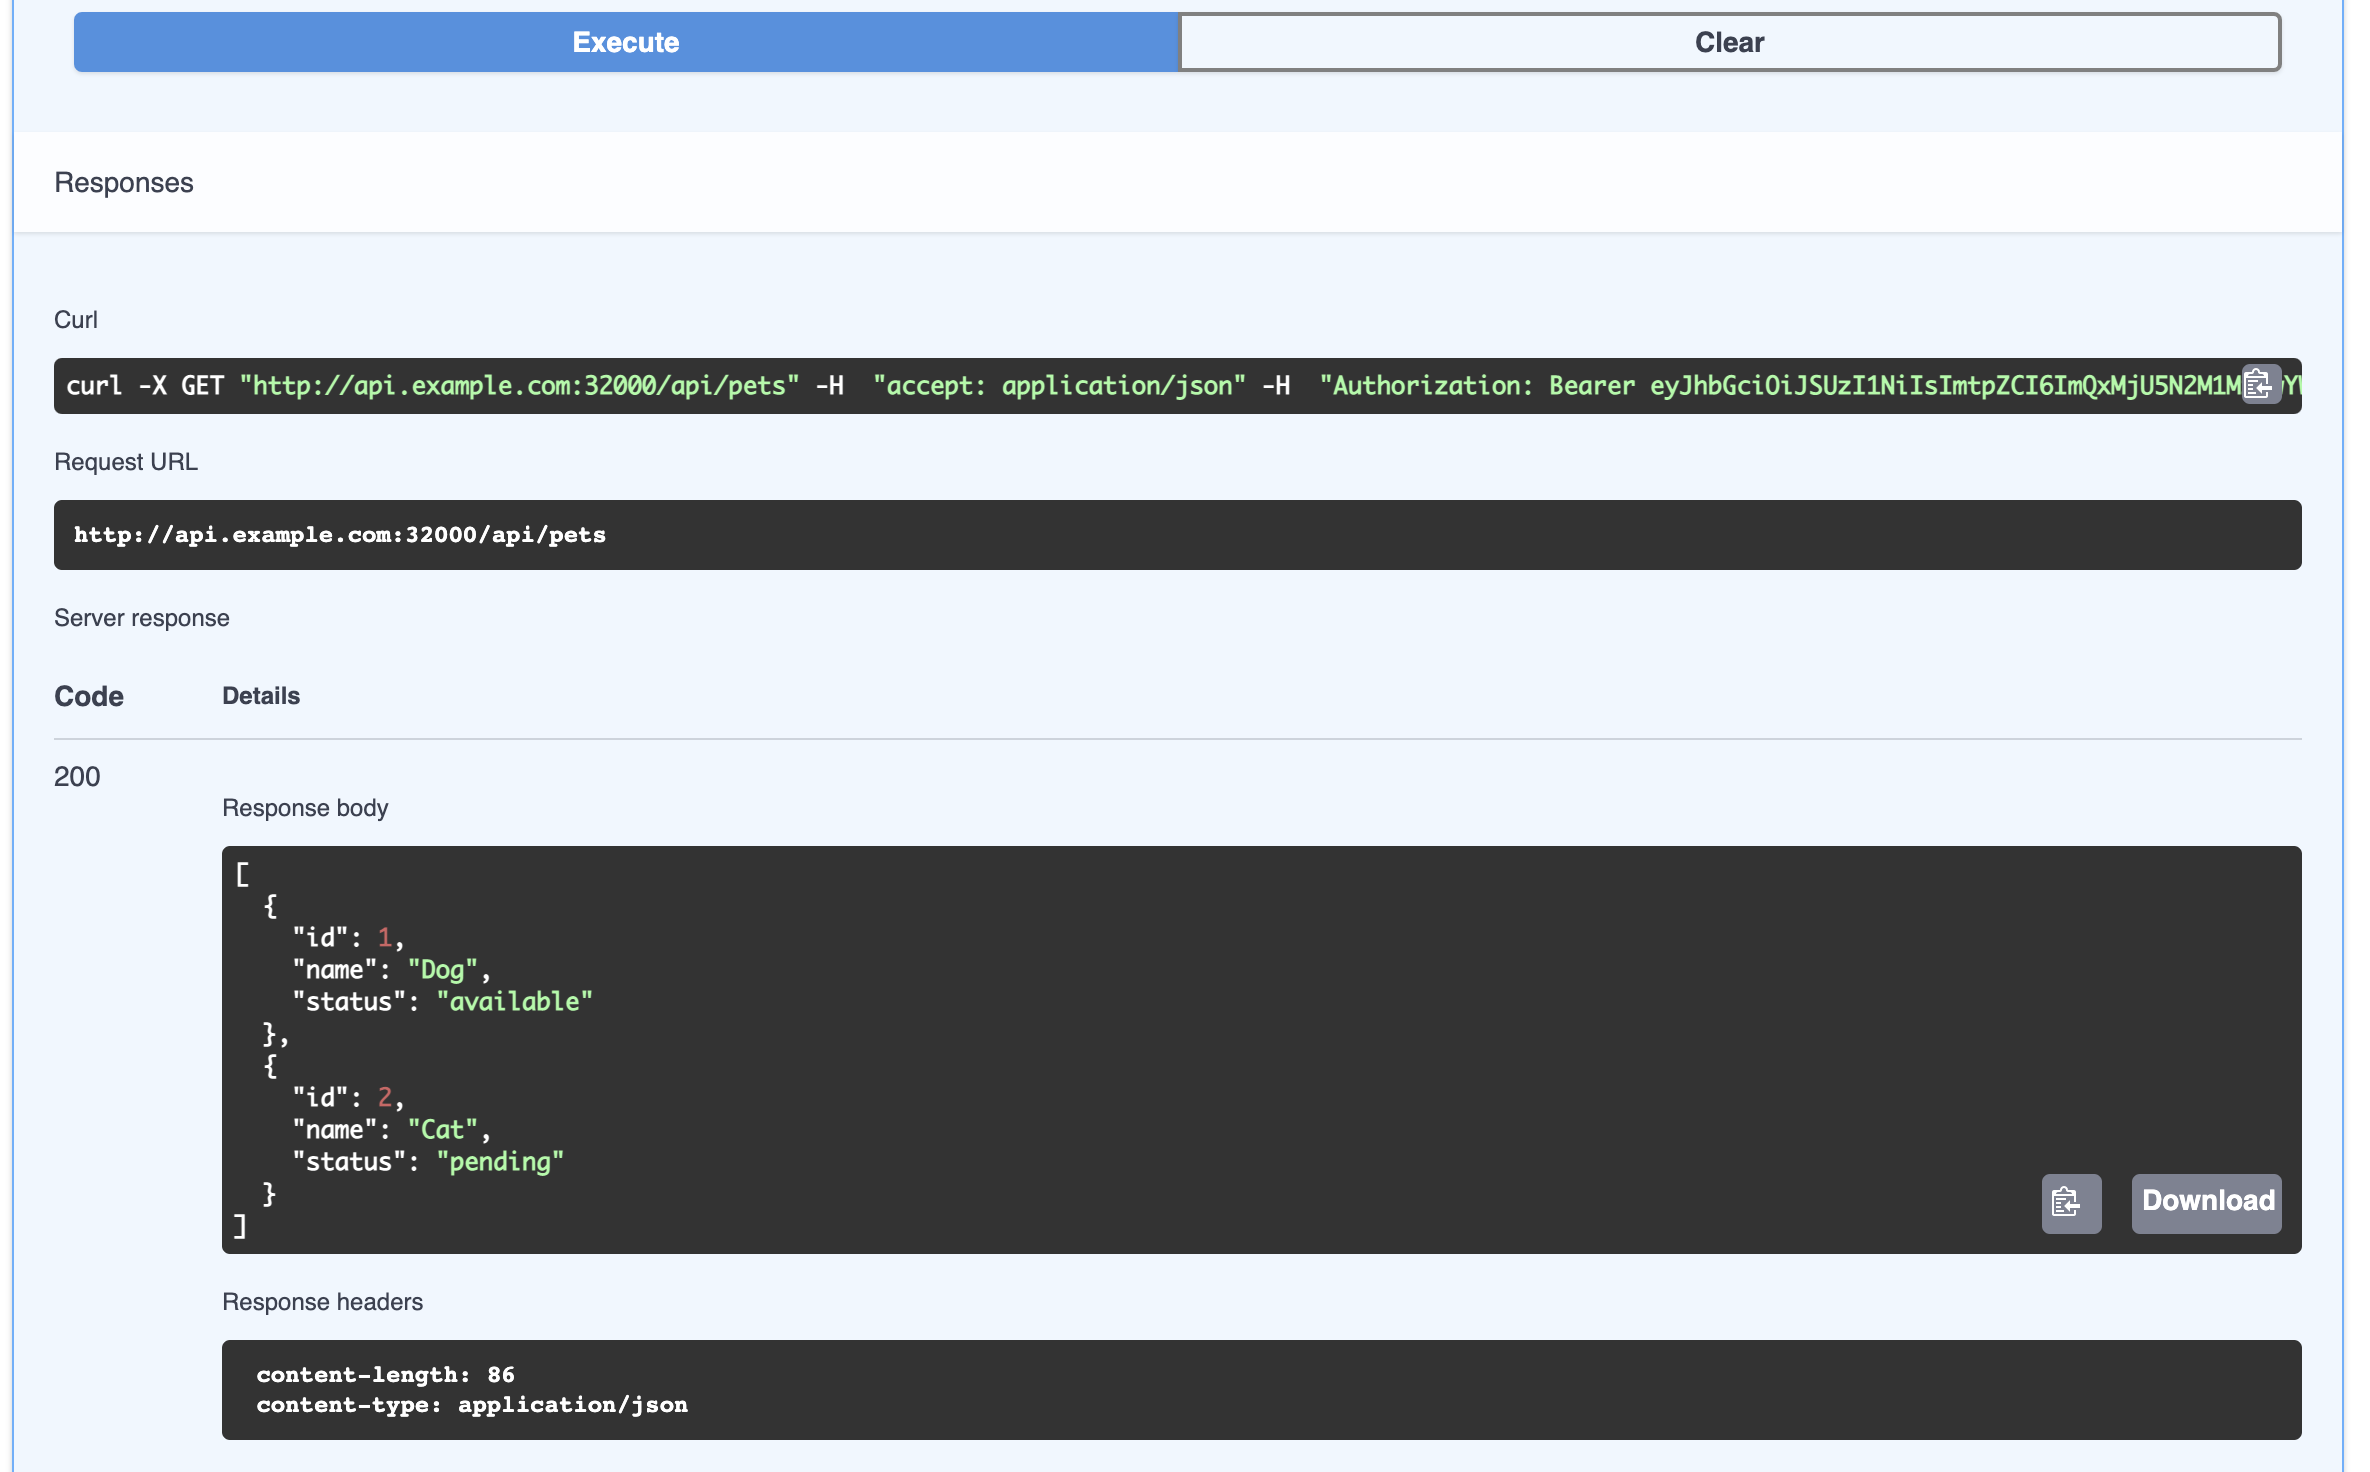
You are now able to make authenticated requests via the Portal!
Choose an endpoint within the product, press Try it Out, add any relevant body or parameters, and press Execute. You will receive the expected response:
If you are able to log in to the Portal UI but are unable to make authenticated requests, Dex may be running on a different port than the one specified in the dev Environment.
To fix this:
- Find the exposed Dex port by running
kubectl get deployment -n dex dex -oyaml | grep -i "containerPort" -C 2. The port named “http” is the port we want. - Update the
devEnvironment'sremoteJwksurl to point to the correct port.
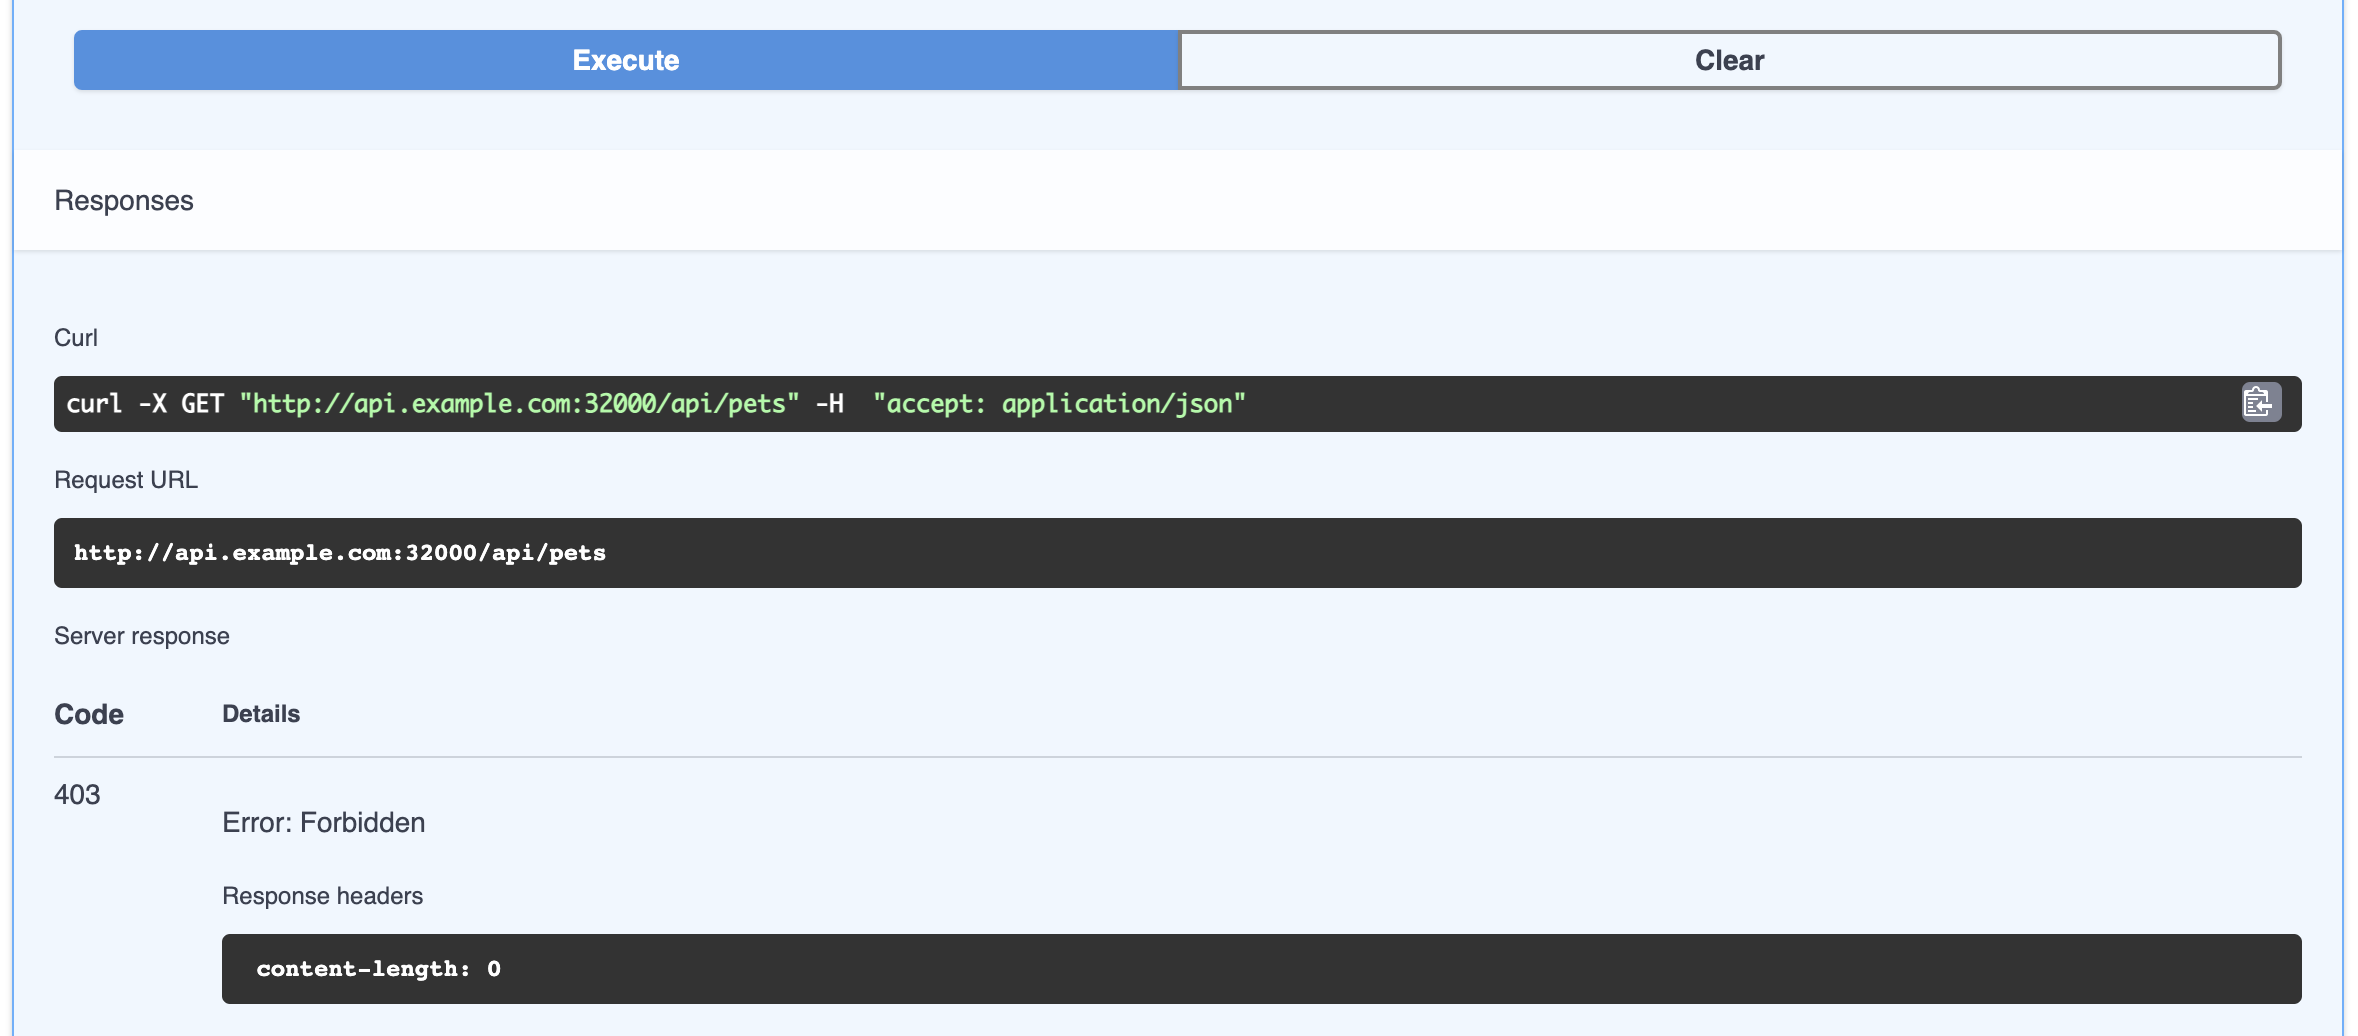
If you logout, as described above, you can see that this same request will result in a 403 response from the Portal without proper authorization:
Summary
In this guide you set up an OAuth client, created a usage plan that uses that OAuth client for authentication, added a user to that usage plan, and made authenticated requests with that user via the Portal.