Monetization/Usage Graph
Gloo Edge can be configured to persist API usage data in a postgres database. This data can be used to monetize APIs and to generate a usage graph in Gloo Portal Admin Dashboard.
Pre-requisites
- A running Kubernetes cluster.
- Gloo Edge Enterprise with version >= 1.8.0 installed to the
gloo-systemnamespace. - Gloo Portal with version >= 1.0.0 installed to the
gloo-systemnamespace. You can refer to the installation instructions to see how to set up Gloo Portal, but make sure Gloo Portal is installed to thegloo-systemnamespace instead of thegloo-portalone (see note below for an explanation why). - An
Environmentwith at least oneAPIProduct, for testing. For an example, follow the Getting Started Guide.
Set up postgres database
The first step to set up the monetization feature is to deploy a postgres database
instance in which we will persist the usage data.
We expect the postgres database to contain a table named requests with the following columns:
   Column    |           Type           | Collation | Nullable |               Default
-------------+--------------------------+-----------+----------+--------------------------------------
 id          | bigint                   |           | not null | nextval('requests_id_seq'::regclass)
 user_id     | text                     |           | not null |
 route       | text                     |           | not null |
 api_product | text                     |           | not null |
 environment | text                     |           | not null |
 status      | integer                  |           | not null |
 request_ts  | timestamp with time zone |           | not null |
 method      | text                     |           | not null |
 request_id  | text                     |           | not null |
Indexes:
    "requests_pkey" PRIMARY KEY, btree (id)
Let's start by creating a ConfigMap with the Data Definition Language
required to create a table with the above columns.
We will use this ConfigMap when installing postgres.
cat << EOF | kubectl apply -f -
apiVersion: v1
kind: ConfigMap
metadata:
  name: postgres-schema
  namespace: gloo-system
data:
  init-schema.sql: |
    CREATE TABLE public.requests
    (
        id          bigint                   NOT NULL,
        user_id     text                     NOT NULL,
        route       text                     NOT NULL,
        api_product text                     NOT NULL,
        environment text                     NOT NULL,
        status      integer                  NOT NULL,
        request_ts  timestamp with time zone NOT NULL,
        method      text                     NOT NULL,
        request_id  text                     NOT NULL
    );

    ALTER TABLE public.requests
        OWNER TO "postgres-user";

    CREATE SEQUENCE public.requests_id_seq
        AS bigint
        START WITH 1
        INCREMENT BY 1
        NO MINVALUE
        NO MAXVALUE
        CACHE 1;

    ALTER TABLE public.requests_id_seq
        OWNER TO "postgres-user";

    ALTER SEQUENCE public.requests_id_seq OWNED BY public.requests.id;

    ALTER TABLE ONLY public.requests
        ALTER COLUMN id SET DEFAULT nextval('public.requests_id_seq'::regclass);

    ALTER TABLE ONLY public.requests
        ADD CONSTRAINT requests_pkey PRIMARY KEY (id);
EOF
Now let's deploy postgres to the gloo-system namespace using helm:
helm repo add bitnami https://charts.bitnami.com/bitnami
helm repo update
helm install postgres bitnami/postgresql -n gloo-system --version 10.14.3 \
--set global.postgresql.postgresqlDatabase=postgres-db \
--set global.postgresql.postgresqlUsername=postgres-user \
--set global.postgresql.postgresqlPassword=postgres-password \
--set global.postgresql.servicePort=5432 \
--set initdbScriptsConfigMap=postgres-schema
The above Helm values will configure the postgres instance to:
- contain a database named
postgres-db - define a user named
postgres-userwith passwordpostgres-password - listen on port
5432 - be initialized using the DDL defined in the
postgres-schemaConfigMapwe just created.
Add monetization configuration
Next we will need to create additional resources that will be used by Gloo Edge and Gloo Portal to determine how to connect to the postgres database.
First, let's create a secret to hold the credentials of the user that Gloo Edge and Gloo Portal will use to query the database:
cat <<EOF | kubectl apply -n gloo-system -f -
apiVersion: v1
kind: Secret
metadata:
  name: monetization-secret
type: kubernetes.io/basic-auth
stringData:
  username: postgres-user
  password: postgres-password
EOF
Next, let's create a ConfigMap with the rest of the information required to connect to the database:
cat <<EOF | kubectl apply -n gloo-system -f -
apiVersion: v1
kind: ConfigMap
metadata:
  name: monetization-config
data:
  storage-type: "postgres"
  config.yaml: | # Edge and Portal will mount this volume and read this field as a YAML file
    secretpath: /etc/monetization/secret
    host: postgres-postgresql.gloo-system.svc.cluster.local
    db: postgres-db
    port: 5432
EOF
The ConfigMap needs to have two data entries:
storage-typedetermines the type of persistent storage for usage data (currently onlypostgresis supported)config.yamlis a YAML document that must contain the following elements:secretpath: is the path at which we will mount the user credentials secret we just createdhostis the host name of the postgres databasedbis the name of the databaseportis the port on which the database listens
Enable monetization in Gloo Edge Enterprise
In order for the gateway instances to record usage data, we need to update our Gloo Edge Enterprise deployment. Specifically, we need to enable the monetization module that is deployed as part of the Gloo Edge Enterprise external auth server and configure the gateway proxies to stream request data to the module.
Let's create a Helm values file to do that:
cat << EOF > glooe-monetization-values.yaml
global:
  extensions:
    extAuth:
      deployment:
        # Specify the monetization config and secret as volumes for the extauth deployment
        extraVolume:
        - name: monetization-config
          configMap:
            name: monetization-config
        - name: monetization-secret
          secret:
            secretName: monetization-secret
        # Mount the volumes
        extraVolumeMount:
        - name: monetization-config
          mountPath: /etc/monetization/storage-config
          readOnly: true
        - name: monetization-secret
          mountPath: /etc/monetization/secret
          readOnly: true
        # Set this env to enable monetization
        customEnv:
        - name: MONETIZATION_ENABLED
          value: "true"
gloo:
  gatewayProxies:
    gatewayProxy:
      gatewaySettings:
        # Configure envoy to stream access logs to the "extauth" cluster
        accessLoggingService:
          accessLog:
          - grpcService:
              logName: "monetization-log"
              staticClusterName: "extauth"
      # Access log clusters need to be static, so let's add "extauth" as a static cluster
      envoyStaticClusters:
      - name: extauth # we use the extauth server as an access log service to enable monetization
        connect_timeout: 5.000s
        type: STRICT_DNS
        typed_extension_protocol_options:
          envoy.extensions.upstreams.http.v3.HttpProtocolOptions:
            "@type": type.googleapis.com/envoy.extensions.upstreams.http.v3.HttpProtocolOptions
            # Explicitly require HTTP/2
            explicit_http_config:
              http2_protocol_options: { }
        lb_policy: ROUND_ROBIN
        load_assignment:
          cluster_name: extauth
          endpoints:
          - lb_endpoints:
            - endpoint:
                address:
                  socket_address:
                    address: extauth.gloo-system.svc.cluster.local
                    port_value: 8083
EOF
If you have installed Gloo Edge using custom Helm values, you should provide those above values in addition to the ones above.
We can now update our Gloo Edge deployment with the above values to enable the recording of usage data.
Assuming that Gloo Edge Enterprise is installed as a Helm release named gloo, you can submit the following command:
helm upgrade -n gloo-system gloo glooe/gloo-ee --values=glooe-monetization-values.yaml --set license_key=$GLOO_LICENSE_KEY
Where GLOO_LICENSE_KEY is your Gloo Edge Enterprise license key.
At this point, requests we make to the gateway should result in rows written in our postgres database. To observe this, let's send some requests through our gateway:
The command below assumes the example configuration described in part 1 of the Getting Started Guide.
curl "http://${INGRESS_HOST}:${INGRESS_PORT}/api/pets" -H "Host: api.example.com"
[
  {
    "id": 1,
    "name": "Dog",
    "status": "available"
  },
  {
    "id": 2,
    "name": "Cat",
    "status": "pending"
  }
]
Now we should have a row in the requests table in our postgres database, using the password we specified earlier:
kubectl exec -it -n gloo-system postgres-postgresql-0 -- psql -U postgres-user -d postgres-db --password -c 'select * from requests;'
 id | user_id |   route   |           api_product           |         environment         | status |          request_ts           | method |              request_id
----+---------+-----------+---------------------------------+-----------------------------+--------+-------------------------------+--------+--------------------------------------
  1 |         | /api/pets | petstore-product.dev-portal | test-environment.dev-portal |    200 | 2021-06-28 21:10:00.998876+00 | GET    | c7493fdb-f642-43eb-b291-8e3f6784567a
(1 row)
user_id will only be populated for authenticated requests.
Display usage graph in Gloo Portal Admin Dashboard
API usage data can be viewed as a graph in the Gloo Portal Admin Dashboard. To enable this feature we need to update our Gloo Portal installation with the following values:
cat << EOF > gloo-values.yaml
# Values from the setup guide of the docs
glooEdge:
  enabled: true
licenseKey:
  secretRef:
    name: license
    namespace: gloo-system
    key: license-key
# Monetization configuration values
monetization:
  enabled: true
  configMapName: monetization-config
  secretName: monetization-secret
EOF
helm upgrade gloo-portal gloo-portal/gloo-portal -n gloo-system --values gloo-values.yaml
We can verify that this was successful by checking that the gloo-portal-admin-server pod has restarted:
$ kubectl get -n gloo-system pods
NAME                                        READY   STATUS    RESTARTS   AGE
...
gloo-portal-admin-server-7fb78c4d59-jjfm8   3/3     Running   0          10s
...
After the upgrade completes successfully, you should be able to visualize the API usage data by opening the Admin Dashboard in a browser and navigating to the “API Usage” tab.
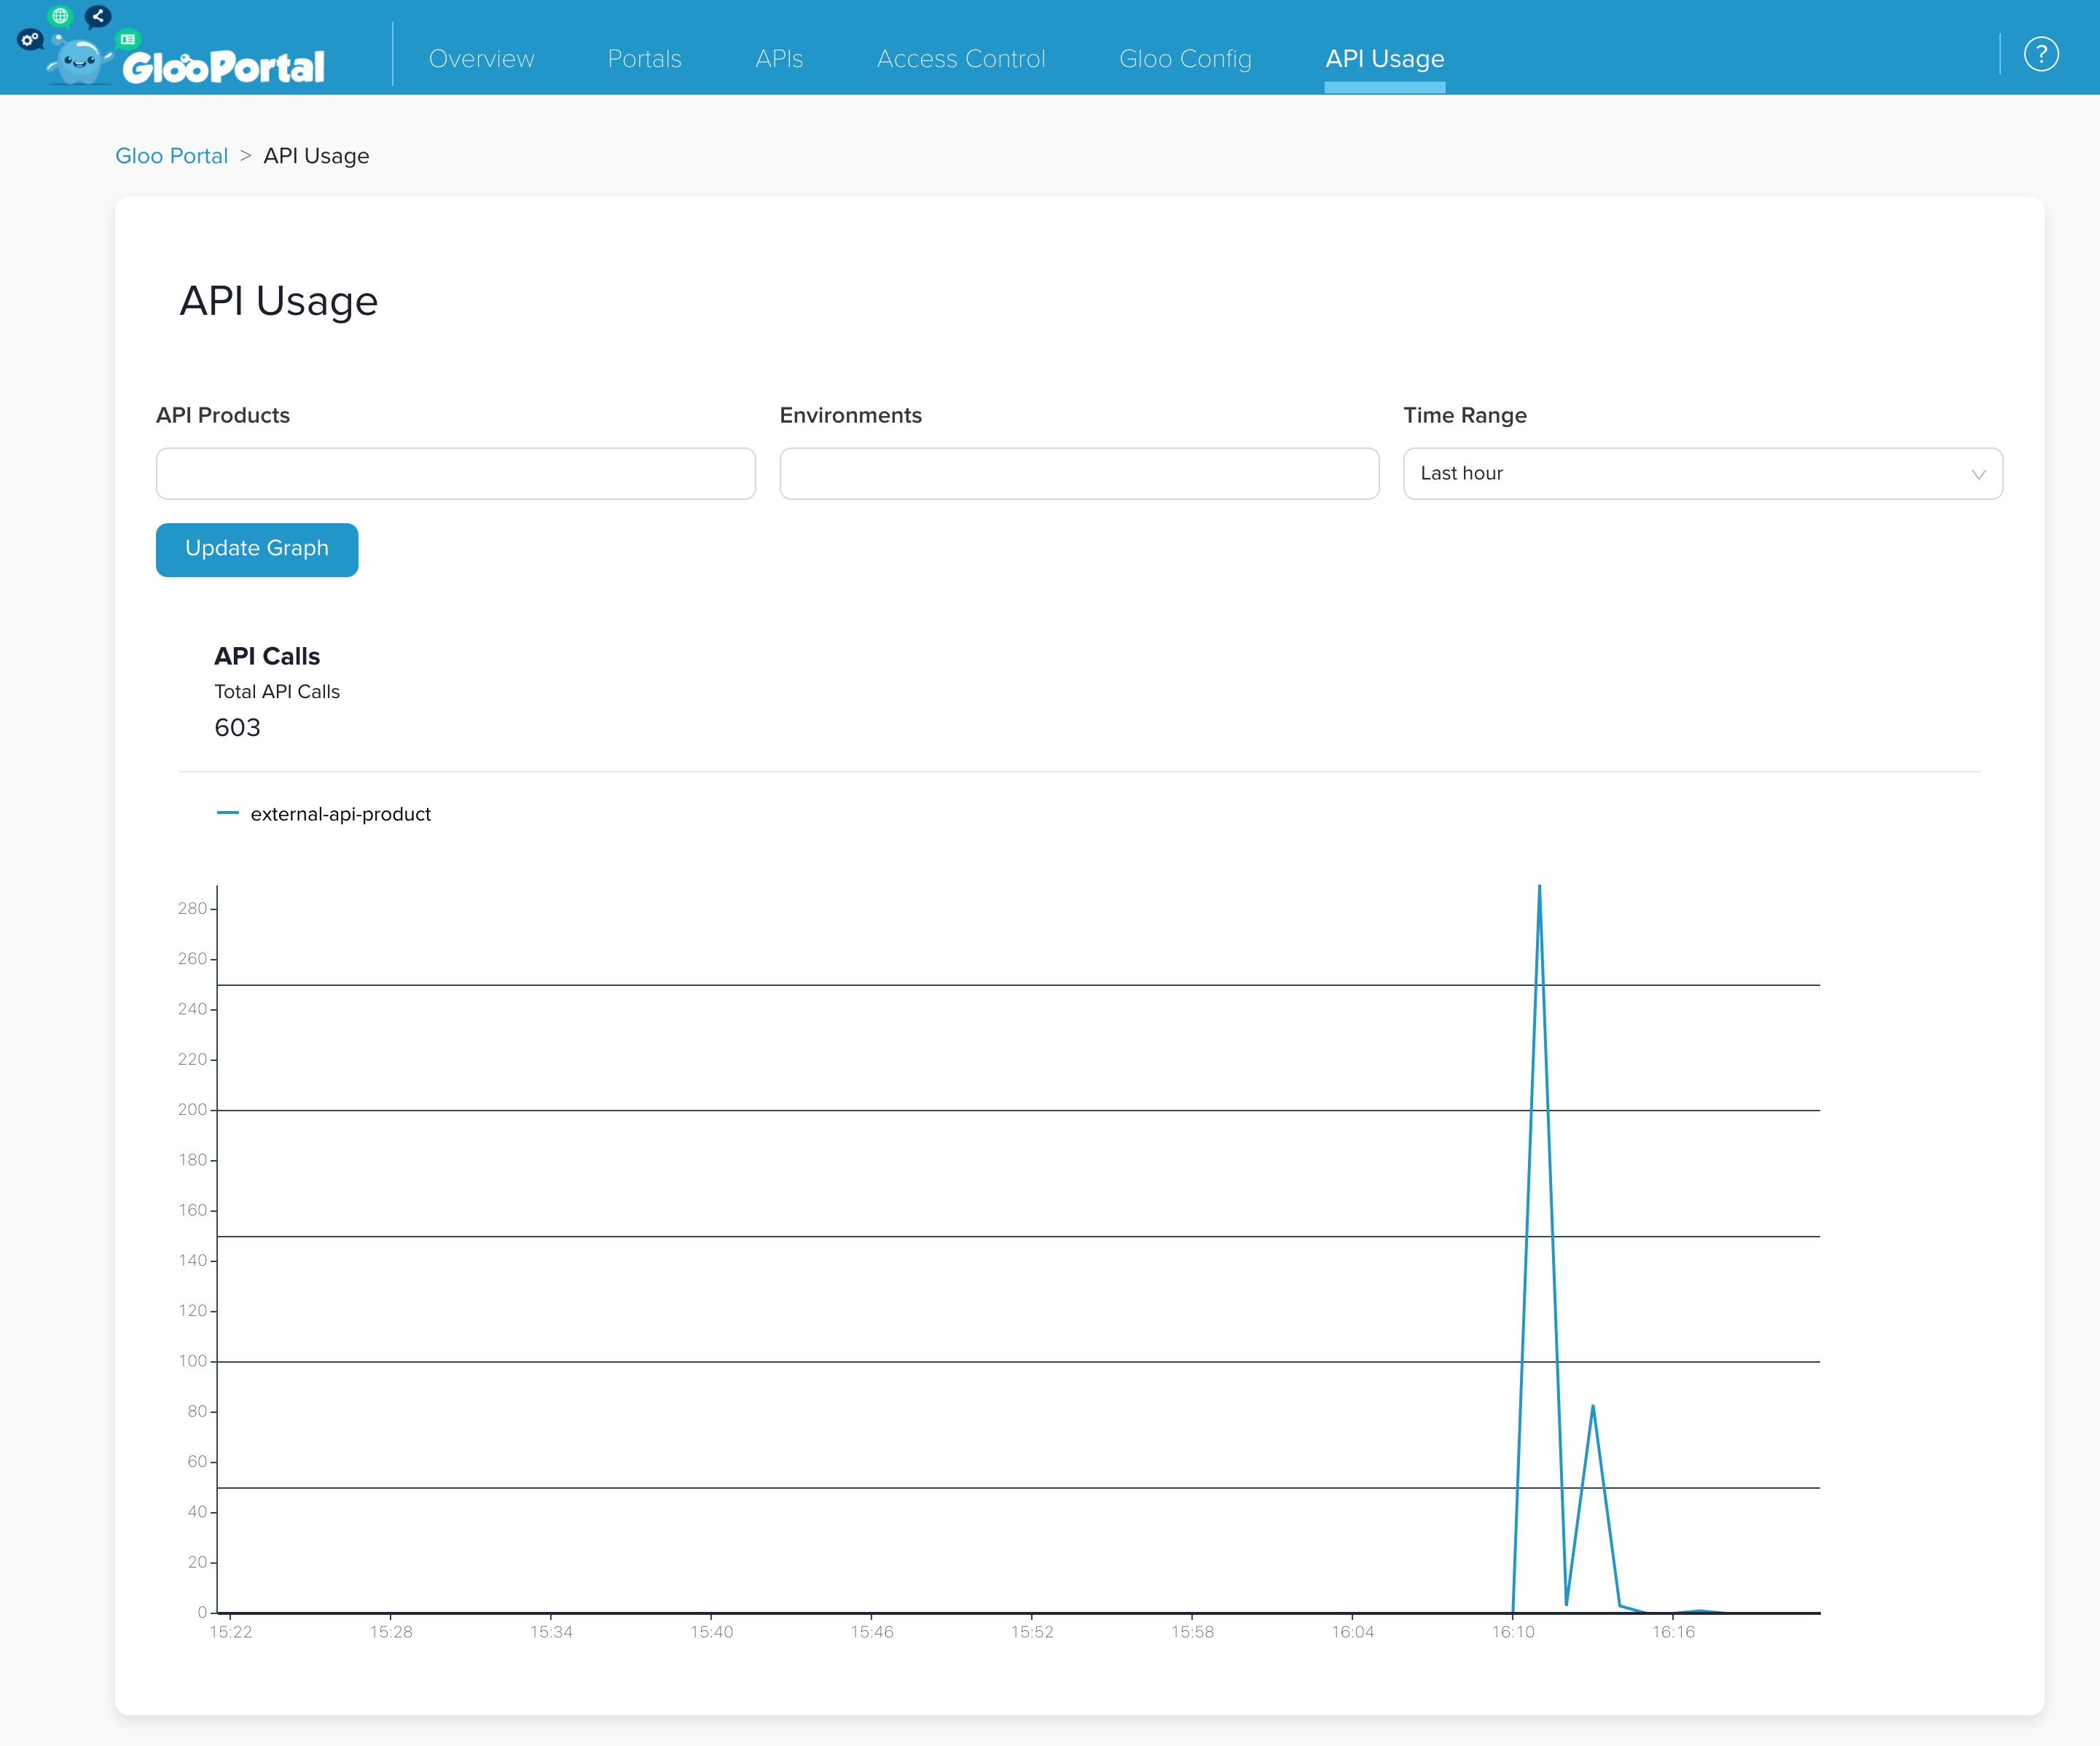
This screenshot reflects more, and different, test data than we've generated in this guide