Set up external auth
Set up authentication and authorization (AuthN/AuthZ) for the Admin UI by using OpenID Connect (OIDC) and Kubernetes role-based access control (RBAC).
About external authentication
The Admin UI runs as a deployment in the gloo-portal namespace. By default, anyone with access to the gloo-portal namespace can use the Admin UI.
The Admin UI server has its own external auth service built in. This way, you can manage external auth for the Admin UI separately from the external auth that you set up for your application networking policies, such as in Gloo Edge or Gloo Gateway. Keep in mind that the authentication is enforced at the UI-level only.
To control who can use the Admin UI, you can set up OIDC authentication. The Admin UI supports OIDC authentication from common identity providers (IdPs) such as Google, Okta, and Auth0. You configure OIDC authentication in the AdminUiSettings Gloo Portal resource. Gloo Portal uses only one Admin UI settings resource with one IdP at a time. If you create multiple settings resources, you might experience an error.
The following clip shows two different user views of the Admin UI. The different identity providers are for example scenarios. Keep in mind that you configure only one IdP at a time in Gloo Portal, and use Kubernetes RBAC to control permissions.
- In the first example, Gloo Portal is set up for local authentication with Dex, such as for testing purposes. The user has no RBAC permissions and can view only the overview page.
- In the second example, Gloo Portal is set up for external authentication with Google, in more of a production scenario. The user has admin RBAC permissions and can view all the Gloo Portal features.
For more information, see the following resources:
Example setup with Google
You can use a Google account to log in to the Admin UI. First, you set up your OAuth app and credentials in Google. Then, you use those credentials to configure Google as the external auth provider for the Admin UI.
- Set up OAuth in Google
- Configure the Admin UI settings for authentication
- Set up authorization with RBAC
Step 1: Set up OAuth in Google
Set up Google to accept external auth requests from the Admin UI. You get credentials that you can use to set up Google as an identity provider (IdP) in the Admin UI.
- Log in to the Google Developer Console.
- Optional: For first-time users, or to separate your resources from others in your cloud, create a project.
- Configure your OAuth consent screen details. If you have an existing consent screen that you want to use, skip to the next step.
- From the menu, click OAuth consent screen.
- Select the Internal user type, and click Create.
- From the OAuth consent screen tab, enter the details of your app.
- In the App information section, enter a name and email for your app.
- You can skip the App domain and Authorized domain sections.
- In the Developer contact information section, enter your email.
- Click Save and continue.
- Optional: From the Scopes tab, you can restrict permissions to particular APIs in your app. For testing purposes, you can skip this section. Click Save and continue.
- Review the summary and click Back to dashboard.
- Create the credentials to use Google as an OAuth client.
- From the menu, click Credentials.
- From the Credentials menu bar, click + Create credentials, and then OAuth client ID.
- From the Application type dropdown, select Web application. You can optionally rename the client.
- In the Authorized redirect URIs section, click + Add URI.
- Enter the URL for users to access the Admin UI. For example, if you expose the UI locally, enter
http://localhost:8080/oidc-callback. - Click Create.
- Store the Client ID and Client secret values as environment variables. You can also download the client information as a JSON file.
export CLIENT_ID=<client-id>
export CLIENT_SECRET=<client-secret>
Step 2: Configure the Admin UI settings for authentication
Configure the Admin UI to use Google authentication.
-
Create a Kubernetes secret with the client secret from your Google credentials. Note that the client secret value is base64-encoded.
kubectl apply -f - <<EOF apiVersion: v1 kind: Secret type: Opaque metadata: name: admin-ui-oidc namespace: gloo-portal data: oidc-client-secret: $(echo -n ${CLIENT_SECRET} | base64) EOF -
Create an
AdminUiSettingscustom resource. Remember, Gloo Portal uses only one Admin UI settings resource at a time. If you create multiple settings resources, you might experience an error.kubectl apply -f - <<EOF apiVersion: portal.gloo.solo.io/v1beta1 kind: AdminUiSettings metadata: name: admin-ui-oidc namespace: gloo-portal spec: authn: oidc: appUrl: http://localhost:8080/ clientId: ${CLIENT_ID} clientSecretRef: name: admin-ui-oidc namespace: gloo-portal issuerUrl: https://accounts.google.com EOFReview the following table to understand this configuration. For more information, see the API reference.
Setting Description namespaceCreate the Admin UI settings in the same namespace as the Admin UI deployment ( gloo-portal).authn.oidcConfigure the details to set up authentication via an OIDC provider, in this case Google. appURLThe URL to send the user to after successful authentication. If you exposed the Admin UI externally such as with a Kubernetes load balancer, use that URL. For users that access the Admin UI locally, use the local host: http://localhost:8080/clientIdThe client ID token that you got when you registered your app with the identity provider. In this example, you set the client ID as an environment variable on your local machine in the previous section. clientSecretRefThe name and namespace of the Kubernetes secret that has the client secret that you got when you registered your app with the identity provider. The secret must exist on the same cluster as the Admin UI deployment. In this example, you created the secret in the previous step. issuerUrlThe URL of the OpenID Connect identity provider. Gloo Portal automatically discovers the OIDC configuration by querying the .well-known/openid-configurationendpoint on theissuer_url. In this example, Gloo Portal expects to find OIDC discovery information athttps://accounts.google.com. -
Check that the Admin UI settings state is Succeeded.
kubectl get adminuisettings -n gloo-portal -o yaml -
Test that the Admin UI requires authentication by opening the login URL and clicking Grant Access. This URL matches the Authorized redirect URIs that you configured in your Google credentials, such as http://localhost:8080/.
Not being asked to log in to the Admin UI? Try opening the link in a private browser or clearing your browser cookies.
Step 3: Set up authorization with RBAC
You can modify your Admin UI settings and RBAC resources so that Google can also be used for authorization. For more information, see RBAC for resources for Gloo Portal.
- Update the Admin UI settings to add the
authzoption for RBAC and theauthnuser mapping. Gloo Portal extracts theusernameClaimfrom the Google tokens to map the user to the cluster role binding in RBAC. Make sure that theusernameClaimmatches a claim in the token as requested in thescopes. For more information, see the API reference.kubectl apply -f - <<EOF apiVersion: portal.gloo.solo.io/v1beta1 kind: AdminUiSettings metadata: name: settings namespace: gloo-portal spec: authz: enableRbac: true authn: oidc: userMapping: usernameClaim: "email" appUrl: http://localhost:8080/ clientId: ${CLIENT_ID} clientSecretName: dashboard issuerUrl: https://accounts.google.com scopes: - openid - profile - email EOF - In your cluster, configure RBAC cluster roles for the Gloo Portal resources that you want your user to have. For example, you might add Gloo Portal resources to existing
cluster-admin,edit, andviewcluster roles. The following example role gives only view access to theportalresource.kubectl apply -f - <<EOF apiVersion: rbac.authorization.k8s.io/v1 kind: ClusterRole metadata: labels: test: "true" name: test-auth rules: - apiGroups: - portal.gloo.solo.io resources: - portals verbs: - get - list - watch EOF - Update the cluster role bindings to add the Google account email addresses for the users that you want to give access to.
kubectl apply -f - <<EOF kind: ClusterRoleBinding apiVersion: rbac.authorization.k8s.io/v1 metadata: name: test-auth labels: test: "true" subjects: - kind: User name: <user-email@google-org.com> apiGroup: rbac.authorization.k8s.io roleRef: kind: ClusterRole name: test-auth apiGroup: rbac.authorization.k8s.io EOF - Repeat the previous RBAC steps for each cluster.
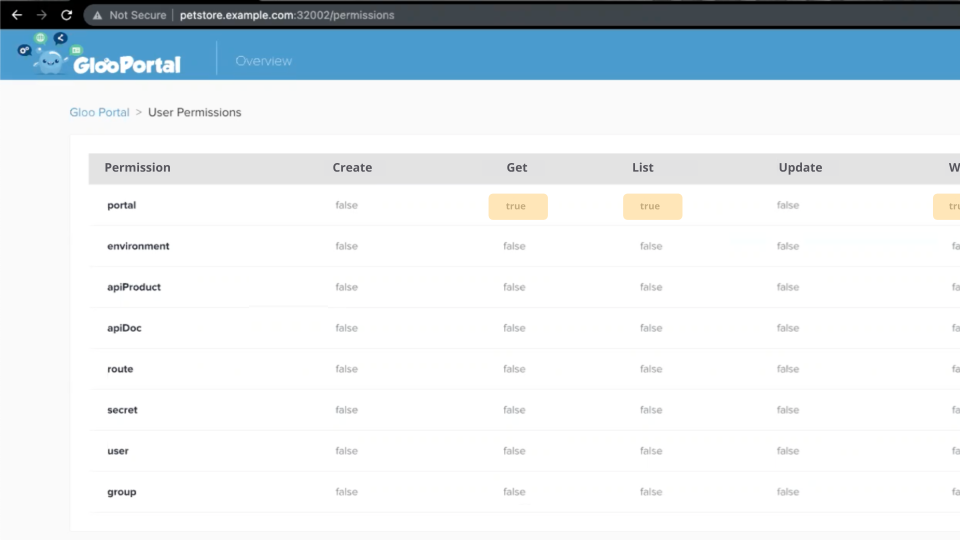
- Ask the user to test the Admin UI authorization by opening the login URL, such as http://localhost:8080/. If prompted, sign in again. The user sees only the resources that are permitted by the RBAC rules. The user can also check the Gloo Portal > User Permissions page (
/permissionURL) in the Admin UI to see a table of allowed actions, as shown in the following image.