gRPC
In this guide you are going to create an API Doc associated with a gRPC service and add it as a new version of an API Product in an Environment. You will then see how you can make requests to your service, leveraging Gloo Edge.
We will do the following:
- Create an API Doc using a gRPC service
- Add the API Doc to an API Product that's included in your Environment and Portal
- Try out a gRPC endpoint using the routing set up by Gloo Edge
- Try out a gRPC endpoint from the Portal UI
Prerequisites
You will need these things in place to follow the guide:
grpcurlkubectl- A compatible Kubernetes cluster setup (1.16 or higher), to which you can connect via
kubectl - The Gloo Edge Enterprise Gateway installed to your cluster, version 1.5.0-beta9 or higher
- The Gloo Portal installed to your cluster. Please refer to the setup guide for detailed installation instructions.
- An API Product, Environment, and Portal configured. Please refer to the Getting Started guide to configure these components. (The third section, Customize your Portal, is not a prerequisite for this guide.)
- A user and group configured to access APIs in the Portal. Please refer to the Users and Groups guide to configure these components.
This guide also assumes that CoreDNS is the default DNS server in your cluster.
Install API Backend
In this guide we'll be using a gRPC service similar to the OpenAPI Example Pet Store as the backend for our API Product version.
To install the gRPC Pet Store to Kubernetes:
cat <<EOF | kubectl apply -f -
apiVersion: apps/v1
kind: Deployment
metadata:
  labels:
    app: petstore-grpc
  name: petstore-grpc
  namespace: default
spec:
  selector:
    matchLabels:
      app: petstore-grpc
  replicas: 1
  template:
    metadata:
      labels:
        app: petstore-grpc
    spec:
      containers:
      - image: quay.io/solo-io/petstore-grpc:0.0.2
        name: petstore-grpc
        ports:
        - containerPort: 8080
          name: grpc
        env:
        - name: SERVER_PORT
          value: "8080"

---

apiVersion: v1
kind: Service
metadata:
  name: petstore-grpc
  namespace: default
  labels:
    service: petstore-grpc
spec:
  selector:
    app: petstore-grpc
  ports:
  - name: grpc
    port: 8080
    protocol: TCP

EOF
kubectl -n default rollout status deployment petstore-grpc
If the installation completed successfully, you should see the output:
deployment "petstore-grpc" successfully rolled out
Create an API Document
The next step in our process is to create an API Document based on the gRPC service defined by the Pet Store application. An API Document includes only the spec for the service and does not include any details on where the service is published or how to route to it.
The Pet Store application implements a reflection endpoint. Let's register this service with the Gloo Portal operator by creating an APIDoc:
cat <<EOF | kubectl apply -f -
apiVersion: portal.gloo.solo.io/v1beta1
kind: APIDoc
metadata:
 name: petstore-grpc-doc
 namespace: default
spec:
 ## specify the type of schema provided in this APIDoc.
 grpc:
   reflectionSource:
     connectionTimeout: 5s
     insecure: true
     serviceAddress: petstore-grpc.default:8080
     # we use a reflection server here to tell the Gloo Portal
     # to fetch the schema contents directly from the petstore service.

EOF
Once the API Doc has been created, we can verify that the Gloo Portal has processed it by checking its status:
kubectl get apidoc -n default petstore-grpc-doc -oyaml
apiVersion: portal.gloo.solo.io/v1beta1
kind: APIDoc
# ...truncated for brevity
spec:
  grpc:
    reflectionSource:
      connectionTimeout: 5s
      insecure: true
      serviceAddress: petstore-grpc.default:8080
status:
  grpc:
    methods:
    - rpcName: ServerReflectionInfo
      rpcType: BIDIRECTIONAL_STREAMING
      serviceName: grpc.reflection.v1alpha.ServerReflection
    - rpcName: ListPets
      rpcType: UNARY
      serviceName: test.solo.io.PetStore
    - rpcName: FindPetById
      rpcType: UNARY
      serviceName: test.solo.io.PetStore
    - rpcName: AddPet
      rpcType: UNARY
      serviceName: test.solo.io.PetStore
    - rpcName: DeletePet
      rpcType: UNARY
      serviceName: test.solo.io.PetStore
    - rpcName: WatchPets
      rpcType: SERVER_STREAMING
      serviceName: test.solo.io.PetStore
  observedGeneration: 1
  state: Succeeded
When we see the Doc in a Succeeded state, it means its methods can now be published as an API Product.
You can also reference your gRPC service using a dataSource that specifies a protoset file.
You can also create an API Doc by using the Admin Dashboard.
Add our API Doc to an API Product
In the Getting Started guide, you created an API Product. Let's add a version to that API Product including all methods from the new Pet Store API Doc we just created.
Apply the API Product to the cluster:
For Gloo Edge Enterprise, the preferred way of configuring a routing destination is to use an
Upstream.
If you have Upstream Discovery
configured in Gloo Edge, then you should already have an Upstream for the petstore-grpc service.
If not, we can easily create one:
cat << EOF | kubectl apply -f -
apiVersion: gloo.solo.io/v1
kind: Upstream
metadata:
  name: default-petstore-grpc-8080
  namespace: gloo-system
spec:
  useHttp2: true
  kube:
    serviceName: petstore-grpc
    serviceNamespace: default
    servicePort: 8080
EOF
This assumes that you have installed Gloo Edge Enterprise to the gloo-system namespace, or that the namespace is
watched by Gloo Edge. You should adapt the above configuration if that is not the case.
Now we can create our APIProduct and use the Upstream as a backend for out route:
cat << EOF | kubectl apply -f -
apiVersion: portal.gloo.solo.io/v1beta1
kind: APIProduct
metadata:
  name: petstore-product
  namespace: default
  labels:
    app: petstore
spec:
  displayInfo:
    description: Petstore Product
    title: Petstore Product
  versions:
  - name: v1
    apis:
    - apiDoc:
        name: petstore-schema
        namespace: default
    gatewayConfig:
      route:
        inlineRoute:
          backends:
          - upstream:
              name: default-petstore-8080
              namespace: gloo-system
    tags:
      stable: {}
  - name: v2
    apis:
    - apiDoc:
        name: petstore-grpc-doc
        namespace: default
    gatewayConfig:
      route:
        inlineRoute:
          backends:
          - upstream:
              name: default-petstore-grpc-8080
              namespace: gloo-system
    tags:
      stable: {}
EOF
If you are integrating Gloo Portal with Istio directly, the simplest way of configuring a route is to just reference the Kubernetes service you want to send traffic to.
cat << EOF | kubectl apply -f -
apiVersion: portal.gloo.solo.io/v1beta1
kind: APIProduct
metadata:
  name: petstore-product
  namespace: default
  labels:
    app: petstore
spec:
  displayInfo:
    description: Petstore Product
    title: Petstore Product
  versions:
  - name: v1
    apis:
    - apiDoc:
        name: petstore-schema
        namespace: default
    gatewayConfig:
      route:
        inlineRoute:
          backends:
          - kube:
              name: petstore
              namespace: default
              port: 8080
    tags:
      stable: {}
  - name: v2
    apis:
    - apiDoc:
        name: petstore-grpc-doc
        namespace: default
    gatewayConfig:
      route:
        inlineRoute:
          backends:
          - kube:
              name: petstore-grpc
              namespace: default
              port: 8080
    tags:
      stable: {}
EOF
We can verify that our product was accepted into the system by checking its status.state:
kubectl get apiproducts.portal.gloo.solo.io -n default petstore-product -ojsonpath='{.status.state}'
The command should result in an output of Succeeded once the product has been updated.
The complete status of an API Product gives detailed information. You can view the complete status and confirm that the new version is present by running:
kubectl get apiproducts.portal.gloo.solo.io -n default petstore-product -oyaml
Add our new API Product Version to an Environment
The final piece of the puzzle is to include our new API Product version in the Environment.
If you followed the first part of the Getting Started guide
the new API Product version should have been automatically included in the dev Environment, since we added the stable
tag which is matched by the API Product selector defined on the Environment.
We can confirm this by checking the status of our Environment by running the following command:
kubectl get environment -n default dev -oyaml
The status should show information about the new API Product version:
status:
  apiProducts:
  - name: petstore-product
    namespace: default
    usagePlans:
    - basic
    versions:
      v1: {} # omitted for brevity
      v2:
        apiType: GRPC
        routes:
        - isGrpc: true
          method: POST
          operationId: petstore-product.default.petstore-grpc-doc.default.grpc.reflection.v1alpha.ServerReflection.ServerReflectionInfo
          path: /grpc.reflection.v1alpha.ServerReflection/ServerReflectionInfo
          route:
            backends:
            - kube:
                name: petstore-grpc
                namespace: default
                port: 8080
        # ...
We can now take a look at the Route Table which corresponds to v2 of our petstore-product in the dev Environment:
kubectl get routetables.gateway.solo.io dev.petstore-product.v2 -oyaml
apiVersion: gateway.solo.io/v1
kind: RouteTable
metadata:
  labels:
    apiproducts.portal.gloo.solo.io: petstore-product.default
    apiproducts.portal.gloo.solo.io/version: v2
    environments.portal.gloo.solo.io: dev.default
  name: dev.petstore-product.v2
  namespace: default
spec:
  routes:
  - matchers:
    - exact: /grpc.reflection.v1alpha.ServerReflection/ServerReflectionInfo
      methods:
      - POST
      - OPTIONS
    name: petstore-product.default.petstore-grpc-doc.default.grpc.reflection.v1alpha.ServerReflection.ServerReflectionInfo
    routeAction:
      multi:
        destinations:
        - destination:
            kube:
              port: 8080
              ref:
                name: petstore-grpc
                namespace: default
          weight: 1
  - matchers:
    - exact: /test.solo.io.PetStore/AddPet
      methods:
      - POST
      - OPTIONS
    name: petstore-product.default.petstore-grpc-doc.default.test.solo.io.PetStore.AddPet
    routeAction:
      multi:
        destinations:
        - destination:
            kube:
              port: 8080
              ref:
                name: petstore-grpc
                namespace: default
          weight: 1
  - matchers:
    - exact: /test.solo.io.PetStore/DeletePet
      methods:
      - POST
      - OPTIONS
    name: petstore-product.default.petstore-grpc-doc.default.test.solo.io.PetStore.DeletePet
    routeAction:
      multi:
        destinations:
        - destination:
            kube:
              port: 8080
              ref:
                name: petstore-grpc
                namespace: default
          weight: 1
  - matchers:
    - exact: /test.solo.io.PetStore/FindPetById
      methods:
      - POST
      - OPTIONS
    name: petstore-product.default.petstore-grpc-doc.default.test.solo.io.PetStore.FindPetById
    routeAction:
      multi:
        destinations:
        - destination:
            kube:
              port: 8080
              ref:
                name: petstore-grpc
                namespace: default
          weight: 1
  - matchers:
    - exact: /test.solo.io.PetStore/ListPets
      methods:
      - POST
      - OPTIONS
    name: petstore-product.default.petstore-grpc-doc.default.test.solo.io.PetStore.ListPets
    routeAction:
      multi:
        destinations:
        - destination:
            kube:
              port: 8080
              ref:
                name: petstore-grpc
                namespace: default
          weight: 1
  - matchers:
    - exact: /test.solo.io.PetStore/WatchPets
      methods:
      - POST
      - OPTIONS
    name: petstore-product.default.petstore-grpc-doc.default.test.solo.io.PetStore.WatchPets
    routeAction:
      multi:
        destinations:
        - destination:
            kube:
              port: 8080
              ref:
                name: petstore-grpc
                namespace: default
          weight: 1
status:
  reportedBy: gateway
  state: 1
  subresourceStatuses:
    '*v1.Proxy.gloo-portal.gateway-proxy':
      reportedBy: gloo
      state: 1
It specifies a route corresponding to each of the gRPC methods from v2 of our API Product.
Test our API using gRPCurl
Now that we have added v2 of our API Product to an Environment, we should be able to make client requests to the gRPC service.
Let's get the address of the Gateway, if you didn't already set these in the Getting Started guide. Choose the option corresponding to your Ingress Service Type:
- Gloo Edge - External Load Balancer
- Gloo Edge - Docker for Desktop / Node port
- Gloo Edge - Kind Cluster with Node Port
export INGRESS_HOST=$(kubectl -n gloo-system get service gateway-proxy -o jsonpath='{.status.loadBalancer.ingress[0].ip}')
export INGRESS_PORT=$(kubectl -n gloo-system get service gateway-proxy -o jsonpath='{.spec.ports[?(@.name=="http")].port}')
export INGRESS_HOST=$(kubectl get po -l gloo=gateway-proxy -n gloo-system -o jsonpath='{.items[0].status.hostIP}')
export INGRESS_PORT=$(kubectl -n gloo-system get service gateway-proxy -o jsonpath='{.spec.ports[?(@.name=="http")].nodePort}')
export INGRESS_HOST=127.0.0.1
export INGRESS_PORT=$(kubectl -n gloo-system get service gateway-proxy -o jsonpath='{.spec.ports[?(@.name=="http")].nodePort}')
With the Ingress address, we can now try to call one of our published operations. You'll need to use the API Key you generated for your user:
grpcurl -plaintext -H "api-key: {your-api-key}" -authority api.example.com ${INGRESS_HOST}:${INGRESS_PORT} test.solo.io.PetStore/ListPets
We should see the output:
{
  "pets": [
    {
      "id": "1",
      "name": "Dog",
      "tags": [
        "puppy"
      ]
    },
    {
      "id": "2",
      "name": "Cat"
    }
  ]
}
Great! We've just seen how the Gloo Portal can publish a gRPC API on Gloo Edge without you needing to directly configure those resources. Let's now see how to expose our APIs to developers using the Portal resource.
Testing the gRPC service from the Portal
Let's take a look at the Portal you created in the Getting Started guide.
kubectl get portal -n default petstore-portal -oyaml
apiVersion: portal.gloo.solo.io/v1beta1
kind: Portal
# ...
status:
  observedGeneration: 1
  publishedEnvironments:
  - apiProducts:
    - name: petstore-product
      namespace: default
    name: dev
    namespace: default
  state: Succeeded
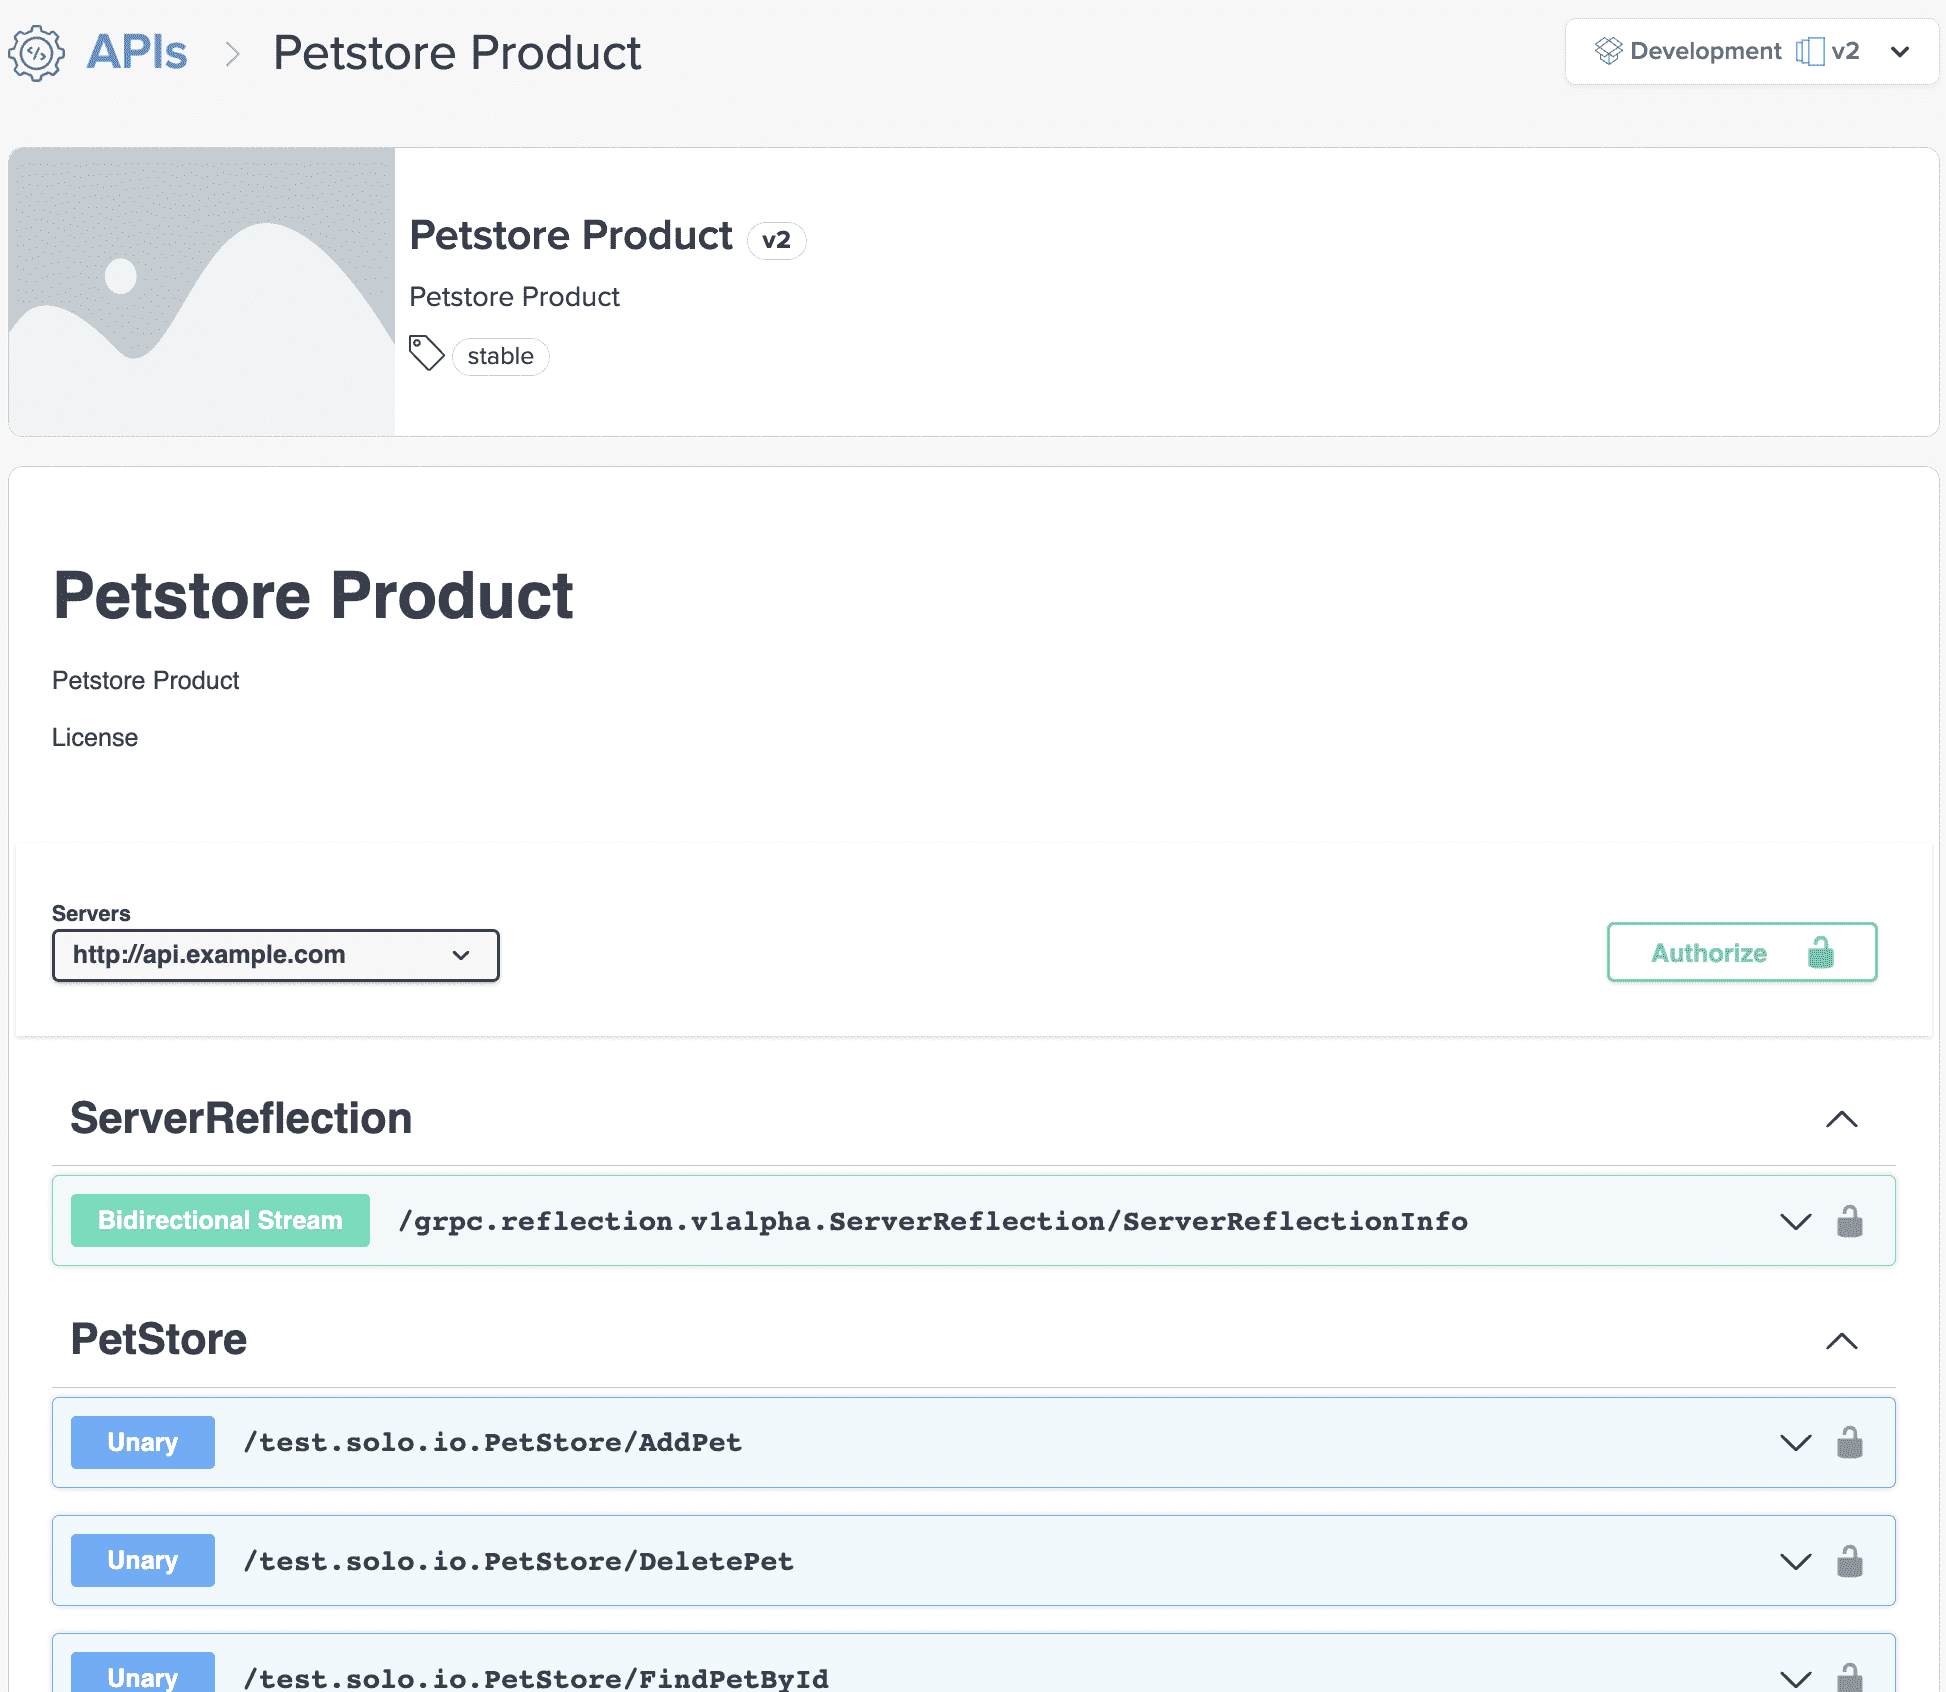
Since it already contains the entire API Product with our gRPC service, it's already configured to display the gRPC methods in the UI.
Let's take a look at our APIs in the Portal UI in the browser.
open $(echo http://petstore.example.com:${INGRESS_PORT}/apis/)
Click on the gRPC version of your API to view the methods.
It should look something like this:
“Try it out” won't yet work for this guide because Kubernetes does not know how to resolve the api.example.com host name.
To get it working, we'll modify the default DNS setup by editing the CoreDNS ConfigMap such that requests sent to api.example.com will be rerouted to our gateway:
cat << EOF | kubectl apply -f -
apiVersion: v1
kind: ConfigMap
metadata:
  name: coredns
  namespace: kube-system
data:
  Corefile: |
    .:53 {
        errors
        health {
           lameduck 5s
        }
        ready
        kubernetes cluster.local in-addr.arpa ip6.arpa {
           pods insecure
           fallthrough in-addr.arpa ip6.arpa
           ttl 30
        }
        rewrite name exact api.example.com gateway-proxy.gloo-system.svc.cluster.local
        prometheus :9153
        forward . /etc/resolv.conf
        cache 30
        loop
        reload
        loadbalance
    }
EOF
Note that you may have to wait about 30 seconds for the DNS setup to refresh, due to caching.
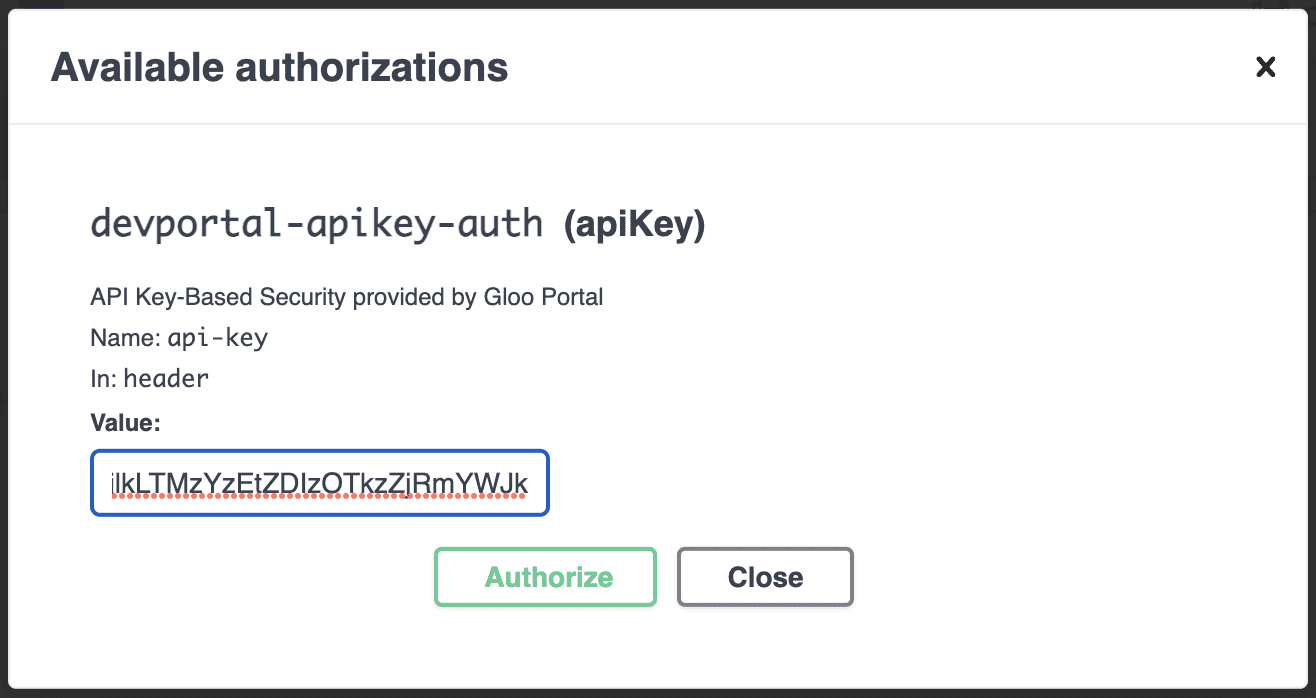
While we're waiting, since we have an API Key, we are first going to click on Authorize to add that key to the test commands, as we did in the Users and Groups guide.
In the Available Authorizations pop-up, enter the API Key you generated for your user and click Authorize.
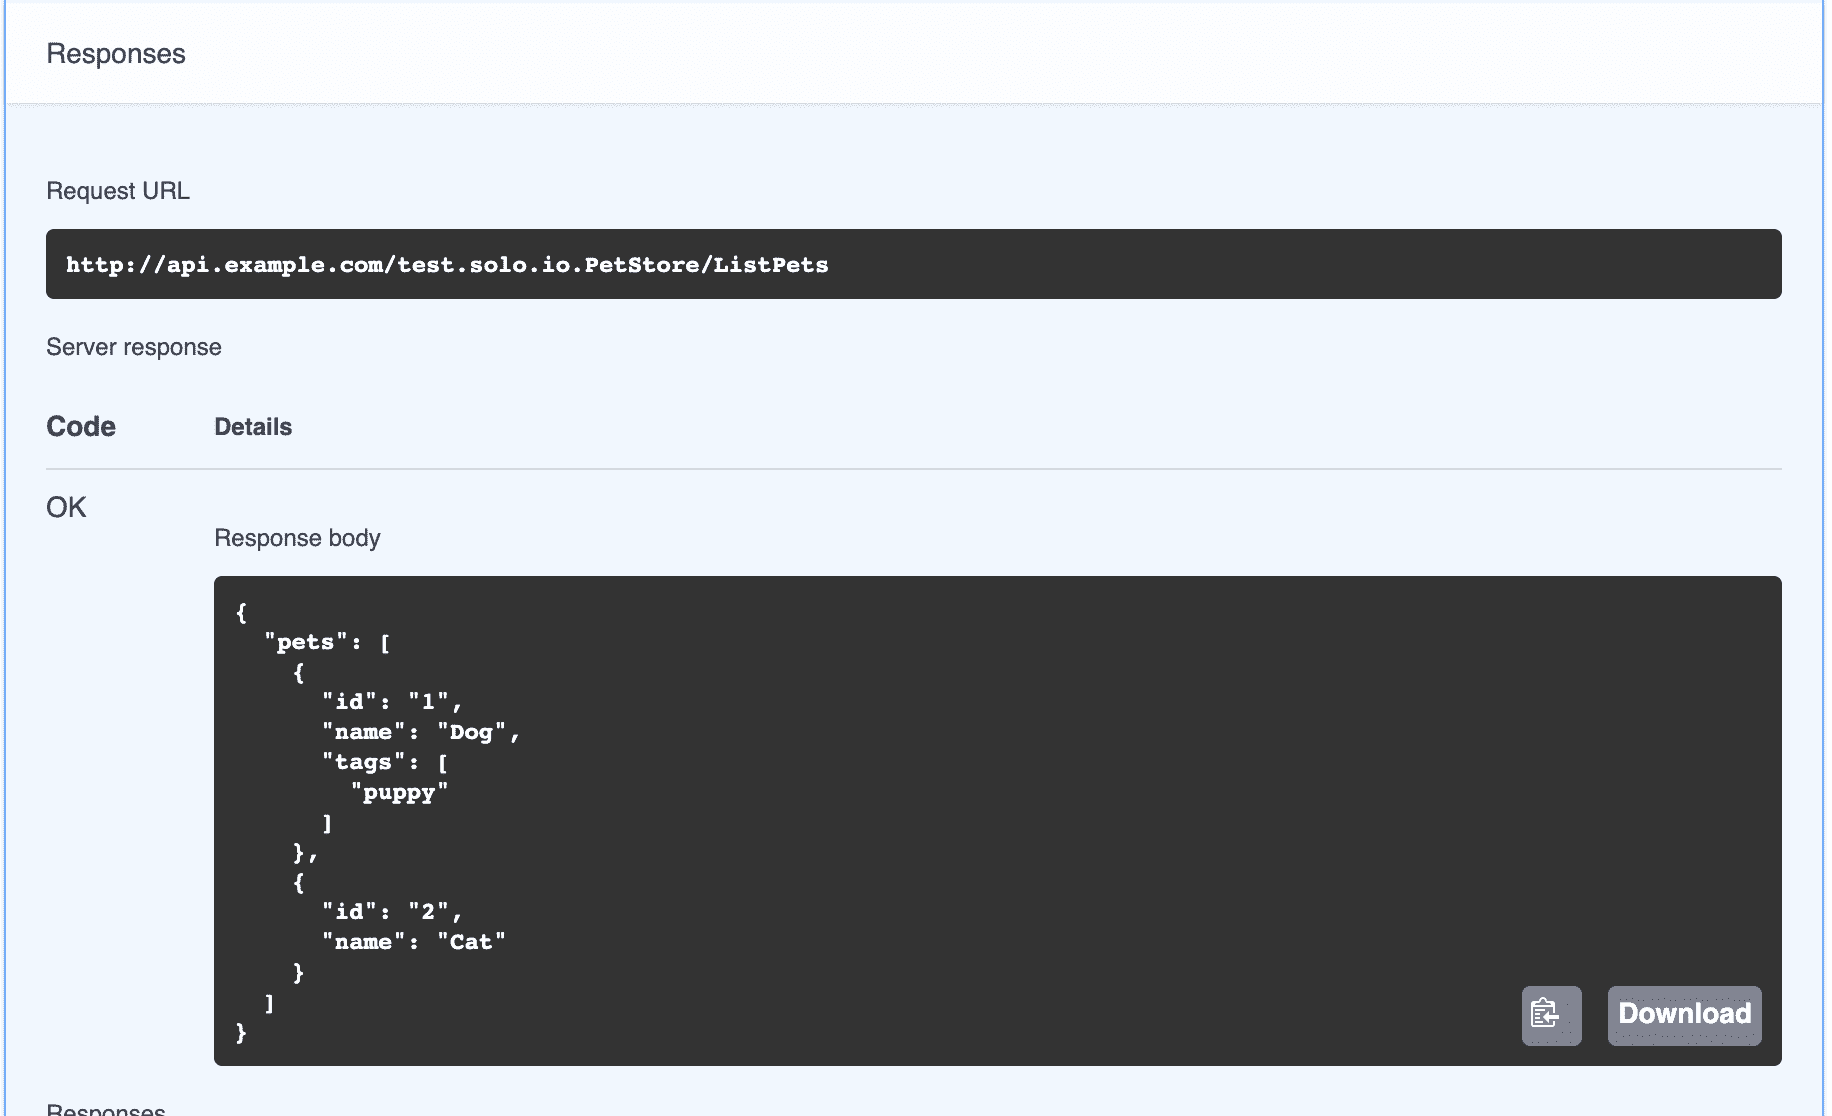
Now we are ready to test the API commands with an authorized key. Expand the Unary /test.solo.io.PetStore/ListPets method and click on the Try it out button in the top right corner and then on Execute below.
You should see something like this:
Congratulations! Your gRPC service is ready to use with Gloo Portal!
Next steps
Please see the guides section for guides on using more advanced features of the Gloo Portal.
Questions
For any questions using the Gloo Portal, please visit the Solo.io slack channel at https://slack.solo.io.
If you'd like to report an issue or bug, please see the Gloo Portal Issues Repository on GitHub.