Use OIDC for multiple API products
Let users authenticate once with an OpenID Connect (OIDC) identity provider (IdP) for access to multiple API products. This guide uses Okta as an example, but you can adapt the steps to your OIDC provider.
In the OIDC provider, you configure an app with credentials that you give the Gloo external auth service to handle the OAuth flow for you. As part of this configuration, you create a custom scope with the API product ID of each product. This way, the IdP returns an access token with the scope for all the API product IDs that you want to grant access to. Gloo uses the API product ID scope to validate and grant access to an individual API product.
You configure the API product ID when you bundle your APIs together in a Gloo route table. To protect your APIs, you can also label the route table so that you can apply an external auth policy to it. The external auth policy includes the details for how to retrieve the access token from the IdP, as well as rules for allowing or denying requests. In this guide, you write an Open Policy Agent (OPA) policy to check the API product IDs in a JWT access token.
For more information about this type of external auth, see OIDC and OAuth.
Before you begin
- Install Gloo Platform Portal.
- Create your APIs, including the Gloo ApiDocs that describe the stitched schema.
- Bundle your APIs into API products by using a route table.
- Optional: Review the Usage plan overview to understand how the various Gloo custom resources work together to create usage plans for your developer portal.
Step 1: Get your API product details
Get the route labels and API product IDs to configure your OIDC provider.
-
Get the labels of your routes that you can use to apply policies to, such as with the example query.
kubectl get rt -n gloo-mesh-gateways -o=jsonpath='{range .items[*]}[{.metadata.name}, {.spec.http[*].name}, {.spec.http[*].labels}]{"\n"}{end}'Example output:
- The
api-example-com-rtroute table does not have any route-level labels. To apply policies, you must add labels to the routes. - The
petstore-rtroute table has ausagePlans: dev-portallabel on itspets-api,users-api, andstore-apiroutes. You can use this label to apply policies to the route, or create another label on the route, such asoauth: true. - The
tracks-rtroute table has ausagePlans: dev-portallabel on itstracks-apiroute. You can use this label to apply policies to the route, or create another label on the route, such asoauth: true.
[api-example-com-rt, , ] [petstore-rt, pets-api users-api store-api, {"usagePlans":"dev-portal"} {"usagePlans":"dev-portal"} {"usagePlans":"dev-portal"} ] [tracks-rt, tracks-api, {"usagePlans":"dev-portal"}] - The
-
Get each API product ID that you want to enforce authentication to. The API product ID is set in the route table's
portalMetadata.apiProductIdfield. In the following example, you get thepetstoreandtracksAPI product IDs.Some IdPs such as AWS Cognito require that the API product ID for the scopes in the IdP-provided token include the URI of the resource server. For example, if your API is exposed on
http://api.example.com/, then the API product ID must have this value, such ashttp://api.example.com/tracks. If you use AWS Cognito, updateapiProductIdin the route table metadata.kubectl get rt -n gloo-mesh-gateways -o=jsonpath='{range .items[*]}[{.metadata.name}, {.spec.portalMetadata.apiProductId}]{"\n"}{end}'- The
api-example-com-rtroute table does not have an API product ID. This route table is used to set theapi.example.comhost domain and delegates its routes to thepetstore-rtandtracks-rtroute tables that represent your API products. - The
petstore-rtroute table has thepetstoreAPI product ID. - The
tracks-rtroute table has thetracksAPI product ID.
[api-example-com-rt, ] [petstore-rt, petstore] [tracks-rt, tracks] - The
Step 2: Configure the OIDC provider
Configure the OIDC provider that you use for the OAuth external authentication policy. The steps vary depending on the OIDC provider. The following example includes steps for Okta. For other providers, see OIDC and OAuth.
-
Follow Step 2: Set up an Okta OIDC app in the Okta authorization code guide. You get details such as the
CLIENT_IDandCLIENT_SECRETthat you need to get a test access token later. -
Follow Step 3: Configure other Okta account details in the Okta access token guide. You get details such as the
TOKEN_ENDPOINTandCERT_KEYSthat you use to configure external auth policies and test access later. -
From the Okta navigation menu, click Security > API.
-
Click the Authorization Server that you want to use, such as
default. -
From the Scopes tab, click Add Scope.
-
Fill out the form to add a scope for the API product that you want to grant access to.
- Name: Enter the host domain with the exact name of the API product ID that you previously retrieved from the
portalMetadata.apiProductIdfield in the route table that you use to expose your APIs, such astracks. Note that if this value does not match the API product ID, authentication fails. Keep in mind that some IdPs such as AWS Cognito require that the API product ID for the scopes in the IdP-provided token include the URI of the resource server. For example, if your API is exposed onhttp://api.example.com/, then both the scope and the API product ID must have this value, such ashttp://api.example.com/tracks. - Display phrase: Especially if your API product ID is not human-friendly, give a descriptive phrase for the API product, such as
Tracks API product. - Description: Optionally enter a description of the API product, such as to note that this scope is to authenticate with multiple API products in your developer portal.
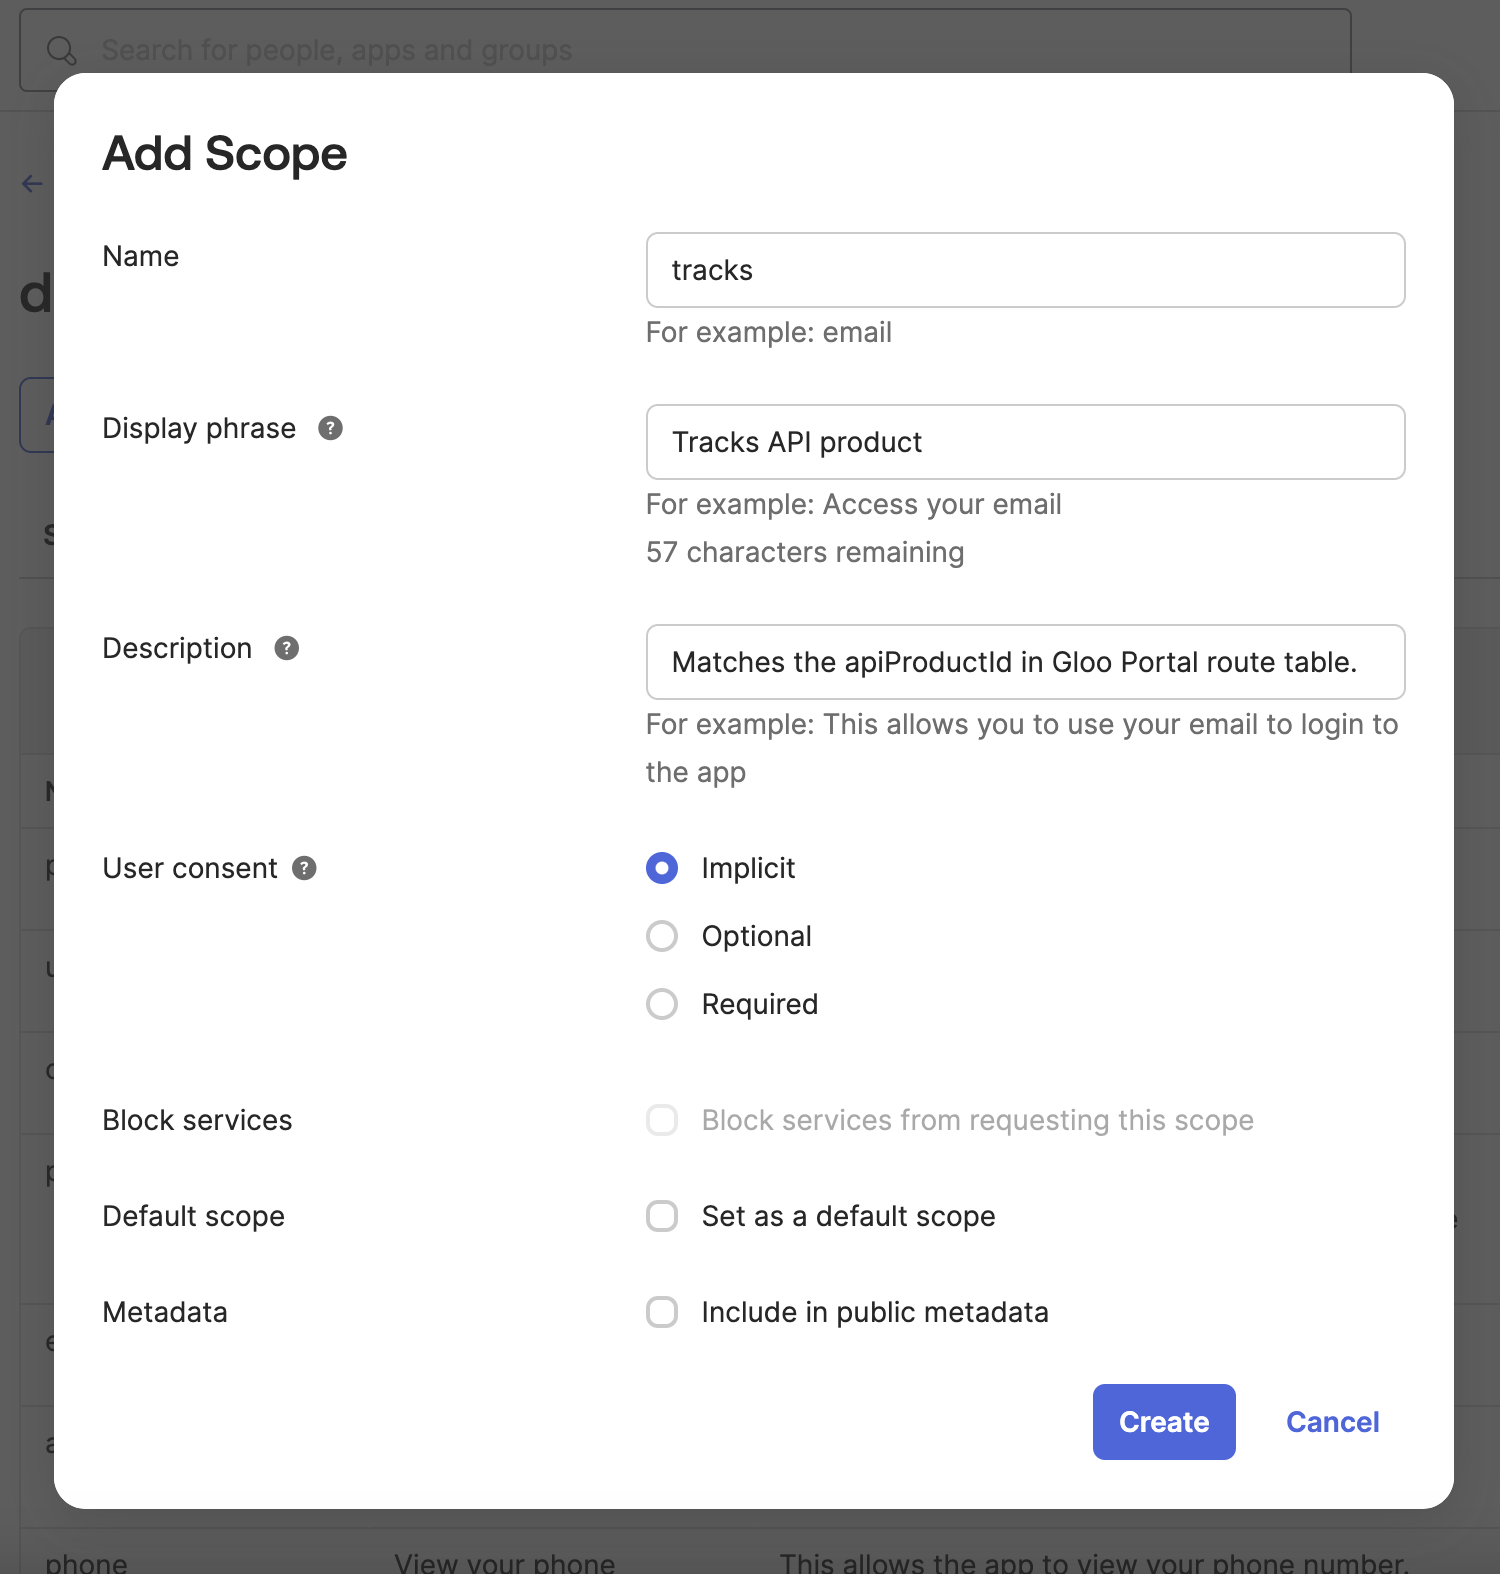
- Name: Enter the host domain with the exact name of the API product ID that you previously retrieved from the
-
Repeat the previous step for each API product that you want to grant access to, such as
petstore.
Step 3: Apply an OAuth external auth policy
Create Rego and OAuth policies to enforce authentication to your API products. The following example uses JWT access token validation. If you want to use a different method of access token validation such as introspection, you must adjust your OPA Rego policy accordingly.
-
Create an OPA Rego policy as a Kubernetes config map in the same cluster where you create the external auth policy. The example Rego policy grants access to API products when the access token from the OIDC provider has a scope that matches the API product ID. For more information about Rego policies, see OPA.
kubectl apply -f - <<EOF apiVersion: v1 kind: ConfigMap metadata: name: oauth-scope-apiproduct-opa-cm namespace: gloo-mesh-addons data: policy.rego: |- package test default allow = false allow { # Get the API product ID of the API product that the # user is trying to access from the request metadata filter_metadata := input.check_request.attributes.metadata_context.filter_metadata apimanagement_metadata := filter_metadata["io.solo.gloo.apimanagement"] api_product_id := apimanagement_metadata["api_product_id"] # Get the scopes from the access token scopes := split(input.state.jwtAccessToken.scope, " ") scope := scopes[_] # Ensure API product ID and scopes are not empty api_product_id != "" scope != "" # Validate that the scope includes the API product ID # of the product that the user is accessing scope == api_product_id } EOF -
Create an external auth server that enforces your extauth policy.
kubectl apply -f - <<EOF apiVersion: admin.gloo.solo.io/v2 kind: ExtAuthServer metadata: name: oauth-okta-server namespace: gloo-mesh-addons spec: destinationServer: ref: cluster: $CLUSTER_NAME name: ext-auth-service namespace: gloo-mesh-addons port: name: grpc EOF -
Create an OAuth external auth policy to enforce authentication via an access token from the Okta OIDC provider that you set up. Make sure that the label you use to apply the policy matches the labels on the routes that you want to protect, such as
usagePlans: "dev-portal".kubectl apply -f -<<EOF apiVersion: security.policy.gloo.solo.io/v2 kind: ExtAuthPolicy metadata: name: oauth-okta namespace: gloo-mesh-addons spec: applyToRoutes: - route: labels: usagePlans: "dev-portal" config: server: name: oauth-okta-server namespace: gloo-mesh-addons cluster: $CLUSTER_NAME glooAuth: configs: - oauth2: accessTokenValidation: jwt: remoteJwks: url: <https://dev-1234567.okta.com/oauth2/default/v1/keys> dynamicMetadataFromClaims: usagePlans: usagePlan - opaAuth: modules: - name: oauth-scope-apiproduct-opa-cm namespace: gloo-mesh-addons query: "data.test.allow == true" EOFReview the following table to understand this configuration. For more information, see the API docs.
Setting Description spec.applyToRoutes Select the routes that you want to apply this policy to. In this example, you want to require external authentication for all routes with the usagePlans: "dev-portal"label.spec.config.server The external auth server to use for the policy. glooAuth.configs.oauth2.accessTokenValidation.jwt Set up the policy to enforce authentication via an access token that conforms to the JWT specification. glooAuth.configs.oauth2.accessTokenValidation.jwt.remoteJwks.url Use the remote JWKS that you provide inline to validate the JWT access token. You can retrieve this value from the authorization server's well-known metadata URI. The remote JWKS value is often in a field such as jwks_uri, similar to the following:https://dev-1234567.okta.com/oauth2/default/v1/keys. For quick testing, you can also replace theremoteJwks.urlfield with thelocalJwks.inlineStringsetting instead, and provide the$CERT_KEYSwith the entire{"keys":[{"kid":"_YYA...","kty":"RSA","alg":"RSA-OAEP","use":"enc","n":"r4AXlC9sR..."}]}value that you retrieved when you set up Okta.glooAuth.configs.opaAuth Configure the OPA authentication details. glooAuth.configs.opaAuth.modules Refer to the name and namespace of the config map that has the OPA policy. Then, Gloo Mesh Gateway can use the OPA policy to resolve the query. This example uses the config map that you previously created.glooAuth.configs.opaAuth.query The query that determines the authentication decision. The result of this query must be either a boolean or an array with a boolean as the first element. A value of truemeans that the request is authorized. Any other value or error means that the request is denied. In this example,data.test.allowis set totrue.datais the section in the config map.test.allowis part of the OPA policy that you previously created. Access is allowed only if the response meets theallowconditions in the policy. -
Verify that the external auth policy is applied successfully.
- Review the status of the external auth policy and make sure that it shows
ACCEPTED.kubectl get extauthpolicy oauth-okta -n gloo-mesh-addons -o yaml - Get the authconfig resource that was created for your policy and make sure that it shows
ACCEPTED.kubectl get authconfig -n gloo-mesh-addons -o yamlIf you see a
REJECTEDerror similar toinvalid character 'k' looking for beginning of object key string, try copying the$CERT_KEYSvalue manually again.
- Review the status of the external auth policy and make sure that it shows
Step 4: Test access to the API product
Use an access token from your OIDC provider to verify that you can access the API product.
-
Verify that requests to your API now require external auth. The following request does not succeed because you need to authenticate via OIDC.
curl -v --resolve api.example.com:80:${INGRESS_GW_IP} http://api.example.com/trackapi/tracksExample output:
< HTTP/1.1 403 Forbidden -
Get an access token from Okta that includes the API product ID in the scope.
- The
CLIENT_IDandCLIENT_SECRETare from the Okta app that you configured. - The scope is the scope that you configured in the Okta authorization server that matches your API product ID, such as
https://api.example.com/tracks. - The
TOKEN_ENDPOINTis where to get the access token from the authorization server that you configured, such ashttps://dev-1234567.okta.com/oauth2/default/v1/token.
curl -X POST -H "Accept: application/json" -H "Content-Type: application/x-www-form-urlencoded" \ --data-urlencode "client_id=$CLIENT_ID" \ --data-urlencode "client_secret=$CLIENT_SECRET" \ --data-urlencode "grant_type=client_credentials" \ --data-urlencode "scope=https://api.example.com/tracks" \ $TOKEN_ENDPOINT - The
-
Save the token as an environment variable.
export ACCESS_TOKEN=<access-token> -
Repeat the request to your API. Now, the request succeeds!
curl -v -H "Authorization: Bearer $ACCESS_TOKEN" --resolve api.example.com:80:${INGRESS_GW_IP} http://api.example.com/trackapi/tracksExample output:
< HTTP/1.1 200 OK ... [ { "id": "c_0", "thumbnail": "https://res.cloudinary.com/dety84pbu/image/upload/v1598465568/nebula_cat_djkt9r.jpg", "topic": "Cat-stronomy", "authorId": "cat-1", "title": "Cat-stronomy, an introduction", "description": "Curious to learn what Cat-stronomy is all about? Explore the planetary and celestial alignments and how they have affected our space missions.", "numberOfViews": 163, "createdAt": "2018-09-10T07:13:53.020Z", "length": 2377, "modulesCount": 10, ... -
Send a similar request to a different API product. Because the access token includes the API product IDs for both API products, this request also succeeds.
curl -v -H "Authorization: Bearer $ACCESS_TOKEN" --resolve api.example.com:80:${INGRESS_GW_IP} http://api.example.com/petstore/petExample output:
< HTTP/1.1 200 OK
...
[
  {
    "id": 1,
    "name": "Barky",
    "photoUrls": [
      "image1.jpg"
    ],
...
Good job! Your API products are now protected by the OAuth policies. Later, you set up the frontend for the developer portal. Then, you are able to securely log in and get access to the API products again.
Next steps
- If you haven't already, set rate limits for your API products.
- Configure the developer portal.