Backstage backend plugin
Integrate your API products into the backend of the Backstage API catalog.
You can use the Gloo Portal Backstage backend plugin to integrate your API products into the Backstage catalog. Then, you can use your APIs as part of Backstage, such as to bundle your API products with other APIs in the Backstage catalog to create your own customized developer portal.
Looking for a prebuilt developer portal for your Gloo Portal APIs in Backstage? Try the frontend plugin. After setting up the frontend, your developers can view details about the API products and usage plans that they have access to. They can also manage their own API keys for their usage plans.
Before you begin
- Make sure that the external auth service is installed and running. If not, install the external auth service in your single or multicluster environment.
kubectl get pods -A -l app=ext-auth-service - Configure the developer portal, including to create and expose the portal server securely.
- Store the URL to your developer portal app as an environment variable. The following example uses
https://developer.example.com.export PORTAL_URL=http://developer.example.com - Decide on the OpenID Connect (OIDC) provider that you want to use, such as Keycloak or Okta. This guide uses Okta as an example. If you don’t have an Okta account, sign up for an Okta developer account. For other examples, review the OIDC and OAuth guides.
Step 1: Set up an Okta OIDC app
Configure an Okta OIDC app to get the client and issuer information that you need to create external auth policies.
Open the Okta dashboard. If you don’t have an Okta account that you can use, sign up for an Okta developer account.
From the Applications menu, click Applications > Create New App. Note that you might see a Create App Integration button instead.
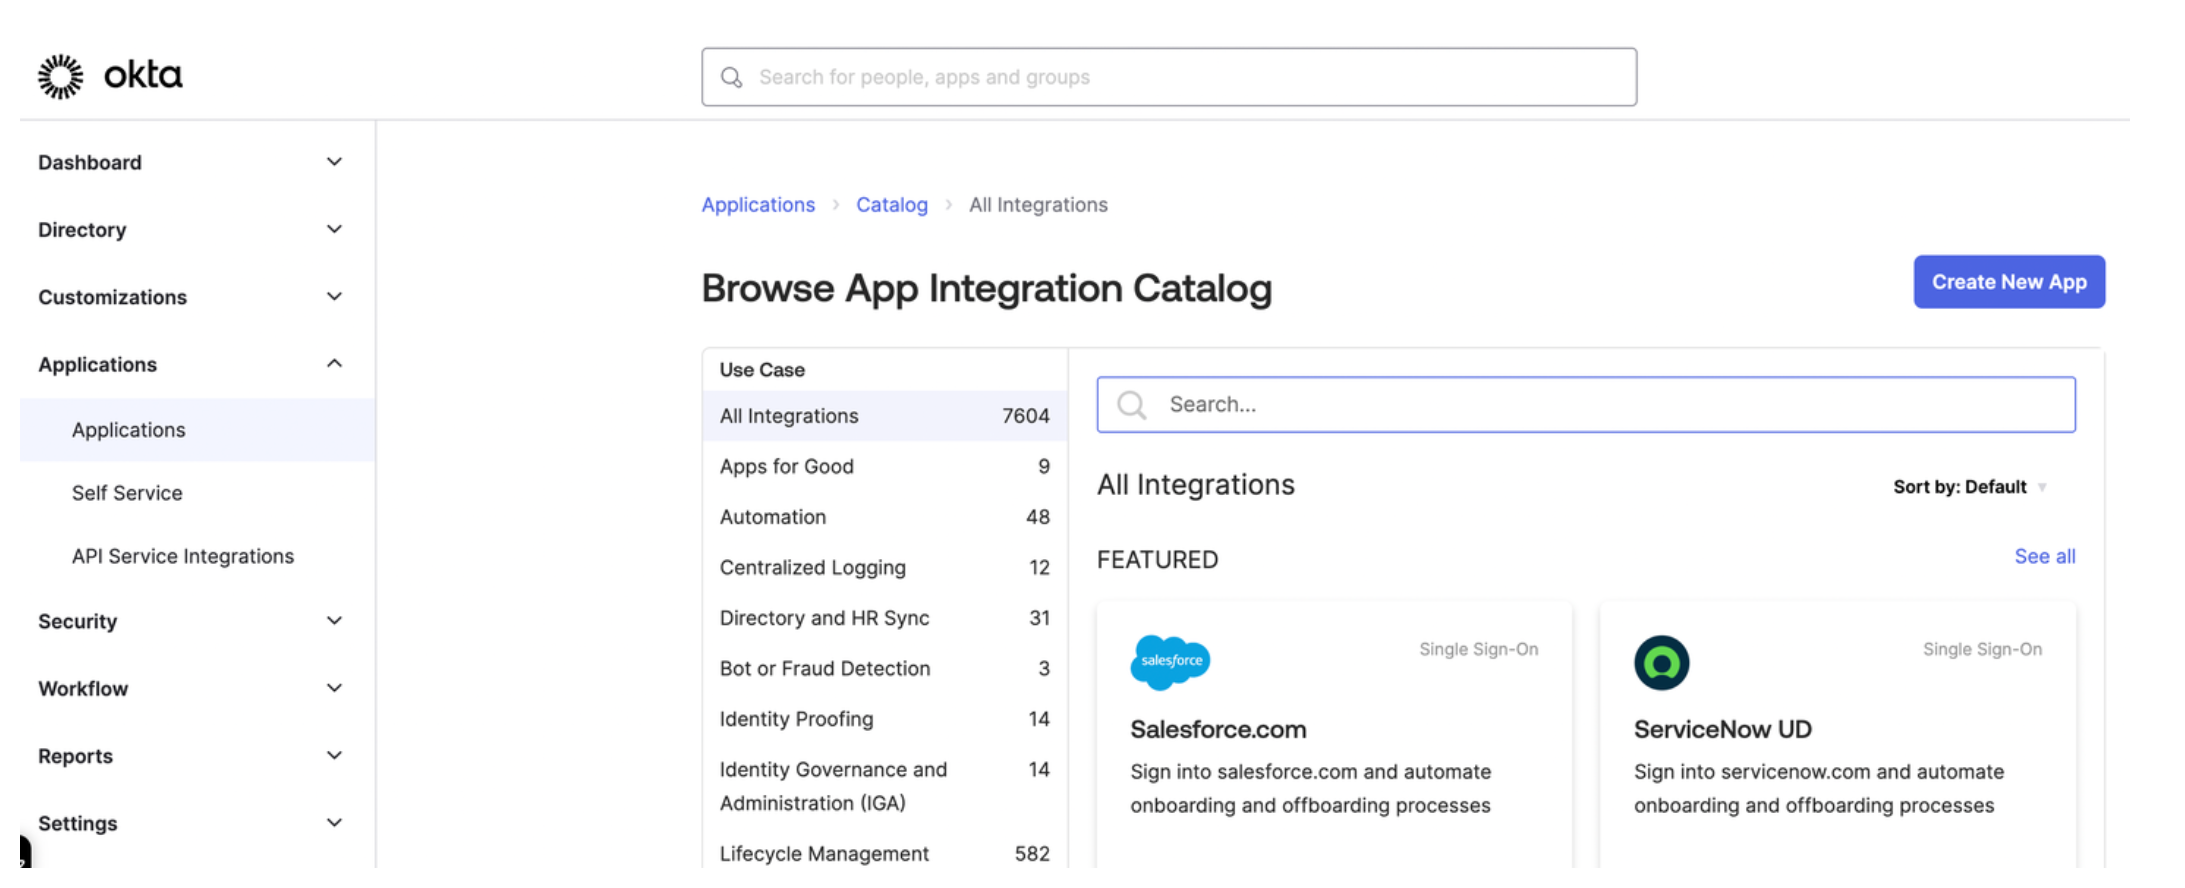
Figure: Okta application dashboard Select OIDC - OpenID Connect as the sign-in method for your app and Web application as your application type. Then, click Next.
Enter a name for your app and optionally upload a logo.
For Grant type, select Client Credentials, Authorization Code, and Refresh Token.
For Sign-in redirect URIs, enter the location from which you want to allow users to log in. The URL is composed of the hostname that you set up for your Portal resources and the
/callbackpath. For example, for the developer portal frontend app, you might enterhttps://developer.example.com/callback.For the Sign-out redirect URIs, enter the location to redirect the user after logging out, such as
https://developer.example.com/logout.From the Assignments section, select Allow everyone in your organization to access. This way, you do not need to assign a user or group to this app. Instead, you can use your Okta developer account credentials to test the Okta authentication flow.
Click Save to save your changes. You are redirected to the Okta app details page.
From the General tab on the Okta app details page, note the Client ID and the client Secret.

Figure: Okta General tab Store the Client ID and Secret as environment variables.
  export CLIENT_ID=<client-id>
export CLIENT_SECRET=<secret>
From the Sign on tab in the OpenID Connect ID Token section, change the Issuer from
Dynamicto the Okta URL. Your Okta URL typically includes your account ID and anokta.comextension, such ashttps://dev-12345678.okta.com.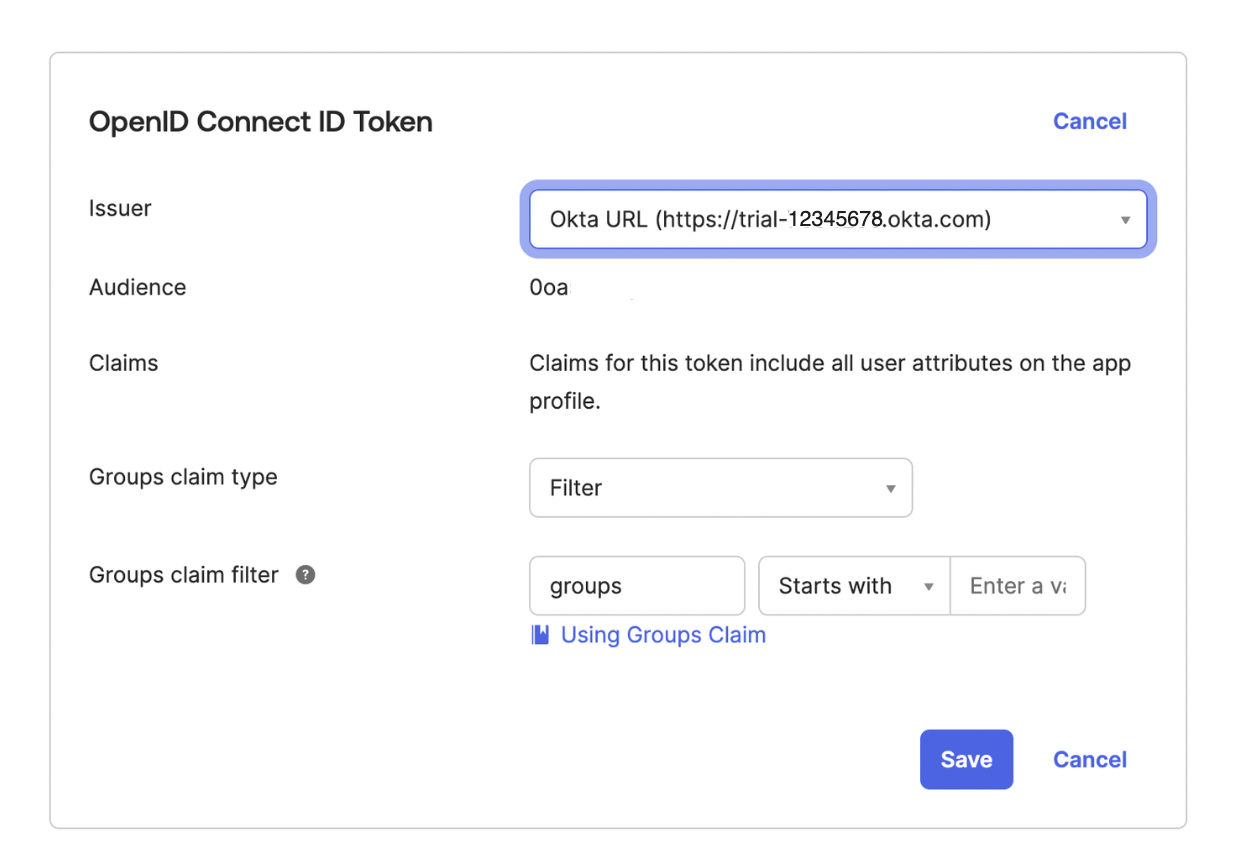
Figure: Okta Signon tab Store the issuer URL as an environment variable.
export ISSUER_URL=<issuer-URL>From the navigation menu, click Security > API.
Click the Authorization Server that you want to use, such as
default.From the Settings tab, click the Metadata URI. In a new tab, your browser opens to a URL similar to
https://dev-1234567.okta.com/oauth2/default/.well-known/oauth-authorization-server.From the metadata URI, search for and save the
token_endpointas an environment variable. This endpoint is where to get the OAuth token.export TOKEN_ENDPOINT=https://dev-1234567.okta.com/oauth2/default/v1/token
Step 2: Set up OAuth external auth for your portal
Set up Gloo Platform external auth policies with Okta as the OIDC provider.
Create an external auth server that enforces your extauth policy.
  kubectl apply -f - <<EOF
apiVersion: admin.gloo.solo.io/v2
kind: ExtAuthServer
metadata:
  name: ext-auth-server
  namespace: gloo-mesh
spec:
  destinationServer:
    port:
      number: 8083
    ref:
      cluster: $CLUSTER_NAME
      name: ext-auth-service
      namespace: gloo-mesh
EOF
Create a Kubernetes secret with the client secret from your Okta account. Note that the client secret value is base64-encoded after you apply the configuration file.
  kubectl apply -f - <<EOF
apiVersion: v1
kind: Secret
type: extauth.solo.io/oauth
metadata:
  name: okta-client-secret
  namespace: gloo-mesh
stringData:
  client-secret: ${CLIENT_SECRET}
EOF
Create an external auth policy to enforce authentication to your developer portal routes via an authorization code from the Okta OIDC provider that you set up.
  kubectl apply -f- <<EOF
apiVersion: security.policy.gloo.solo.io/v2
kind: ExtAuthPolicy
metadata:
  name: oauth-okta-auth-code
  namespace: gloo-mesh-gateways
spec:
  applyToRoutes:
    - route:
        labels:
          usagePlans: "dev-portal"
  config:
    glooAuth:
      configs:
      - oauth2:
          oidcAuthorizationCode:
            appUrl: '$PORTAL_URL'
            callbackPath: /callback
            clientId: '$CLIENT_ID'
            clientSecretRef:
              name: okta-client-secret
              namespace: gloo-mesh
            issuerUrl: '$ISSUER_URL'
            scopes:
            - openid
    server:
      name: ext-auth-server
      namespace: gloo-mesh
EOF
Review the following table to understand this configuration.
Setting Description spec.applyToRoutes Select the routes that you want to apply this policy to. In this example, you want to require external authentication for all routes with the usagePlans: "dev-portal"label.appUrlEnter the address to access the developer portal app. If you followed the example in this guide, your app URL is https://example.developer.com.callbackPathCreate the redirect URL by appending this path to the appUrl. After successful authentication in Okta, you are redirected to this URL.clientIdEnter the client ID that was assigned to your Okta OIDC app. You can retrieve the client ID from the General tab of your Okta OIDC app. clientSecretEnter the reference to the Kubernetes secret that you created earlier and that stores the client secret value. You can retrieve the client secret from the General tab of your Okta OIDC app. issuerUrlEnter the Okta issuer URL that you set up in the Okta app, such as https://dev-12345678.okta.com. You can retrieve the Okta issuer URL from the Issuer field on the Sign on tab of your Okta OIDC app.serverSelect the external auth server that you created in a previous step. Make sure that the authconfig resource that is automatically created for you has a status of
Accepted.kubectl get authconfig -n gloo-mesh -o yaml
Step 3: Install the Gloo Portal Backstage backend plugin
Install the backend plugin for your developer portal in your Backstage application. The following steps show how you can add the backend plugin to an existing Backstage application. You can also use a sample container image in Solo’s public image registry, gcr.io/solo-public/docs/portal-backstage-backend.
The plugin creates the following Backstage catalog entities and relates them to each other:
- A
Groupwith the namesolo-io-service-accounts. - A
Userwith the namegloo-platform-portal-service-account. - A
Systemwith the namegloo-platform-portal-apis. - An
APIfor eachapiVersionof eachapiProductin your Gloo Portal instance that the service account has access to. The API’s name is a combination of theapiProductIdand theapiVersion(apiProductId-apiVersion).
This guide assumes that you created a Backstage app that is named portal and that the portal directory represents the Backstage root directory.
Create or use an existing Backstage app. If you do not have a Backstage app, follow the getting started guide to install one on your local machine.
cd portalInstall the Gloo Portal Backstage backend plugin into your Backstage app.
yarn add --cwd ./packages/backend @solo.io/platform-portal-backstage-plugin-backendFrom the Backstage app root directory, open the
/packages/backend/src/plugins/catalog.tsfile.open packages/backend/src/plugins/catalog.tsUpdate and save the file to include the following Gloo Platform provider information.
  import { CatalogBuilder } from '@backstage/plugin-catalog-backend';
import { ScaffolderEntitiesProcessor } from '@backstage/plugin-catalog-backend-module-scaffolder-entity-model';
import { Router } from 'express';
import { PluginEnvironment } from '../types';

// -> Add the import for the Gloo Platform plugin provider.
import { GlooPlatformPortalProvider } from '@solo.io/platform-portal-backstage-plugin-backend';

export default async function createPlugin(
  env: PluginEnvironment,
): Promise<Router> {
  const builder = await CatalogBuilder.create(env);
  builder.addProcessor(new ScaffolderEntitiesProcessor());

  // -> Instantiate the plugin provider.
  const gppp = new GlooPlatformPortalProvider(
    'production',
    env.logger,
    env.config,
  );
  // -> Add the plugin provider to the catalog builder.
  builder.addEntityProvider(gppp);

  // (These next lines were already provided by Backstage.)
  const { processingEngine, router } = await builder.build();
  await processingEngine.start();

  // -> Start the scheduled update interval after the processing engine starts.
  await gppp.startScheduler(env.scheduler);

  return router;
}
From the Backstage app root directory, open the
app-config.local.yamlfile.open app-config.local.yamlConfigure the details of the OAuth identity provider that you use for external authentication to your Gloo Portal. Replace the
$PORTAL_URL,$CLIENT_ID,$CLIENT_SECRET, and$TOKEN_ENDPOINTvariables with the values that you previously retrieved. For more information, see the Okta step.Example command to get your OAuth details:
  echo $PORTAL_URL
echo $CLIENT_ID
echo $CLIENT_SECRET
echo $TOKEN_ENDPOINT
Example
app-config.local.yamlfile:# Backstage override configuration for your local development environment glooPlatformPortal: backend: # The URL of the Gloo Portal REST server. # Format this variable with a "/v1" path, such as: "https://developer.example.com/v1". portalServerUrl: "$PORTAL_URL/v1" # The OAuth identity provider's Client ID. # In Keycloak, open the $KEYCLOAK_URL UI, click Clients, and from the Settings tab, find the Client ID. # In Okta, open your $OKTA_URL and from the Applications section, find your app's Client ID. clientId: "$CLIENT_ID" # The OAuth identity provider's Client secret. # In Keycloak, open the $KEYCLOAK_URL UI, click Clients, and from the Settings tab, find the Client secret. # In Okta, open your $OKTA_URL and from the Applications section, find your app's Client secret. clientSecret: "$CLIENT_SECRET" # The endpoint to get the OAuth token. # In Okta or Keycloak, you can find the `token_endpoint` property at: # $KEYCLOAK_URL/auth/realms/<your-realm>/.well-known/openid-configuration # $OKTA_URL/.well-known/openid-configuration tokenEndpoint: "$TOKEN_ENDPOINT" # Optionally enable logging to troubleshoot issue # and disable for regular use cases debugLogging: false syncFrequency: hours: 0 minutes: 1 seconds: 0 milliseconds: 0 syncTimeout: hours: 0 minutes: 0 seconds: 10 milliseconds: 0Open the Backstage app. The app opens on http://localhost:3000. It might take a few minutes to open and finish building.
yarn devFrom the menu, select APIs. Verify that you see your portal API products, such as
petstore-v1andtracks-v1.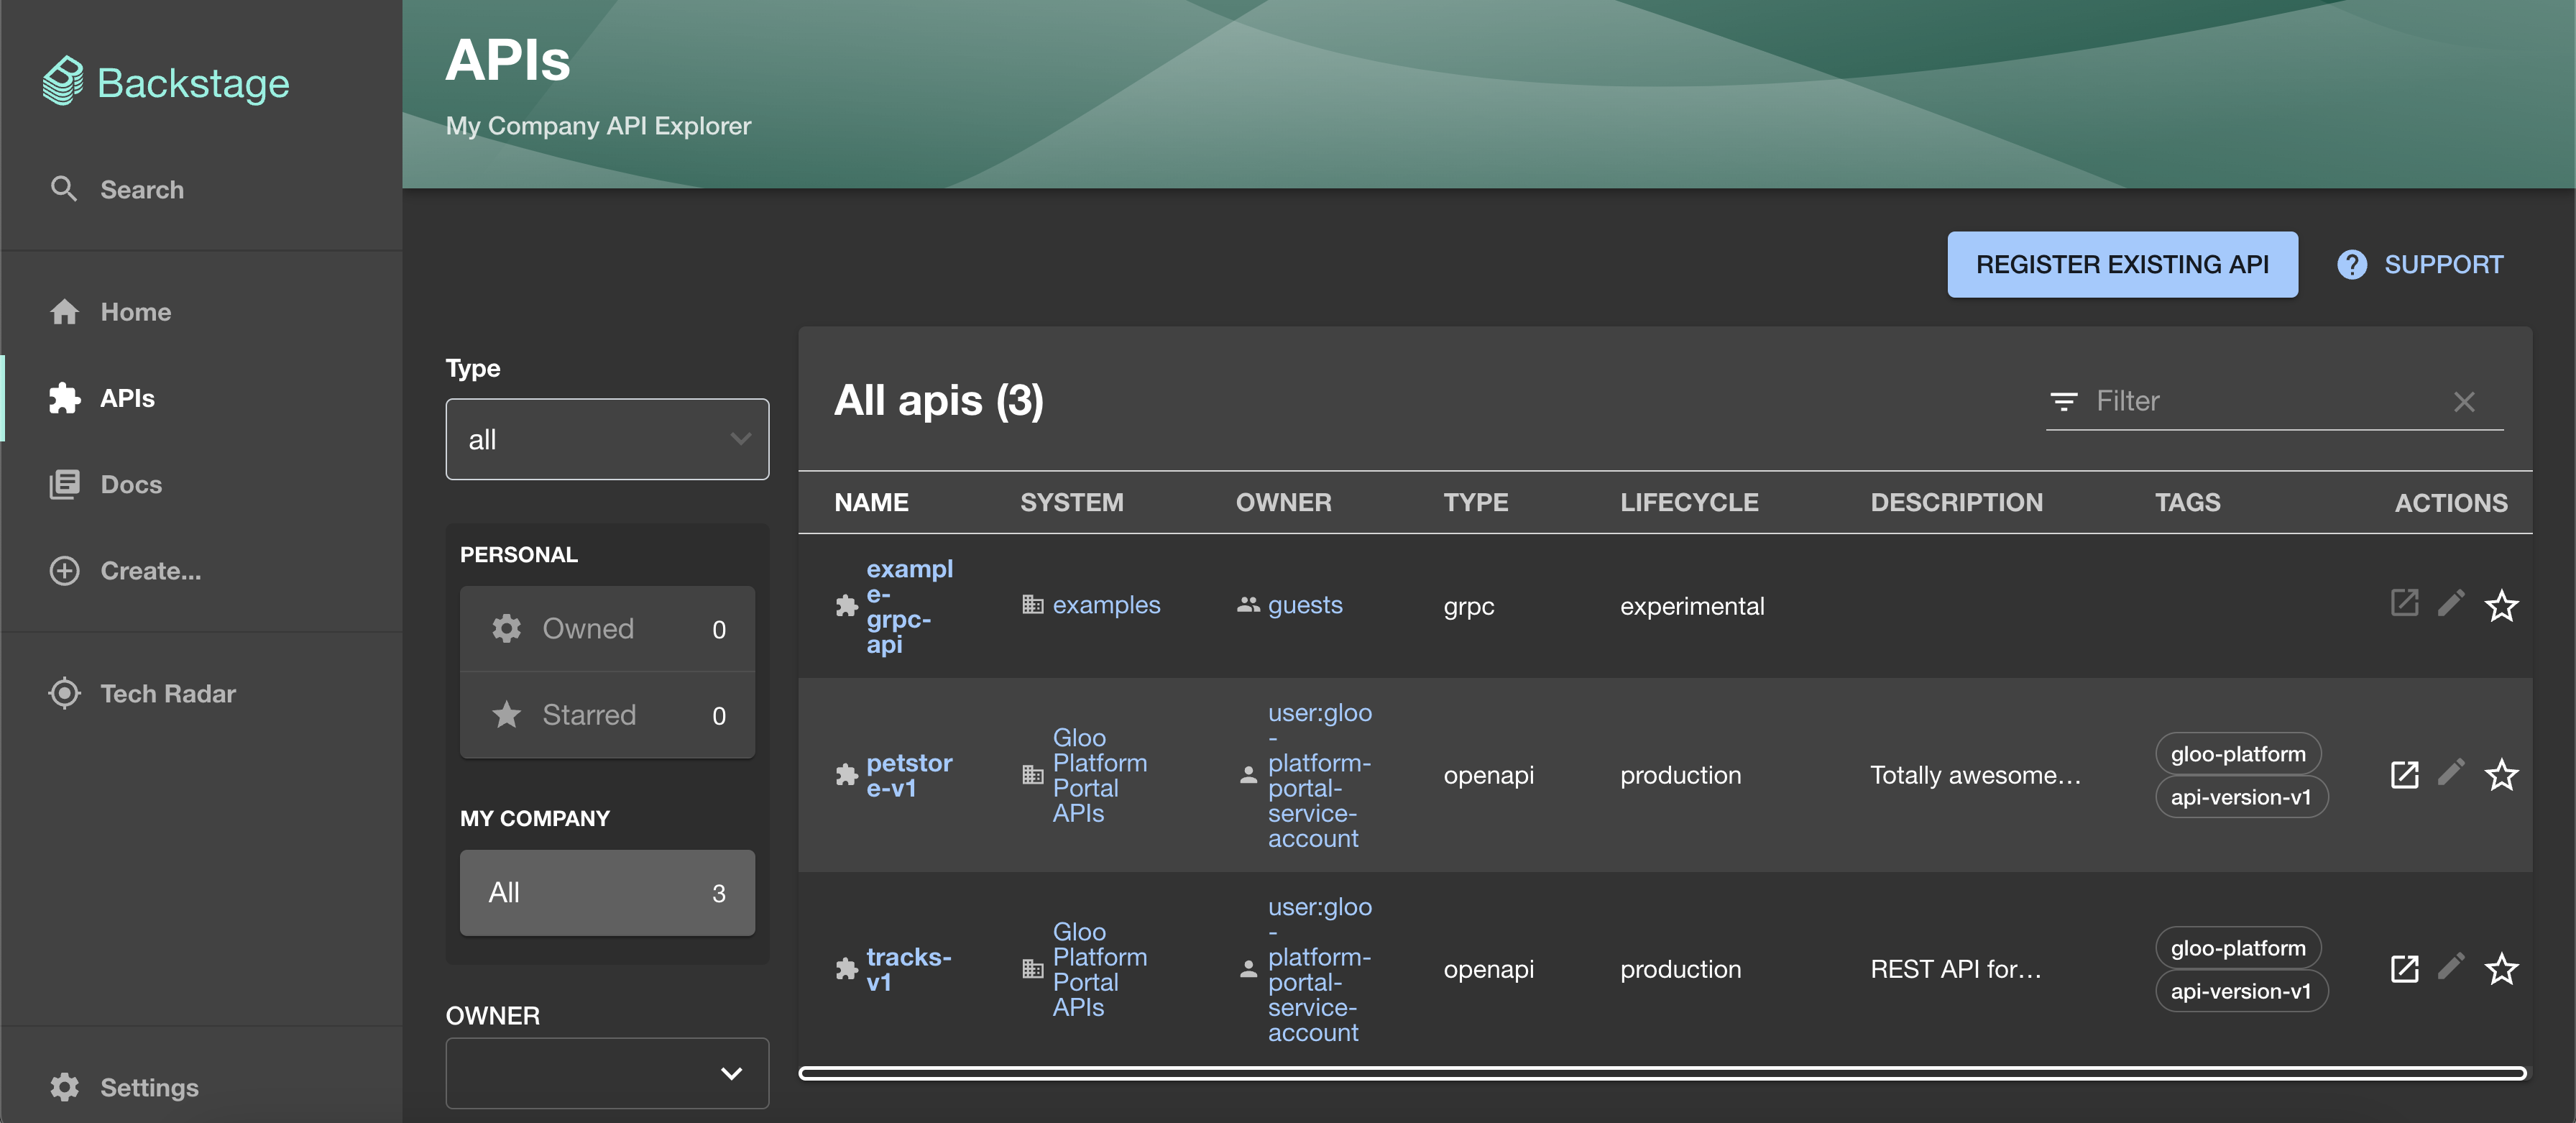
Figure: Backstage API catalog page Click one of the APIs, such as
tracks-v1, and explore the API.From the Overview tab, you can review information for the API, as well as its details in Backstage, such as relations to owners and systems.
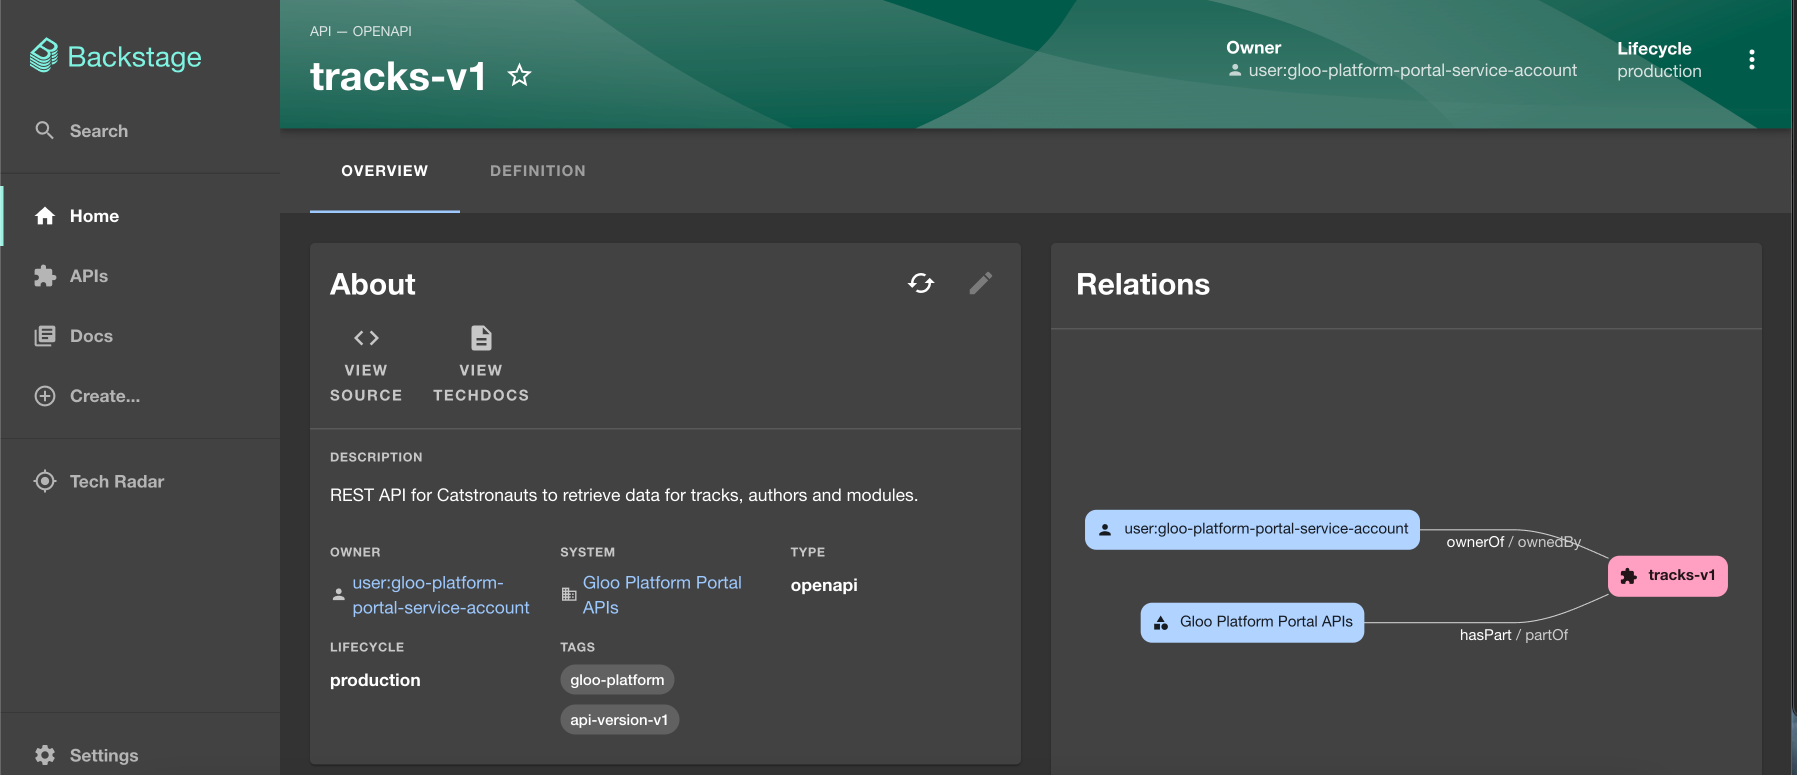
Figure: Backstage API overview page From the Definition tab, you can review the OpenAPI spec in a Swagger view as well as a raw JSON file.
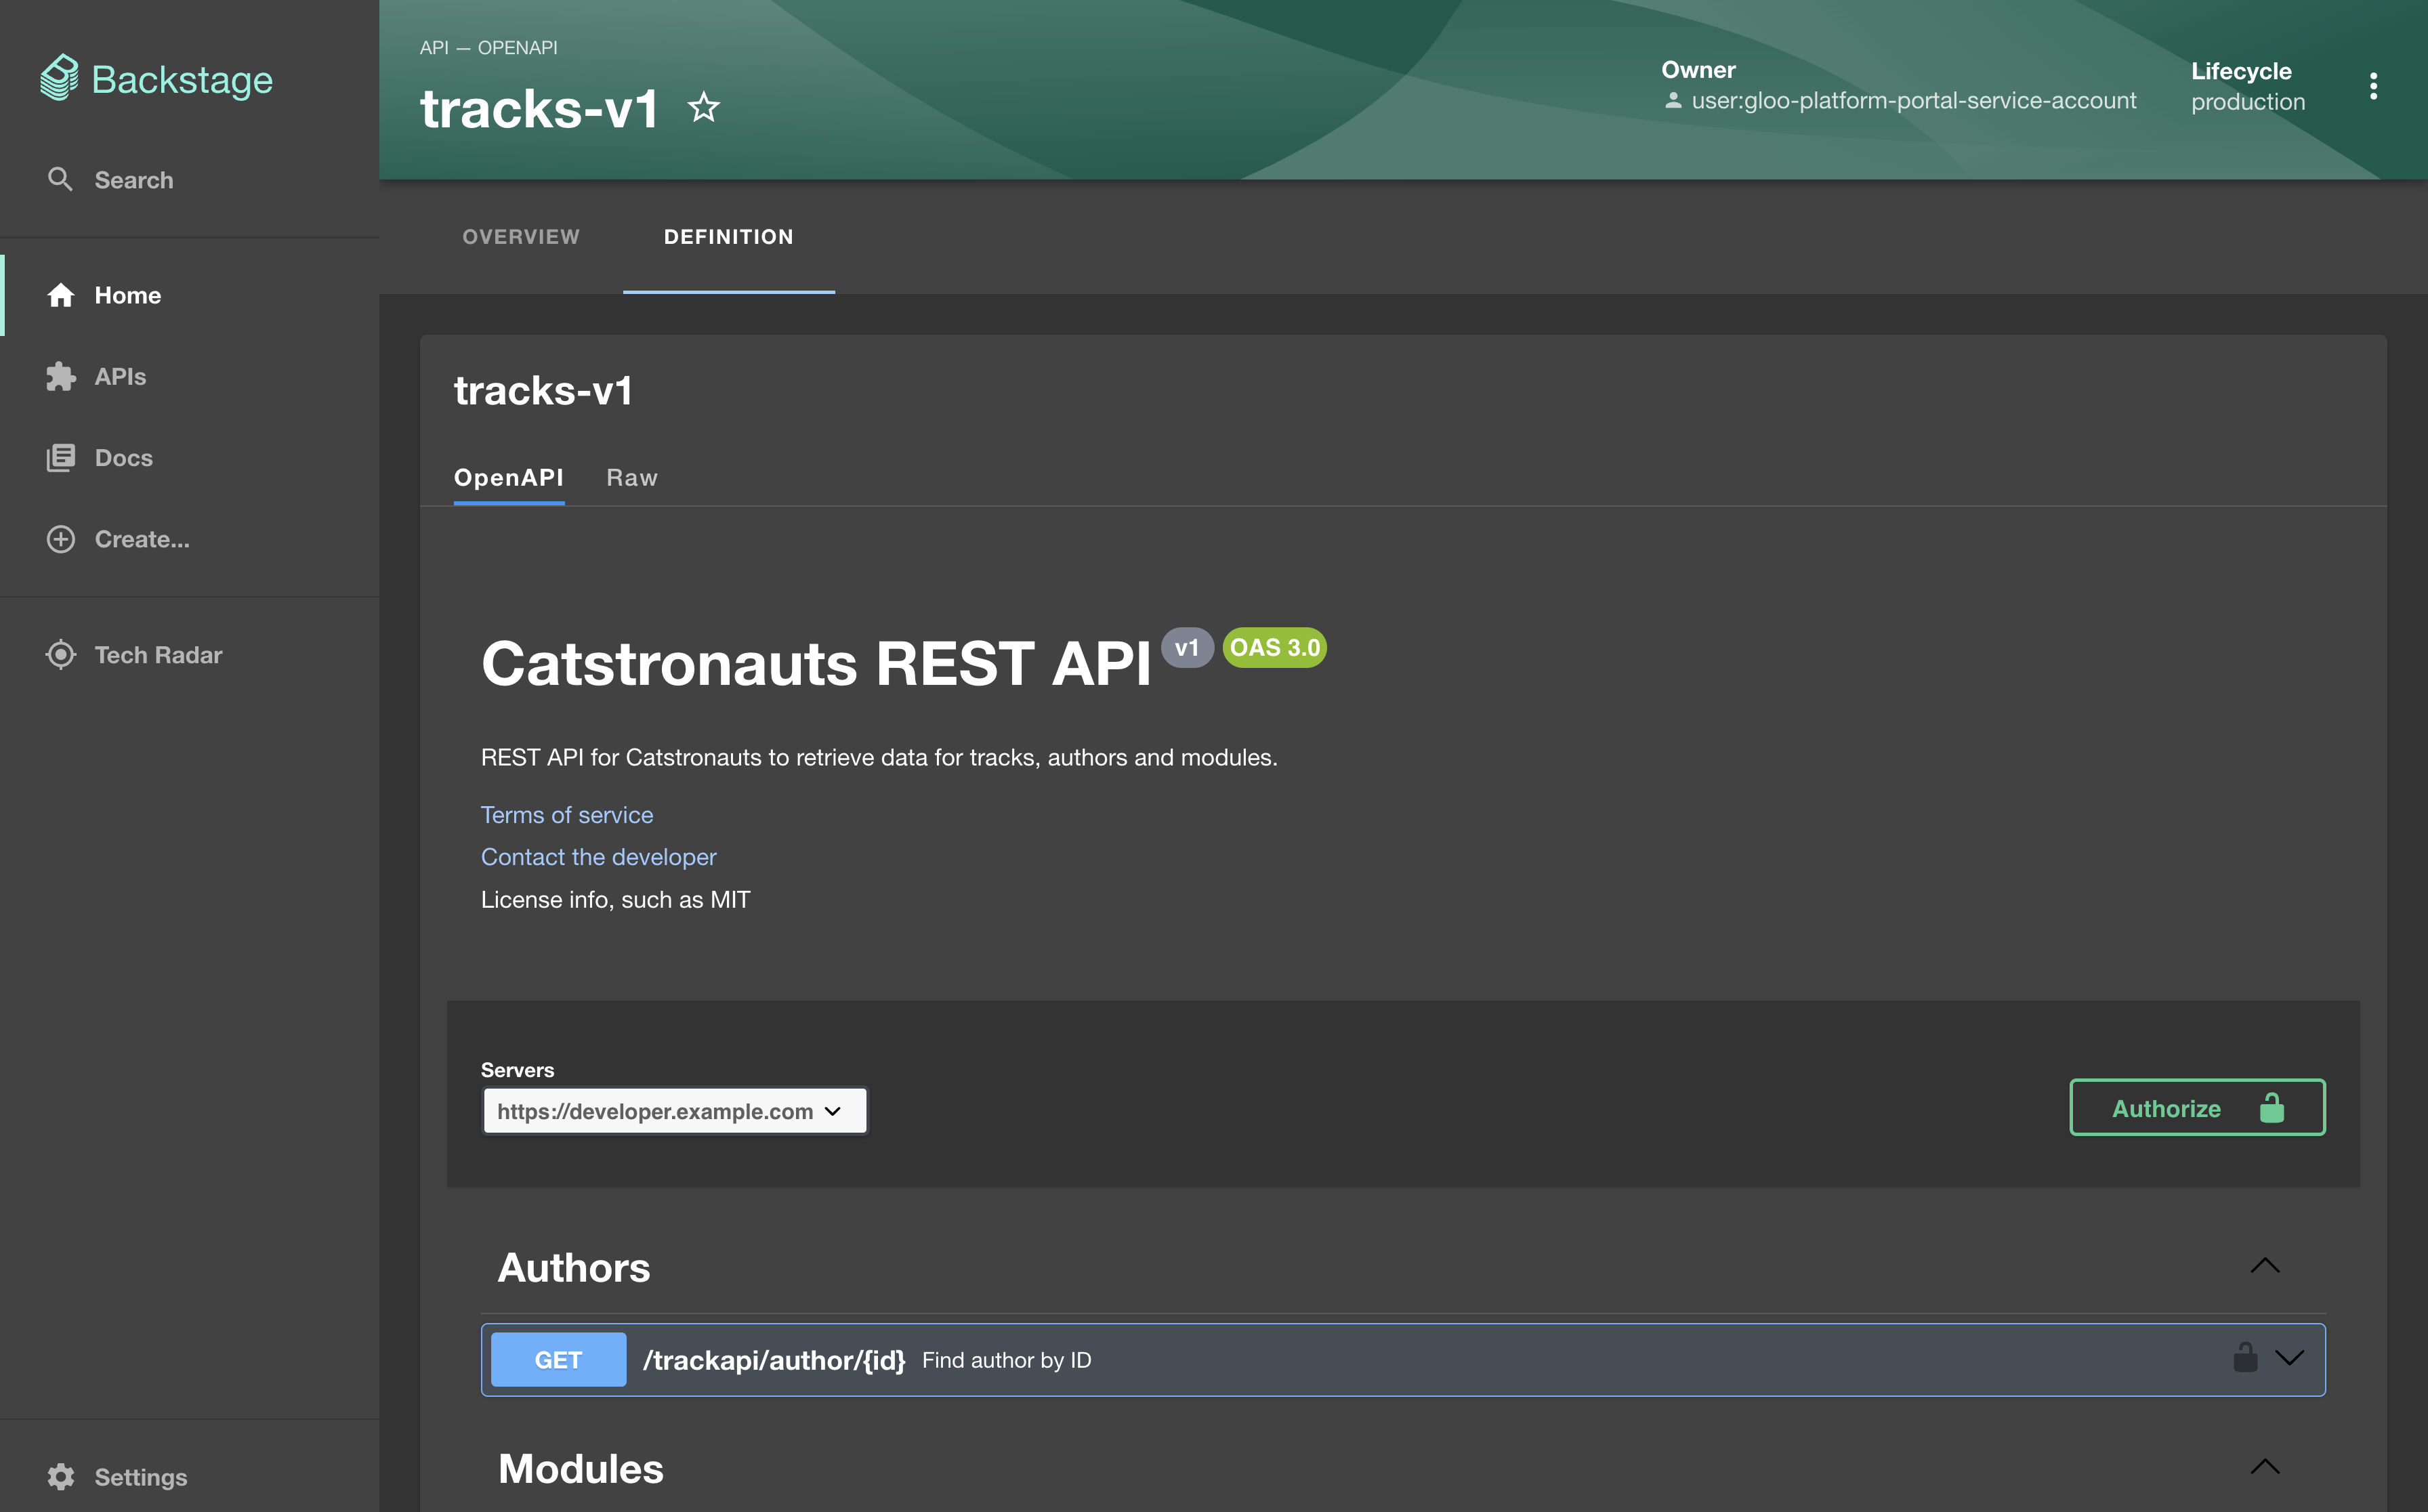
Figure: Backstage API definition page
You successfully installed and verified the Gloo Portal backend plugin for Backstage!
Next steps
You deployed the Backstage backend app to add the APIs from your developer portal to the Backstage API catalog. Now, when you update your Portal resource to add new API products, usage plans, or metadata, your APIs are automatically updated in the Backstage catalog for you.
- Create a frontend application to bundle the APIs in your Backstage API catalog into a Backstage developer portal. For example, you can try the Gloo Portal frontend plugin for Backstage.
- Follow the Backstage documentation to containerize and deploy your Backstage app as a Kubernetes deployment.
- If you didn’t already, you can follow the Backstage docs to customize the frontend app for your brand.
- Share the developer portal guide with your end users so that they know how to interact with the developer portal.