Release notes
Review summaries of the main changes in the Gloo 2.6 release.
Make sure that you review the breaking changes 🔥 that were introduced in this release and the impact that they have on your current environment.
Introduction
The release notes include important installation changes and known issues. They also highlight ways that you can take advantage of new features or enhancements to improve your product usage.
For more information, see the following related resources:
- Changelog: A full list of changes, including the ability to compare previous patch and minor versions.
- Upgrade guide: Steps to upgrade from the previous minor version to the current version.
- Version reference: Information about Solo’s version support.
🔥 Breaking changes
Review details about the following breaking changes. To review when breaking changes were released, you can use the comparison feature of the changelog. The severity is intended as a guide to help you assess how much attention to pay to this area during the upgrade, but can vary depending on your environment.
🚨 High
Review severe changes that can impact production and require manual intervention.
- Automatic resource validation: A new feature that validates Gloo custom resources. This feature is enabled by default. Invalid resources do not block the upgrade. However, after the upgrade, you cannot make any changes to your invalid resources until the errors are resolved. This can block development of or updates to your existing Gloo resources.
- Istio 1.21 support - bug: Gloo Mesh Gateway version 2.6 now supports Istio version 1.21. However, a bug was identified when upgrading from Istio version 1.20 or lower to Istio version 1.21 and later while being on Gloo Mesh Gateway version 2.6.4 or lower. This bug can lead to disabled JWT authentication and authorization policies that fail close, which means that the gateway rejects requests as unauthenticated on any route that is protected by a JWT policy. Note that this bug is fixed in version 2.6.5 and later. Make sure to upgrade to Gloo Mesh Gateway version 2.6.5 first before you upgrade to Istio version 1.21 and later.
- Istio 1.21 support - JWT policy translation: To support Istio version 1.21, translation for authorization-related fields, such as
requiredScopesorclaimschanged. If you plan to use JWT policies with Istio 1.21, wait for the new patch release to be available and follow the upgrade steps to safely re-create existing EnvoyFilters. If not, routes that are protected by JWT policies might fail open, allowing unauthenticated requests to access the routes. - Removal of
memory_ballastextension from OTel collector: Thememory_ballastextension is deprecated and no longer effective for OTel collector agents. If you use this extension to manage garbage collection, you must update your collector configuration.
🔔 Medium
Review changes that might have impact to production and require manual intervention, but possibly not until the next version is released.
- New Helm defaults for Solo image repositories: The default Helm values for the Solo images changed from
docker.iotogcr.io. Make sure to update any internal tooling, such as in airgapped environments.
ℹ️ Low
Review informational updates that you might want to implement but that are unlikely to materially impact production.
- Upstream Prometheus Helm chart upgrade: The Prometheus Helm chart version is upgraded to a newer version, which requires the Prometheus deployment to be re-created. Gloo Mesh Gateway uses a Helm pre-upgrade hooks to re-create the deployment which can cause issues in automated environments, such as Argo CD.
- Istio 1.21 support -
VERIFY_CERTIFICATE_AT_CLIENT: TheVERIFY_CERTIFICATE_AT_CLIENTfeature flag is enabled by default to automatically verify server certificates by using the OS CA certificates on the cluster node. You can configure Istio to use custom CA certificates. - Documentation for add-ons namespace: In all guides for Gloo Mesh Gateway add-ons, such as for the portal, external auth, and rate limiting servers,
gloo-meshis now assumed as the add-on installation namespace. If you maintain a separate namespace for add-ons, be sure to adjust the sample resources as necessary.
Automatic resource validation
In Gloo Mesh Gateway 2.6 and later and Kubernetes 1.25 and later, the fields of select Gloo CRDs contain constraints and rules to ensure that only valid configuration is admitted to your Gloo setup. This feature is enabled by default to ensure that any attempt to apply invalid configuration to your cluster is rejected. To see the constraints and rules for each field, check the API reference docs for each custom resource and look for the Configuration constraints. For more information, see the resource validation overview.
If you have invalid resources that you do not fix before you upgrade, you can still complete the upgrade to 2.6. However, after the upgrade, you cannot make any changes to your invalid resources until the errors are resolved. This can block development of or updates to your existing Gloo resources.
Before you upgrade to 2.6, complete the following steps to ensure that your 2.5 Gloo CRs are valid according to the rules that are enforced in 2.6.
Automatic admission validation is enabled by default in version 2.6 and later. If your resources contain invalid configuration, they are rejected. This can interrupt automated processes that apply CRs to your environment, such as GitOps pipelines. To disable this feature, upgrade your Gloo CRDs Helm chart to include the --set disableAdmissionValidation=true flag.
  helm upgrade -i gloo-platform-crds gloo-platform/gloo-platform-crds \
   --namespace=gloo-mesh \
   --version=$GLOO_VERSION \
   --set disableAdmissionValidation=true
Update
meshctlto the 2.6 patch version you want to upgrade to.curl -sL https://run.solo.io/meshctl/install | GLOO_MESH_VERSION=v$UPGRADE_VERSION sh -Run the following command to validate your existing resources. For more information, see the CLI command reference.
meshctl x validate resources --context $MGMT_CONTEXTCheck the Resource Errors & Warnings section of the output for any errors in your CRs. In this example output, one error is reported for the
ExtAuthPolicyresource namedworkload-00014-portal-rt-delegate-apiin thegloo-meshnamespace. Warnings are also reported forServiceandVirtualDestinationresources, but note that warnings do not prevent resources from being applied.... Resource Errors & Warnings ┌─────────────────────────────────────────────────────────────────────────────────────────────────────────────────────────┐ | Cluster | Kind | Ns/Name | Errors | Warnings | | --------------------------------------------------------------------------------------------------------------------------------------------- | | cluster-1 | Service | workload-00019-cluster-1/workload-00019 | 0 | 25 | | --------------------------------------------------------------------------------------------------------------------------------------------- | | cluster-1 | VirtualDestination | workload-00014-cluster-1/workload-00014-portal-cluster-1-692abccf4324f8554e3a4dc66077734 | 0 | 25 | | --------------------------------------------------------------------------------------------------------------------------------------------- | | cluster-1 | ExtAuthPolicy | gloo-mesh/workload-00014-portal-rt-delegate-api | 1 | 0 | | --------------------------------------------------------------------------------------------------------------------------------------------- | └─────────────────────────────────────────────────────────────────────────────────────────────────────────────────────────┘ Saved to /var/folders/b5/9rwm6sld7w3bw7q0wnnd0ym40000gn/T/validate-logs/input-resource-errors.jsonIf errors are reported:
- Check the errors by opening the generated
input-resource-errors.jsonfile, such as/var/folders/b5/9rwm6sld7w3bw7q0wnnd0ym40000gn/T/validate-logs/input-resource-errors.jsonin the example output of the previous step. - Update your resources to fix the invalid fields. To review the constraints and rules for each field, check the API reference docs for each custom resource and look for the Configuration constraints.
- Run the validation checks on your updated resource YAML files.
meshctl x validate resources <updated-resources>.yaml - Apply the updated, valid resources to your management cluster.
- Check the errors by opening the generated
After you confirm that all resources are valid and that no errors are reported, proceed to upgrade your Gloo Mesh Gateway installation.
Istio 1.21 support
Gloo Mesh Gateway version 2.6 now supports Istio version 1.21. However, a bug was identified when upgrading from Istio version 1.20 or lower to Istio version 1.21 and later while being on Gloo Mesh Gateway version 2.6.4 or lower. This bug can lead to disabled JWT authentication and authorization policies that fail close, which means that the gateway rejects requests as unauthenticated on any route that is protected by a JWT policy. Note that this bug is fixed in version 2.6.5 and later. Make sure to upgrade to Gloo Mesh Gateway version 2.6.5 first before you upgrade to Istio version 1.21 and later.
Learn more about the changes in Gloo Mesh Gateway version 2.6 to support Istio version 1.21. However, hold off from upgrading to Istio version 1.21 and later until the new Gloo Mesh Gateway patch is released.
JWT policy translation:
To support Istio 1.21, the translation of JWTPolicy custom resources into EnvoyFilters changed. If you currently use Gloo JWT policies in your environment that configure authorization-related fields, such as requiredScopes or claims and you plan to upgrade to Istio 1.21, you must upgrade the Gloo management server to version 2.6 first. Upgrading the management server ensures that the translation logic for JWTPolicy custom resources is updated and that the Gloo management server re-generates existing EnvoyFilters to make them compatible with Istio version 1.21.
To upgrade your Gloo Mesh Gateway version, see the Upgrade docs.
If you do not upgrade the Gloo management server to 2.6 prior to upgrading to Istio 1.21, existing JWTPolicy custom resources cannot be translated correctly, and routes or apps that are protected by JWT policy authorization rules might fail open. Note that if you configured your ingress gateway to deny all requests by default, authentication to JWT-protected routes will fail and return a 401 HTTP response code. However, JWT-related authorization rules might fail to get enforced.
Removal of memory_ballast extension from the OTel collector
The memory_ballast extension is deprecated and no longer effective for the OTel collector agents. To ensure that your OTel collector instances continue to perform garbage collection correctly:
- If you do not currently customize the
memory_ballastextension, you can safely remove it from your OTel collector configuration. No further steps are necessary. - If you do customize the
memory_ballastextension, you can instead control garbage collection with a soft memory limit by setting theGOMEMLIMITenvironment variable to the recommended value of 80-90% of the total memory.
New Helm defaults for Solo image repositories
The default Helm values for the Solo images changed from docker.io to gcr.io. For example, the Redis image changed from docker.io/redis:7.2.4-alpine to gcr.io/gloo-mesh/redis:7.2.4-alpine. If you internal tooling is set up to pull the images from docker.io, such as in air-gapped environments, you must update that tooling to pull the images from the Google Cloud Registry repository.
For an overview of the images that are used in an air-gapped environment, see the Install in air-gapped environments docs in the Gloo Mesh Enterprise documentation.
Upstream Prometheus upgrade
Gloo Mesh Gateway includes a built-in Prometheus server to help monitor the health of your Gloo components. This release of Gloo upgrades the Prometheus community Helm chart from version 19.7.2 to 25.11.0. As part of this upgrade, upstream Prometheus changed the selector labels for the deployment, which requires recreating the deployment. To help with this process, the Gloo Helm chart includes a pre-upgrade hook that automatically recreates the Prometheus deployment during a Helm upgrade. This breaking change impacts upgrades from previous versions to version 2.4.10, 2.5.1, or 2.6.0 and later.
If you do not want the redeployment to happen automatically, you can disable this process by setting the prometheus.skipAutoMigration Helm value to true. For example, you might use Argo CD, which converts Helm pre-upgrade hooks to Argo PreSync hooks and causes issues. To ensure that the Prometheus server is deployed with the right version, follow these steps:
- Confirm that you have an existing deployment of Prometheus at the old Helm chart version of
chart: prometheus-19.7.2.kubectl get deploy -n gloo-mesh prometheus-server -o yaml | grep chart - Delete the Prometheus deployment. Note that while Prometheus is deleted, you cannot observe Gloo performance metrics.
kubectl delete deploy -n gloo-mesh prometheus-server - In your Helm values file, set the
prometheus.skipAutoMigrationfield totrue. - Continue with the Helm upgrade of Gloo Mesh Gateway. The upgrade recreates the Prometheus server deployment at the new version.
⚒️ Installation changes
In addition to comparing differences across versions in the changelog, review the following installation changes from the previous minor version to version 2.6.
Safe mode enabled by default
Starting in version 2.6.0, safe mode is enabled on the Gloo management server by default to ensure that the server translates input snapshots only if all input snapshots are present in Redis or its local memory. This way, translation only occurs based on a complete translation context that includes all workload clusters.
Enabling safe mode resolves a race condition that was identified in version 2.5.3, 2.4.11, and earlier that could be triggered during simultaneous restarts of the management plane and Redis, including an upgrade to a newer Gloo Mesh Enterprise version. If hit, this failure mode could lead to partial translations on the Gloo management server which could result in Istio resources being temporarily deleted from the output snapshots that are sent to the Gloo agents.
To learn more about safe mode, see Safe mode.
Enabling safe mode requires the Gloo management server to be scaled down to 0 replicas. Make sure to follow the upgrade guide to safely upgrade your Gloo Mesh Gateway installation.
New default values for Gloo UI auth sessions
Some of the default Helm values changed for configuring the Gloo UI auth session storage:
glooUi.auth.oidc.session.backend: The default value changed from""(empty) tocookieto ensure auth sessions are stored in browser cookies by default.glooUi.auth.oidc.session.redis.host: The default value changed from""(empty) togloo-mesh-redis.gloo-mesh:6379to ensure a valid Redis host is set whenglooUi.auth.oidc.session.backendis changed toredis.
To learn how to set up Gloo UI auth session storage, see Store UI sessions.
New container settings for Redis
In 2.6, the default container settings for the built-in Redis changed. To apply these settings, Redis must be restarted during the upgrade. Make sure that safe mode is enabled before you proceed with the upgrade so that translation of input snapshots halts until the input snapshots of all connected Gloo agents are re-populated in Redis. In 2.6.0, safe mode is enabled by default.
To learn more about safe mode, see Safe mode.
Redis installation for snapshots, insights, external auth service, and rate limiter
In version 2.5 and earlier, you configured the details for the backing Redis instance for different Gloo Mesh Gateway components in the Helm chart section for each component. When components had to share Redis instances, this approach could lead to misconfiguration. For example, the Gloo external auth service and portal server must share the same configuration details to use the same Redis instance, but these Redis details were configured separately.
Now, you can configure the details for the backing Redis instance consistently across components by using the new redisStore section of the Helm chart. The redisStore section also organizes Redis into four main use cases, which you can configure to use separate Redis instances. All the components that read or write data for this particular use case automatically get the same Redis details set up for them. This way, you can consistently configure Redis.
The previous way of configuring Redis is still supported, so you do not have to update your configuration right away. However, you might want to update to redisStore for simplicity, as well as to use the new use case-driven approach that lets you configure Redis for snapshot, insights, extAuthService, and rateLimiter.
Optional steps to migrate to the redisStore configuration:
The following example shows how your configuration might look when you use the built-in Redis options for the control plane (redis), external auth service, developer portal, and rate limiter. For other configuration options, such as using shared instances or bringing your own external Redis instance like Amazon ElastiCache, see the updated Redis documentation.
Review your existing Helm values file to find your current Redis values.
redis:
  deployment:
    # Enable the creation of the local gloo-mesh-redis deployment and service.
    enabled: true
   extAuthService:
     enabled: true
     extAuth:
       apiKeyStorage:
         # Use the local gloo-mesh-redis for backing storage
         name: redis
         enabled: true
         config:
           host: "redis.gloo-mesh:6379"
           # Set to 0 to match the default database for the 'glooPortalServer.apiKeyStorage' configuration
           db: 0
         # Replace with a random string to use to generate hash values for other keys
         secretKey: "ThisIsSecret"
         # Optionally enable authentication for Redis with the username and password in the referenced secret.
         redis:
           auth:
             enabled: true
             secretName: extauth-redis-auth-secret
   glooPortalServer:
     enabled: true
     apiKeyStorage:
       # Use the local gloo-mesh-redis for backing storage
       redis:
         enabled: true
         address: redis.gloo-mesh:6379
         # Optionally enable authentication for Redis with the username and password in the referenced secret.
         auth:
           enabled: true
           secretName: portal-redis-auth-secret
       # Path for API key storage config file in the gloo-mesh backing Redis
       configPath: /etc/redis-client-config/config.yaml
       # Replace with a random string to use to generate hash values for other keys
       secretKey: "ThisIsSecret"
   rateLimiter:
     enabled: true
     redis:
       # Enable the creation of the local Redis deployment and service.
       enabled: true
Remove your existing Redis values, and enable the
redisStoreoptions instead. The following example removes the defaultredisoption and enables four built-in instances for thegloo-redis-snapshot,gloo-redis-insights,gloo-redis-ext-auth(which is shared by the developer portal), andgloo-redis-rate-limiterdeployments.redis: deployment: # Disable the creation of the legacy Redis deployment and service, # so that you can use the redisStore configuration path instead. enabled: false extAuthService: enabled: true # Remove the legacy 'extAuth.apiKeyStorage' configuration. glooPortalServer: enabled: true # Remove the legacy 'apiKeyStorage' configuration. rateLimiter: enabled: true redis: # Disable the creation of the legacy Redis deployment and service for rate limiter. enabled: false redisStore: extAuthService: # Enable the creation of the local Redis deployment and service. deployment: enabled: true client: # Replace with a random string to use to hash the API keys that are stored in Redis. # Required to use the developer portal. secretKey: "ThisIsSecret" insights: # Enable the creation of the local Redis deployment and service. deployment: enabled: true rateLimiter: # Enable the creation of the local Redis deployment and service. deployment: enabled: true snapshot: # Enable the creation of the local Redis deployment and service. deployment: enabled: trueContinue with the upgrade.
🌟 New features
Review the following new features that are introduced in version 2.6 and that you can enable in your environment.
Delimiters in JWT token claims
As of version 2.6.6, you can configure custom delimiters when you extract claims from JWT tokens. This way, you can append the claim information in a header in a different format than the default comma-delimited format. For example steps, see Extract claims to headers.
Istio 1.21, 1.22, and 1.23 support
You can now use Istio 1.21 and 1.22 in version 2.6.0 and later, and Istio 1.23 in version 2.6.3 and later. Note that you must upgrade the Gloo management server to version 2.6 first before you start upgrading your Istio version. To find the image reposititories for the Solo distribution of Istio, see the Istio images built by Solo support article. Istio versions 1.16 and 1.17 are no longer supported in 2.6.
For more information about supported Kubernetes and Istio versions, see the version support matrix.
Kubernetes 1.29 and 1.30 support
Starting in version 2.6.0, Gloo Mesh Gateway can now run on Kubernetes 1.29 and 1.30. Kubernetes version 1.22 and 1.23 are no longer supported. For more information about supported Kubernetes and Istio versions, see the version support matrix.
I/O threads for Redis
A new Helm value redis.deployment.ioThreads was introduced to specify the number of I/O threads to use for the built-in Redis instance. Redis is mostly single threaded, however some operations, such as UNLINK or slow I/O accesses can be performed on side threads. Increasing the number of side threads can help improve and maximize the performance of Redis as these operations can run in parallel.
The default and minimum valid value for this setting is 1. If you plan to increase the number of I/O side threads, make sure that you also change the CPU requests and CPU limits for the Redis pod. Set the CPU requests and limits to the same number that you use for the I/O side threads plus 1. That way, you can ensure that each side thread has an available CPU core, and that an additional CPU core is left for the main Redis thread. For example, if you want to set I/O threads to 2, make sure to add 3 CPU cores to the resource requests and limits for the Redis pod. You can find further recommendations regarding I/O threads in this Redis configuration example.
If you set I/O threads, the Redis pod must be restarted during the upgrade so that the changes can be applied. During the restart, the input snapshots from all connected Gloo agents are removed from the Redis cache. If you also update settings in the Gloo management server that require the management server pod to restart, the management server’s local memory is cleared and all Gloo agents are disconnected. Although the Gloo agents attempt to reconnect to send their input snapshots and re-populate the Redis cache, some agents might take longer to connect or fail to connect at all. To ensure that the Gloo management server halts translation until the input snapshots of all workload cluster agents are present in Redis, it is recommended to enable safe mode on the management server alongside updating the I/O threads for the Redis pod. For more information, see Safe mode. Note that in version 2.6.0 and later, safe mode is enabled by default.
To update I/O side threads in Redis as part of your Gloo Mesh Enterprise upgrade:
Scale down the number of Gloo management server pods to 0.
kubectl scale deployment gloo-mesh-mgmt-server --replicas=0 -n gloo-meshUpgrade Gloo Mesh Enterprise and use the following settings in your Helm values file for the management server. Make sure to also increase the number of CPU cores to one core per thread, and add an additional CPU core for the main Redis thread. The following example also enables safe mode on the Gloo management server to ensure translation is done with the complete context of all workload clusters.
glooMgmtServer:
  safeMode: true
redis:
  deployment:
    ioThreads: 2
    resources:
      requests:
        cpu: 3
      limits:
        cpu: 3
Scale the Gloo management server back up to the number of desired replicas. The following example uses 1 replica.
kubectl scale deployment gloo-mesh-mgmt-server --replicas=1 -n gloo-mesh
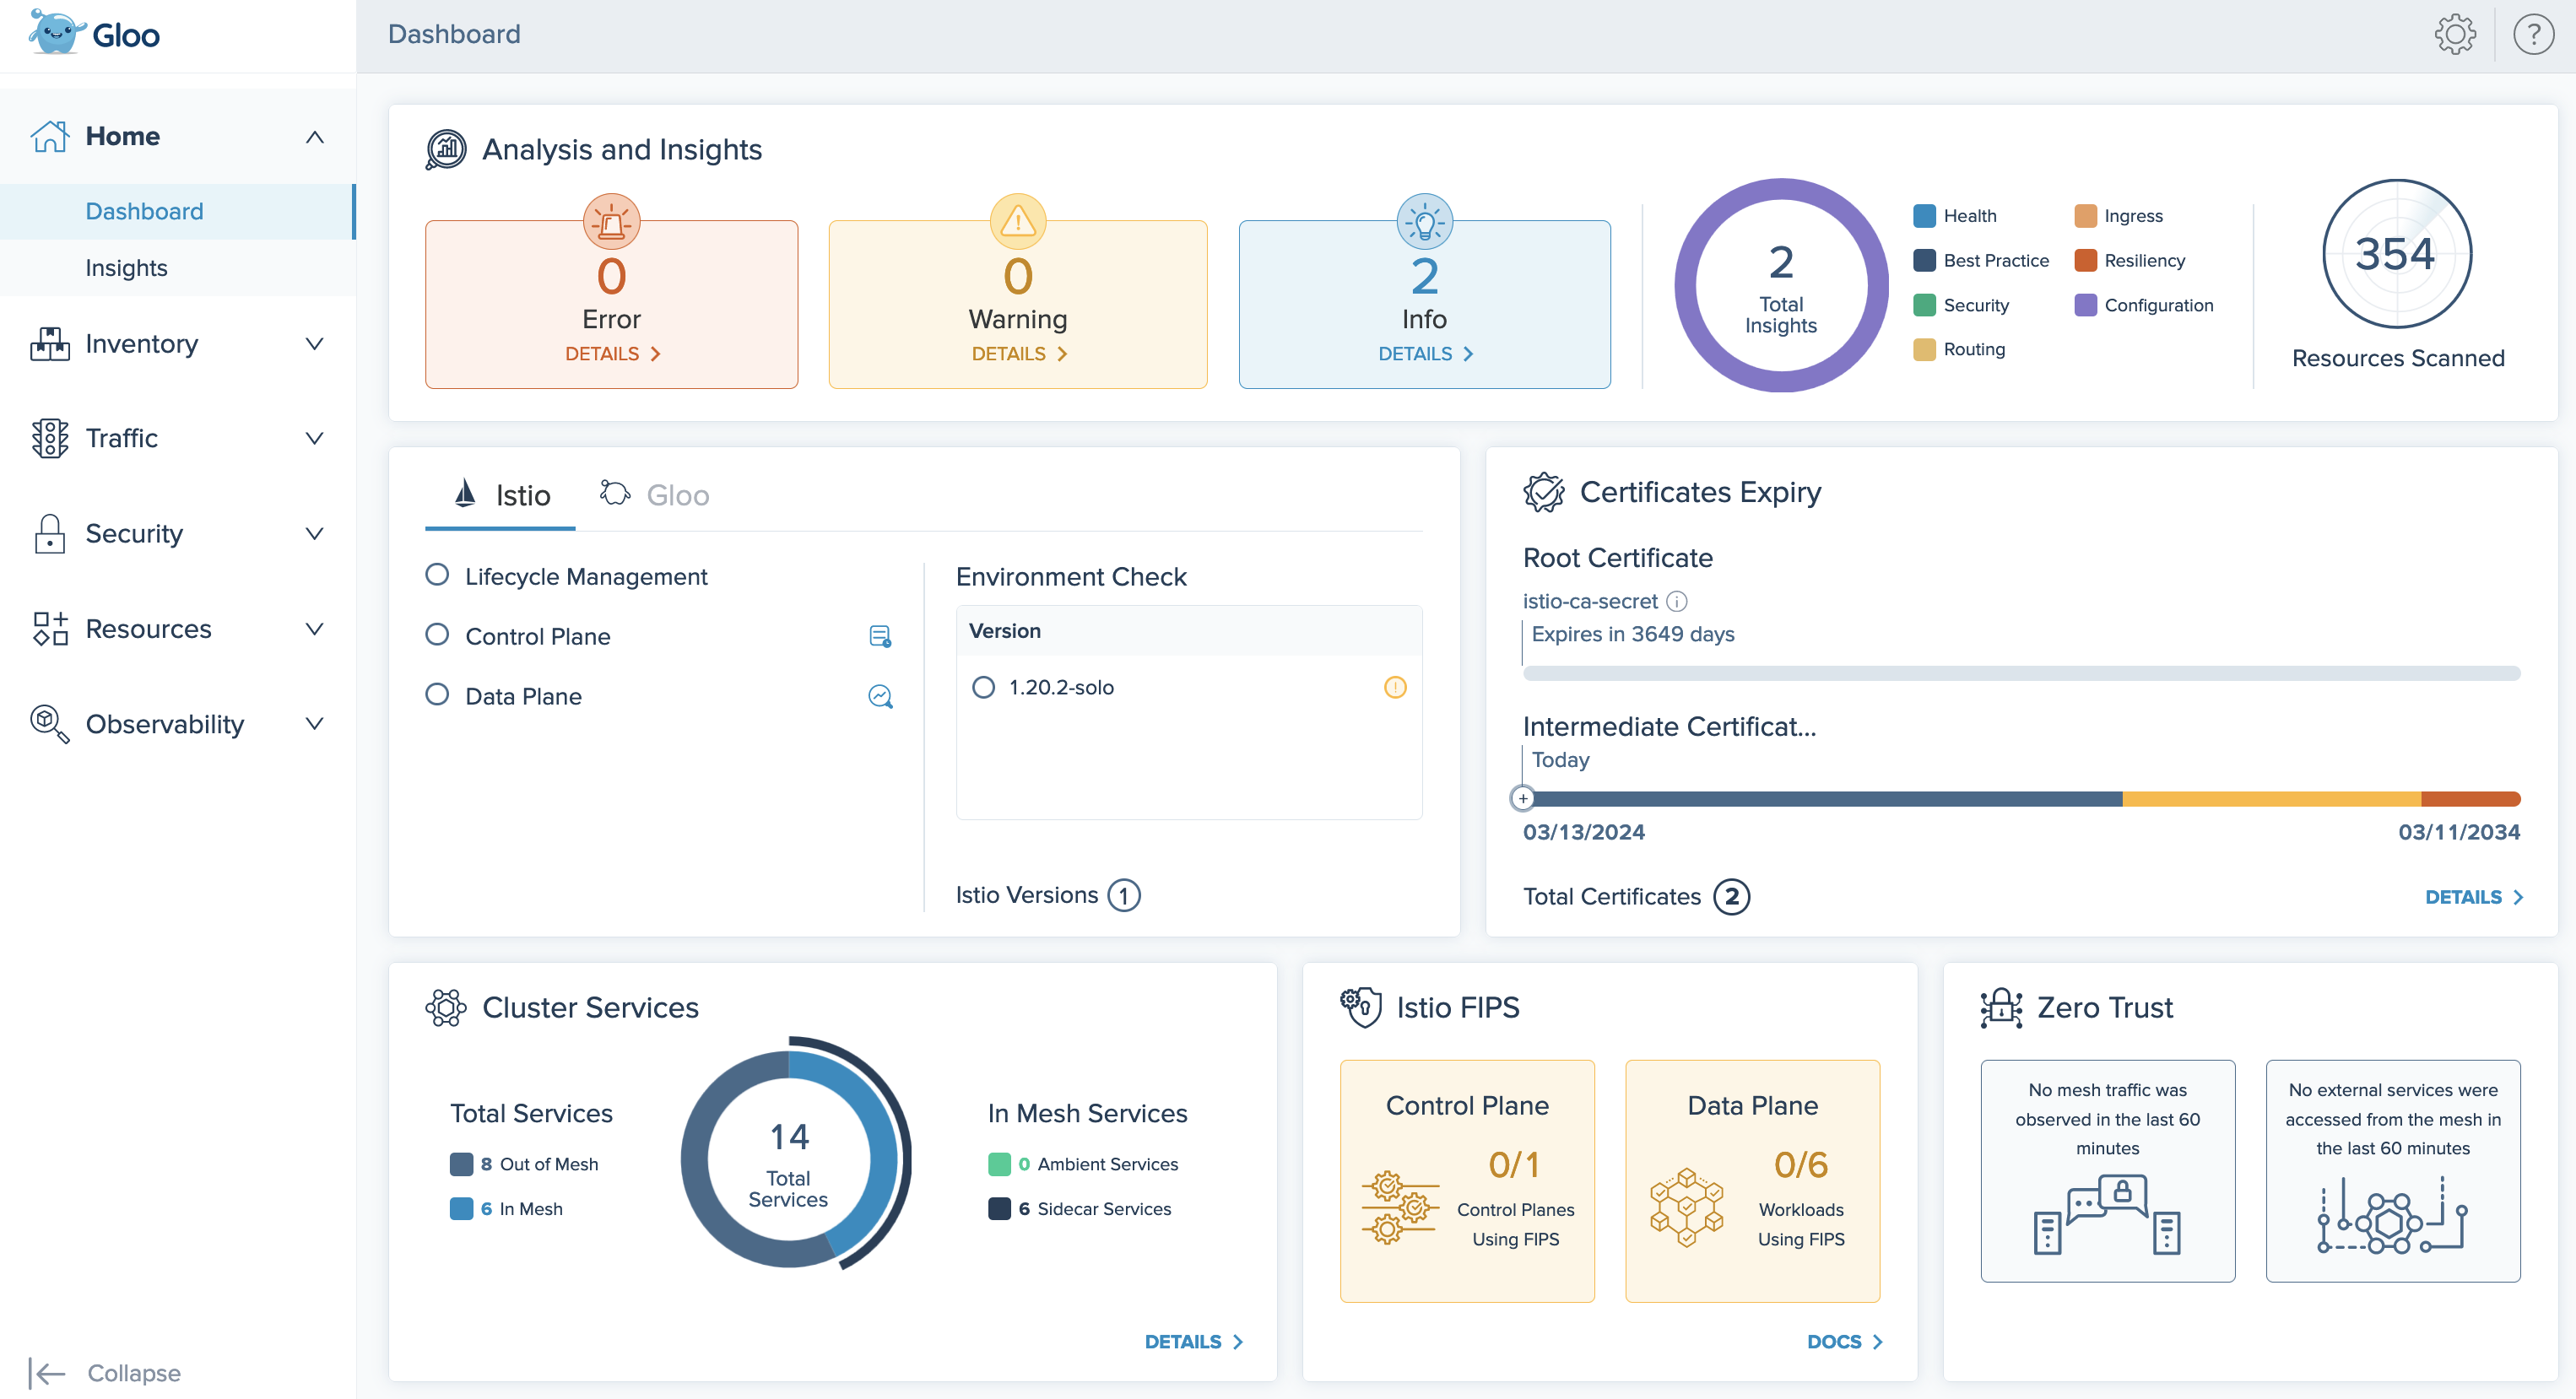
Gloo insights and improved UI
In version 2.6.0 and later, Gloo Mesh Gateway comes with an insights engine that automatically analyzes your Istio setups for health issues. Then, Gloo shares these issues along with recommendations to harden your Istio setups. The insights give you a checklist to address issues that might otherwise be hard to detect across your environment. Note that in large-scale environments, allotting additional resources to the engine and analyzer components is recommended. For an overview of available insights and more information, see Insights.
To enable insights generation, you must include the following settings when you upgrade your Helm installations:
--set glooInsightsEngine.enabled=truein your management cluster--set glooAnalyzer.enabled=truein each workload cluster
Consider deploying a dedicated Redis instance to store insights data, which is recommended to separate observability data from the snapshot data that the Redis instance for your management server stores. You can enable a Gloo-managed Redis instance for the insights engine by including the --set redisStore.insights.deployment.enabled=true setting in your management cluster when you upgrade your Gloo Mesh Gateway installation. For a more secure setup, you can instead bring your own Redis instance, and use the --set redisStore.insights.client.address=<external_redis_address> setting to point to the external address of your Redis instance. For more information, see Backing databases.

Additionally, when you enable insights in your Gloo Mesh Gateway installation, the Gloo UI is updated with an improved Dashboard to help you quickly review the health and status of your environment. To review the new features, see Explore the new UI with insights.
Annotations for virtual services via route tables
You can now add annotations to route tables that are populated to the Istio virtual service that the route table is translated to. A common example for using annotations is to exclude the virtual service from being managed by ExternalDNS so that you can manually manage the DNS record or integrate it with a different DNS provider.
For more information, see Route table annotations for Istio virtual services.
Persistence mode for built-in Redis
To back up data for the Gloo Mesh Gateway control plane components like the management server, you can use a Solo-provided built-in Redis instance that is installed in the cluster. By default, this built-in Redis instance does not persist data, which gets lost during pod restarts. Now, you can also configure the built-in Redis to use persistent storage. This way, data persists across Redis restarts, such as after an upgrade. By persisting the data, you can reduce delays in the relay process that otherwise would happen after a restart. For more information, see Persistent storage.
New feature gate for VirtualDestinationWorkspacePolicyOverride
Previous, virtual destinations that were imported from a source workspace to a target workspace kept the client-side attached policies from the source workspace. Also, when a virtual destination was backed by services on the same host that had different policies attached, the applied policy could be unpredictable.
Now, when you enable the VirtualDestinationWorkspacePolicyOverride feature gate, these policy behaviors are changed to improve consistency and client-side control.
Imported virtual destinations still keep their client-side attached policies from the source workspace. However, you as the target workspace owner can apply your own client-side policies to override the policies from the source workspace. This way, each team can set its own policies for the virtual destination within their own workspace, but share the virtual destination configuration across teams.
Additionally, underlying services behind a virtual destination now can use subset routing. After enabling the feature gate, this feature automatically works in scenarios where you have overriding policies that apply to a virtual destination that is imported across workspaces. This way, services in different workspaces that use the same virtual destination host can have distinct client-side policies where applicable, such as for failover traffic.
Enabling the VirtualDestinationWorkspacePolicyOverride feature gate entails a period of dropped traffic for the impacted virtual destinations. Also, you cannot disable this feature after enabling. Review the following steps before you enable the feature gate.
- Determine whether you need to enable the
VirtualDestinationWorkspacePolicyOverridefeature gate. With the feature gate enabled, you can override client-side policies when importing virtual destinations from a source workspace in to a target workspace. This way, you can apply your own client-side policies in the importing target workspace. Client-side policies include the following. For more information, see the Import and export policies conceptual overview.- ActiveHealthCheckPolicy
- AdaptiveRequestConcurrencyPolicy
- ClientTLSPolicy
- ConnectionPolicy for TCP
- FailoverPolicy
- LoadBalancerPolicy
- OutlierDetectionPolicy
- Assess the impact to your setup if you enable the feature gate.
- Any virtual destinations that currently have client-side policies experience dropped traffic until all the configuration changes propagate across clusters.
- Configuration changes include the underlying Istio resources that are created for the policies. In particular, previously a single Istio DestinationRule per policy was created and used by the importing namespaces. Now, an Istio DestinationRule is created per namespace, increasing the number of underlying resources that are propagated.
- After the upgrade, the underlying EnvoyFilters use subset routing, which means that they have entries per client, inside of a single entry per shared virtual destination host.
- Continue with the upgrade by including the
featureGates.VirtualDestinationWorkspacePolicyOverride=truesetting. For more information, see the Feature gates reference docs.
🔄 Feature changes
Review the following changes that might impact how you use certain features in your Gloo environment.
Improved error logging
The Gloo management server translates your Gloo custom resources into many underlying Istio resources. When the management server cannot translate a resource, it returns debug logs that vary in severity from errors to warnings or info.
In this release, the management server logs are improved in the following ways:
- All translation errors are now logged at the debug level. This way, the management server logs are not cluttered by errors that do not impact the management server’s health.
- Fixed a bug that caused many duplicate error logs. Now, you have fewer logs to sift through.
For example, you might have a service that does not select any existing workloads. This scenario might be intentional, such as if you use a CI/CD tool like ArgoCD to deploy your environment in phases. Translation does not complete until you update the service’s selector or create the workload. Previously, the translation error would show up many times in the management server logs, even though the situation is intentional and the management server is healthy and can translate other objects. Now, the translation error is logged less verbosely at the debug level.
You can still review translation errors in the following ways:
- Translation errors and warnings are shown in the statuses of Gloo custom resources. For example, if a policy fails to apply to a route, you can review the warning in the policy and the route table statuses.
- In the management server, enable debug logging by enabling the
--verbose=truesetting. Example command:kubectl patch deploy -n gloo-mesh gloo-mesh-mgmt-server --type "json" -p '[{"op":"add","path":"/spec/template/spec/containers/0/args/-","value":"--verbose=true"}]'
Improved external service routing
Now, you can create multiple external services that share the same host but have different ports or wildcard subdomains. For example, you might have different teams own different subdomains of an external service. Or, several third-party services might be exposed on different ports of the same host. Previously, creating multiple external services with a conflicting wildcard host or a different port on the same host was not supported. For more information, see Route to external services.
Istio resources not generated on non-mesh clusters
Added a fix that now prevents Istio resources from being written to the management cluster when the management cluster is not registered as a workload cluster at the same time. Previously, if you had an Istio installation in your management cluster that was not managed by Gloo Mesh Gateway and a Gloo agent was deployed to that cluster at the same time, the agent discovered these Istio resources and included them in the snapshot that was sent to the management server. The agent also wrote Istio resources to that cluster, which might have interfered with existing Istio resources in that cluster.
Previously generated resources are not automatically removed during the upgrade. You must manually clean up these resources in the management cluster. You can use the following script to remove these resources.
  #!/bin/bash

namespace=$1

if [ -z "$namespace" ]; then
  echo "Usage: cleanup.sh <namespace>"
  exit 1
fi

kubectl delete authorizationpolicies.security.istio.io -n $namespace -l "reconciler.mesh.gloo.solo.io/name=translator"
kubectl delete certificaterequests.internal.gloo.solo.io -n $namespace -l "reconciler.mesh.gloo.solo.io/name=translator"
kubectl delete clusteristioinstallations.internal.gloo.solo.io -n $namespace -l "reconciler.mesh.gloo.solo.io/name=translator"
kubectl delete destinationrules.networking.istio.io -n $namespace -l "reconciler.mesh.gloo.solo.io/name=translator"
kubectl delete discoveredcnis.internal.gloo.solo.io -n $namespace -l "reconciler.mesh.gloo.solo.io/name=translator"
kubectl delete discoveredgateways.internal.gloo.solo.io -n $namespace -l "reconciler.mesh.gloo.solo.io/name=translator"
kubectl delete envoyfilters.networking.istio.io -n $namespace -l "reconciler.mesh.gloo.solo.io/name=translator"
kubectl delete gateways.networking.istio.io -n $namespace -l "reconciler.mesh.gloo.solo.io/name=translator"
kubectl delete issuedcertificates.internal.gloo.solo.io -n $namespace -l "reconciler.mesh.gloo.solo.io/name=translator"
kubectl delete istiooperators.install.istio.io -n $namespace -l "reconciler.mesh.gloo.solo.io/name=translator"
kubectl delete meshes.internal.gloo.solo.io -n $namespace -l "reconciler.mesh.gloo.solo.io/name=translator"
kubectl delete peerauthentications.security.istio.io -n $namespace -l "reconciler.mesh.gloo.solo.io/name=translator"
kubectl delete podbouncedirectives.internal.gloo.solo.io -n $namespace -l "reconciler.mesh.gloo.solo.io/name=translator"
kubectl delete portalconfigs.internal.gloo.solo.io -n $namespace -l "reconciler.mesh.gloo.solo.io/name=translator"
kubectl delete proxyconfigs.networking.istio.io -n $namespace -l "reconciler.mesh.gloo.solo.io/name=translator"
kubectl delete requestauthentications.security.istio.io -n $namespace -l "reconciler.mesh.gloo.solo.io/name=translator"
kubectl delete serviceentries.networking.istio.io -n $namespace -l "reconciler.mesh.gloo.solo.io/name=translator"
kubectl delete sidecars.networking.istio.io -n $namespace -l "reconciler.mesh.gloo.solo.io/name=translator"
kubectl delete spireregistrationentries.internal.gloo.solo.io -n $namespace -l "reconciler.mesh.gloo.solo.io/name=translator"
kubectl delete telemetries.telemetry.istio.io -n $namespace -l "reconciler.mesh.gloo.solo.io/name=translator"
kubectl delete virtualservices.networking.istio.io -n $namespace -l "reconciler.mesh.gloo.solo.io/name=translator"
kubectl delete wasmplugins.extensions.istio.io -n $namespace -l "reconciler.mesh.gloo.solo.io/name=translator"
kubectl delete workloadentries.networking.istio.io -n $namespace -l "reconciler.mesh.gloo.solo.io/name=translator"
kubectl delete workloadgroups.networking.istio.io -n $namespace -l "reconciler.mesh.gloo.solo.io/name=translator"
kubectl delete xdsconfigs.internal.gloo.solo.io  -n $namespace -l "reconciler.mesh.gloo.solo.io/name=translator"
Workload entry translation update
Currently, you can create a VirtualDestination that has backing endpoints in both the same cluster as the VirtualDestination (local) and other clusters (remote).
During translation, Gloo Mesh Gateway generates an Istio ServiceEntry that selects a group of WorkloadEntries for remote endpoints, as well as selects the local pods. To support new features such as setting failover priority in a FailoverPolicy, Gloo Mesh Gateway adds new labels to the WorkloadEntries. Because the labels are used as part of the name of the translated WorkloadEntries, Gloo Mesh Gateway must re-create the WorkloadEntries during the upgrade. When Gloo Mesh Gateway re-creates the WorkloadEntries, two WorkloadEntries might exist simultaneously for the same destination: the existing one, and one with the new name. The existing WorkloadEntry is automatically removed after the new one is created.
Note that the WorkloadEntry name change does not apply to scenarios where all the backing endpoints of a VirtualDestination are in remote clusters, with none in the local cluster.
Because you continue to have a WorkloadEntry at all times during the upgrade, your traffic should not be impacted. However, the following scenarios might result in no WorkloadEntry existing for a short period.
- The
kube-apiserverexperiences a timeout. - Istio rejects the new WorkloadEntry, and the existing WorkloadEntry has already been deleted.
Even in such scenarios, the local endpoint of the destination still exists, so traffic continues to be fulfilled from that local endpoint.
Follow these general steps to upgrade your Gloo Mesh Gateway installation and to confirm that the WorkloadEntries work after the upgrade:
Get the names of your existing WorkloadEntries in each remote cluster.
kubectl get workloadentries -A --context ${REMOTE_CONTEXT}Continue with the upgrade.
- For most environments, follow the 2.6 upgrade guide.
- If you have many WorkloadEntries and complex failover scenarios, consider following the same procedure as in the 2.5 upgrade guide, which includes extra precautions to prevent impact to your traffic. These precautions include scaling
istioddown to zero (0) replicas and monitoring theobject_write_fails_totalmetric.
If you have a complex environment and your average translation time regularly takes more than 60 seconds, scaling downistiodmight have unexpected impacts and delay the time for your traffic to continue as normal. Follow the 2.6 upgrade guide and monitor your WorkloadEntries closely.After the upgrade, confirm that the WorkloadEntries with the new name are created and that the existing WorkloadEntries are removed.
🚧 Known issues
The Solo team fixes bugs, delivers new features, and makes changes on a regular basis as described in the changelog. Some issues, however, might impact many users for common use cases. These known issues are as follows:
Cluster names: Do not use underscores (
_) in the names of your clusters or in thekubeconfigcontext for your clusters.Istio:
- Due to a lack of support for the Istio CNI and iptables for the Istio proxy, you cannot run Istio (and therefore Gloo Mesh Gateway) on AWS Fargate. For more information, see the Amazon EKS issue.
- Istio 1.22 is supported only as patch version
1.22.1-patch0and later. Do not use patch versions 1.22.0 and 1.22.1, which contain bugs that impact several Gloo Mesh Gateway routing features that rely on virtual destinations. Additionally, in Istio 1.22.0-1.22.3, theISTIO_DELTA_XDSenvironment variable must be set tofalse. For more information, see this upstream Istio issue. Note that this issue is resolved in Istio 1.22.4. - If you plan to upgrade to Istio 1.21, you must upgrade the Gloo management server to version 2.6 first. For more information, see the 2.6 release notes.
- Istio 1.20 is supported only as patch version
1.20.1-patch1and later. Do not use patch versions 1.20.0 and 1.20.1, which contain bugs that impact several Gloo Mesh Gateway features that rely on Istio ServiceEntries.
- If you have multiple external services that use the same host and plan to use Istio 1.20, 1.21, or 1.22, you must use patch versions 1.20.7, 1.21.3, or 1.22.1-patch0 or later to ensure that the Istio service entry that is created for those external services is correct.
- The
WasmDeploymentPolicyGloo CR is currently unsupported in Istio versions 1.18 and later.
meshctl: The meshctl CLI version 2.6.0 has a known issue with the install command that prevents you from using --set options. This issue was resolved in version 2.6.1 and the 2.6.0 meshctl binaries were updated to point to the 2.6.1 meshctl binaries instead. Because of this change, you might see version 2.6.1 when you run meshctl version, even if you installed the 2.6.0 meshctl binaries.
OTel pipeline: FIPS-compliant builds are not currently supported for the OTel collector agent image.
Workspaces: If you run Istio version 1.21 or earlier and you reconfigure your Gloo workspaces, such as by moving from one workspace to multiple workspaces, routing to services that are exposed with a virtual destination might fail. You must re-apply the virtual destination to fix routing for these services. Note that this issue is fixed in Istio version 1.22 and later.
LoadBalancer policy: You cannot set the TTL for a cookie to 0. Note that this issue is fixes in version 2.6.3.