Redis
Debug the Redis backing instance.
Gloo deploys Redis as a backing instance for several components, such as the Gloo management server, UI, and Gloo portal server. You can also bring your own instance, such as Redis Enterprise or a cloud provider service like AWS ElastiCache. For more information, see Backing databases.
Use the following troubleshooting topics to help debug issues with Redis.
Review data in Redis
To review the data that is stored in Redis, you can connect to the local Redis instance. If you bring your own Redis, you must use those connection values. For more information, see your Redis provider docs, such as Amazon ElastiCache or Google Cloud Memorystore.
Choose between using the Redis CLI or RedisInsights.
Redis CLI
You can use the Redis CLI that is built into your deployment to review the data in your database.
Install Redis in your cluster so that you can use the
redis-clito connect to your Redis instance.From your terminal, log in to the Redis pod and open a Redis CLI shell.
Run Redis CLI commands, such as
monitororkeys. For more information, see the Redis docs.Example response of data populated by the management server:
  keys *
1) "$CLUSTER_NAME~apps~v1~Deployment"
2) "reports#$CLUSTER_NAME#httpbin#$CLUSTER_NAME"
3) "$CLUSTER_NAME~install.istio.io~v1alpha1~IstioOperator"
4) "reports#$CLUSTER_NAME#gloo-mesh#globalcccfde00-e4a9-4867-b6c0-5df8601f6e1e"
5) "$CLUSTER_NAME~admissionregistration.k8s.io~v1~MutatingWebhookConfiguration"
6) "reports#idx"
7) "reports#$CLUSTER_NAME#store#$CLUSTER_NAME"
8) "gloo.mesh.key.set"
Example response of rate limit counters:
  monitor
OK
1681223733.198361 [0 10.xxx.x.x:xxxxx] "INCRBY" "tree|solo.io|generic_key^gloo-mesh.rl-server-config-gloo-mesh-$CLUSTER_NAME-rate-limiter|generic_key^counter|1718236800" "1"
Example response of API keys for the external auth service and portal server add-ons. Note that the API key name and value are hashed based on the
apiKeyStorage.secretKeythat you configured when setting up the add-ons.keys * 1) "1bbe3f25-5a2a-4797-8ac0-d59c7480377a" 2) "abcmHk2Iwcy3VL+NNswyrs3B4YIEx39BG84jzwcoWB8=" get "1bbe3f25-5a2a-4797-8ac0-d59c7480377a" "xksmHk2Iwcy3VL+NNswyrs3B4YIEx39BG84jzwcoWB8=" get "abcmHk2Iwcy3VL+NNswyrs3B4YIEx39BG84jzwcoWB8=" "{\"api_key\":\"abcmHk2Iwcy3VL+NNswyrs3B4YIEx39BG84jzwcoWB8=\",\"labels\":[\"first.last@example.com\"],\"metadata\":{\"config_id\":\"gloo-mesh.api-key-auth-default-cluster-name-mgt-ext-auth-service\",\"created-ts-unix\":\"1718742070\",\"name\":\"gold-api-key-name\",\"usagePlan\":\"gold\",\"username\":\"first.last@example.com\"},\"uuid\":\"1bbe3f25-5a2a-4797-8ac0-d59c7480377a\"}"
RedisInsights
RedisInsights is a desktop application that you can install for UI- and CLI-based interactions. For more information, see the Redis docs.
- Install RedisInsights. The steps vary depending on where you want to install the app.
- On your local machine: Download RedisInsights.
- In your Kubernetes cluster: See the Redis docs.
- Enable port forwarding on the Redis deployment. Update the namespace and deployment to match the Redis instance in your cluster.
kubectl port-forward -n gloo-mesh deploy/gloo-mesh-redis 6379 - Launch the RedisInsights app.
- Click + Add Redis Database and enter in your localhost and port details, which by default are
127.0.0.1:6379. - Click the database that you just added.
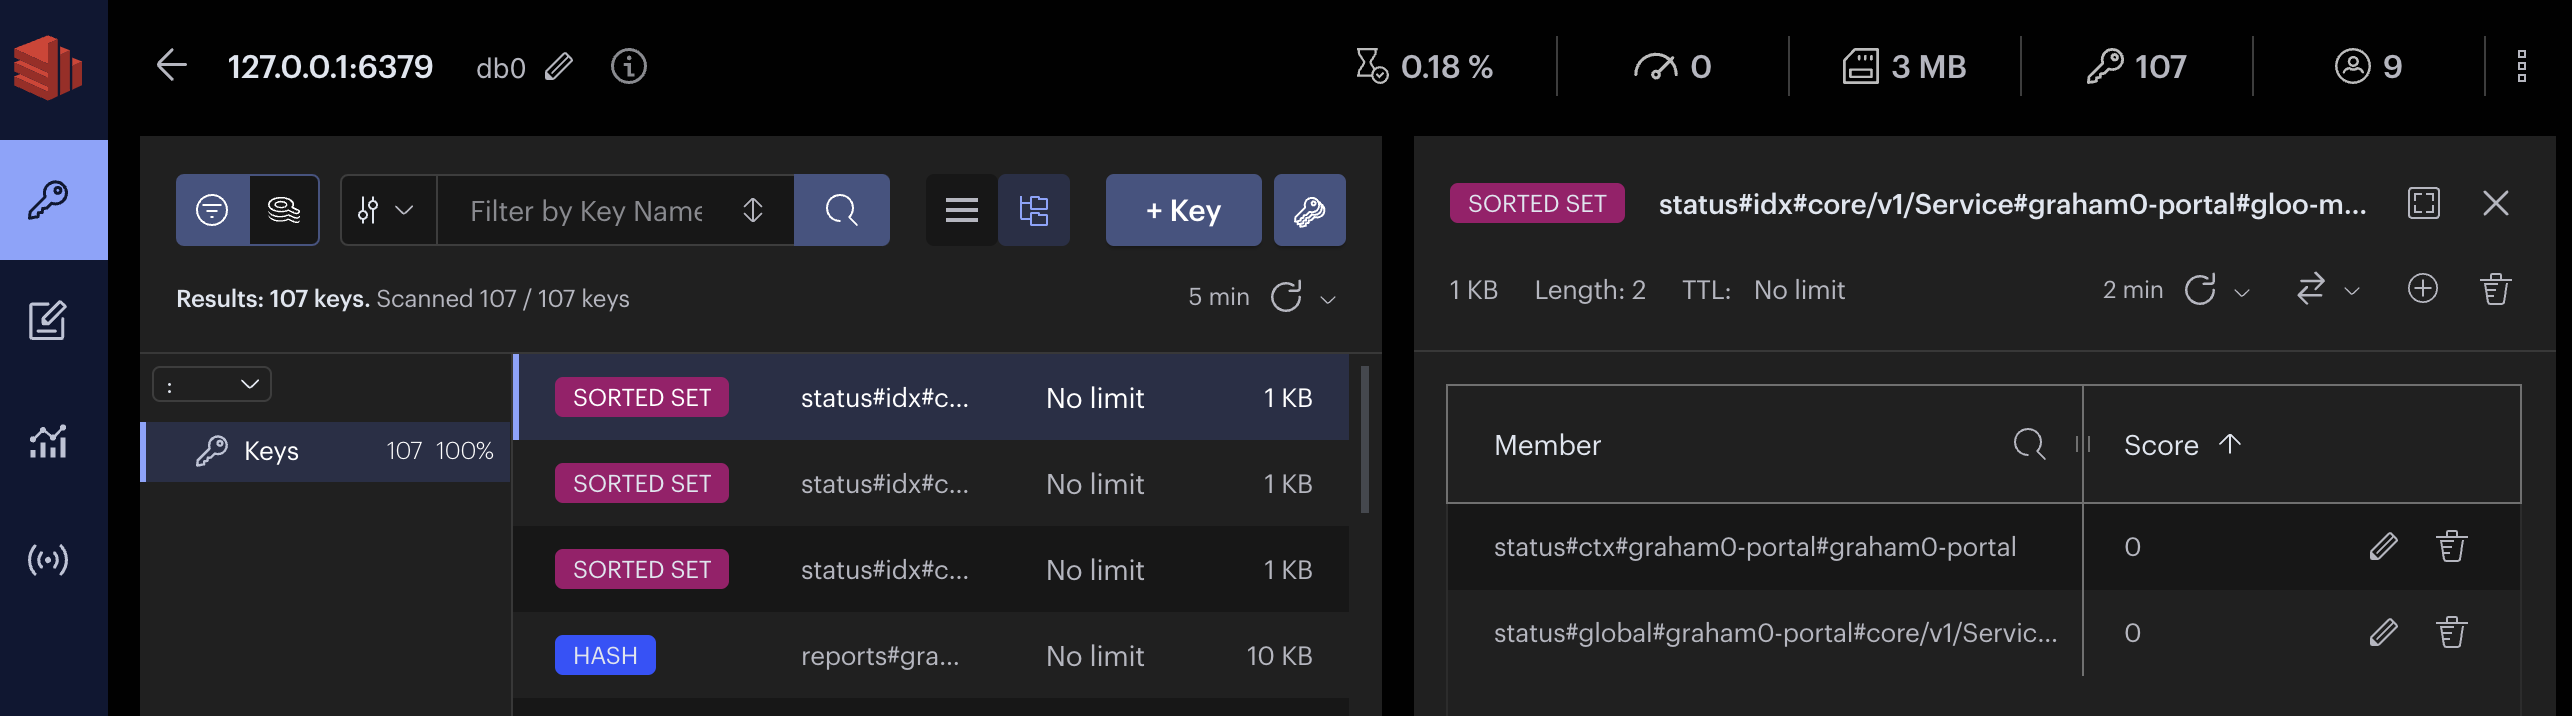
- Use the UI or CLI to explore the data. For example, you can click the Browser tab (the key icon) and toggle the Key view to explore all of the keys in the database instance, as shown in the following screenshot.
Debug Redis for the Gloo management server
After debugging the management server and agent pods, you might still see error messages related to reconciling state. Gloo stores the state of its resources in a Redis pod. You can try to restart the pod to resolve these reconciliation issues.
Enable port forwarding on port 9091 of the
gloo-mesh-mgmt-serverpod to your localhost.Take snapshots of your current state in case you want to refer to the logs later, such as to open a Support issue.
  curl localhost:9091/snapshots/input -o input_snapshot.json
curl localhost:9091/snapshots/output -o output_snapshot.json
Get the
gloo-mesh-redis-*pod.kubectl get pods -n gloo-meshExample output:
  NAME                                    READY   STATUS    RESTARTS   AGE
gloo-mesh-mgmt-server-c7cc4dd77-8shdw   1/1     Running   0          4d19h
gloo-mesh-redis-794d79b7df-28mcr        1/1     Running   0          4d19h
gloo-mesh-ui-c8cfd5fdd-mdscf            3/3     Running   0          4d19h
prometheus-server-647b488bb-ns748       2/2     Running   0          4d19h
Restart the Redis deployment.
kubectl rollout restart deployment/gloo-mesh-redis -n gloo-meshTry checking your Gloo management server and agent logs to see if the reconciliation errors are resolved.
Verify that the add-ons share Redis settings
If you use add-ons such as the external auth service and portal server together, they must share the same backing Redis instance. If the configurations are different, you might experience issues.
Verify that the external auth and portal server add-ons are configured to use the same Redis instance.
Verify that any necessary secrets are created.
kubectl get secrets -n gloo-meshExample output:
  NAME                                      TYPE                    DATA   AGE
ext-auth-service-api-key-secret-key       Opaque                  1      47s
ext-auth-service-api-key-storage          Opaque                  1      47s
ext-auth-service-signing-key              Opaque                  1      47s
portal-storage-config                     Opaque                  1      47s
portal-redis-certs                        Opaque                  1      47s
portal-redis-credentials                  Opaque                  1      47s
Log in to the portal server and external auth service pods, and verify that the host information is stored along the config path that you set.