Gloo UI
Review how the Gloo user interface (UI) server backs up data and your setup options to make the backing database more resilient.
For more information about the feature, see Gloo UI.
What data gets stored
The Gloo UI displays the information that the Gloo management server stores in a snapshot in the database. This information includes discovered Gloo, Kubernetes, and other open source custom resources in your cluster environment. As such, you must set up both the Gloo management server and the Gloo UI to use the same backing database.
The Gloo UI additionally stores the user session information (such as access and ID tokens) in the backing instance when you also enable external auth for Gloo UI. For an example of how to check the data that gets stored, see Review data in Redis.
Backing storage options
Review the following options for setting up backing storage with Redis®* 1 instances.
| Option | Use case | Benefits | Drawbacks |
|---|---|---|---|
| Built-in local Redis | Proof of concept and staging environments |
|
|
| Bring your own Redis | Production environments |
|
|
Shared or separate instances
In Gloo Mesh Gateway, many components use Redis to store data. Several of these components must share the same instance in order to function properly, as follows:
- Management server, UI, and insights engine (which is also used as part of the OTel pipeline).
- External auth service and developer portal server.
- Rate limiter, which is often shared with the external auth service and portal server, but does not have to be.
If you enable the default, Solo-provided, local Redis options, these Redis instances are created separately.
If you bring your own Redis, you can choose to share the Redis instances or not. For internal compliance or security purposes, you might want separate Redis instances for each of these use cases. As such, the following guide assumes a separate deployment, and uses separate secrets. However, you can also share a single external Redis instance and update the names accordingly.
Built-in local Redis
By default, a local Redis instance gloo-mesh-redis is set up in the gloo-mesh namespace of the management cluster when you install the Gloo management server and UI components. The Gloo management server replicas and the Gloo UI are automatically configured to read from and write data to this Redis instance for a global view of your Gloo environment.
Using a local Redis instance is not a recommended practice for production. To achieve higher availability, disaster recovery and add other security features, bring your own Redis instance instead.
When you install or upgrade Gloo Mesh Gateway, include the following Helm values to enable the local Redis instance.
redis:
  deployment:
    # Enable the creation of the local Redis deployment and service.
    enabled: true
Optional: Further configure the default Redis values, such as to modify the Kubernetes deployment’s resource limits and requests. For more information, check the Helm reference for the
rediscomponent.
Bring your own Redis
Instead of using the built-in local Redis instance, you can achieve higher availability, disaster recovery, and enhanced control and security by bringing your own Redis cluster.
Keep in mind that by bringing your own Redis instance, you configure both the Gloo management server and Gloo UI to read from and write to the same Redis database. Any settings for your Redis instance, such as the maximum number of retries, are shared between these components.
Step 1: Choose a Redis provider
You can choose between a local or externally hosted Redis instance.
- For a local instance: Install the Redis instance in the same cluster as the component that the Redis backs. For example, for the Gloo management server, install the Redis instance in the management cluster. For an add-on, install the Redis instance in the same workload as the rate limiter, external auth service, or portal server.
- For an external cloud instance: Create an instance outside your cluster environment, such as Redis Enterprise or a cloud provider service like AWS ElastiCache.
Using a Redis or AWS ElastiCache instance in cluster mode is currently not supported.
Step 2: Configure your Redis instance
To create or use an existing Redis instance, make sure that you can connect to your Redis instance from the Gloo management cluster. These steps can vary by provider, but the following guidelines are common.
- Local instances: The Gloo management server and Redis instances must be able to communicate. For example, you might deploy them in the same Kubernetes namespace.
- Cloud instances: Often, you must configure networking settings such as the following:
- Create the Kubernetes cluster and the Redis instance in the same virtual private network (VPC).
- Create the Kubernetes cluster and the Redis instance in the same security group.
- Make sure that the security group allows inbound and outbound connections between the cluster and Redis instance.
- If the cluster is behind a firewall, you might need to add the public IP address of the Redis cluster to your allowlist.
- Provider-specific considerations: Continue reading for requirements per Cloud provider.
AWS ElastiCache
When setting up your AWS ElastiCache instance, consider the following deployment options:
- Use a high availability (HA) setup consisting of at least 1 primary and 1 replica instance.
- Use non-clustered mode. Cluster mode is currently not supported.
- Set up multiple availability zones (multi-AZ) with auto-failover enabled.
- Set the
maxmemory-policydirective tonoeviction. For more information about eviction policies, see the Redis docs. - Use node types with TLS Offloading and Enhanced I/O Multiplexing.
- Although optional, enabling TLS is recommended.
- Monitor performance metrics including CPU utilization, memory usage, network throughput, and cache hit ratio.
- Based on the size of your environment, increase the type of node instances. For more information, see Size and memory system requirements.
Step 3: Get your Gloo environment details
You can configure Redis during an initial installation or by performing an upgrade. Either way, you can configure the Redis details in your Helm values file.
Installation
If you have not installed Gloo Mesh Gateway yet, prepare details for your installation.
Decide the Helm release namespace to use. The example uses the names suggested throughout the documentation,
gloo-platformandgloo-mesh.export GLOO_MESH_RELEASE_NAMESPACE=gloo-meshCreate a Helm values file for your installation, such as
gloo-single.yamlfor a single cluster ormgmt-plane.yamlanddata-plane.yamlfor a multicluster environment.
Upgrade
If you are upgrading Gloo Mesh Gateway to set up Redis, get the details of your installation.
Save the details of your Gloo Mesh Gateway installation, including the Helm chart namespace for the component that you want to set up the Redis instance for. In the following example, the release name is
gloo-platformand the namespace isgloo-mesh, but you can update your values accordingly.export GLOO_MESH_RELEASE_NAMESPACE=gloo-meshTo get the values for your own release, run the following Helm command.
helm list --all-namespacesNAME NAMESPACE REVISION UPDATED STATUS CHART gloo-platform gloo-mesh 1 2023-09-01 13:26:56.061102 -0400 EDT deployed gloo-platform-2.3.24Get your Gloo Platform Helm values file. For more information, see Upgrade guide.
Single cluster:
  helm get values gloo-platform -o yaml -n gloo-mesh > gloo-single.yaml
open gloo-single.yaml
Multicluster:
  helm get values gloo-platform -n gloo-mesh -o yaml --kube-context $MGMT_CONTEXT > mgmt-plane.yaml
open mgmt-plane.yaml
helm get values gloo-platform -n gloo-mesh -o yaml --kube-context $REMOTE_CONTEXT > data-plane.yaml open data-plane.yaml
Step 4: Set up Redis authentication
Choose how to authenticate with your Redis cluster. Depending on your Redis provider, you might be required to use a specific authentication method, such as TLS certificates or a username and password.
TLS-encryption
For TLS-encrypted communication with Redis, the steps vary by provider.
Enable TLS encryption for your Redis instance.
- For local instances, you might create your own certificates such as with
opensslorcert-managerto make the public Certificate Authority (CA) certificate,ca.crt. Then, you create a secret with this CA certificate so that the Gloo client can establish trust for the TLS connection to the Redis server instance. Note that server-side credentials for a mutual TLS (mTLS) connection are currently not supported. - For cloud instances, the provider often manages the certificates for you. For example, AWS ElastiCache encrypts in-transit communication with their own public CA. Note: Most up-to-date apps include CA certificates that trust the AWS CA by default. However, if after setup, you notice timeouts and
SSL_connect failed: certificate verify failedmessages in the logs, your app might not have the CA certificates. Depending on your app, you can update the CA certificates such as by logging into the pod and runningupdate-ca-certificates. For an example, see the Bring your own Redis deployment example in the verification guide.
- For local instances, you might create your own certificates such as with
For local instances: Create a Kubernetes secret to store the TLS credentials in the same namespace as the management server. Run the following command from the local directory where your TLS certificates and key were created. Update the filenames of the certificates as necessary. Note: If you do not have certificates, such as if you use a cloud provider like AWS ElastiCache, skip this step.
  kubectl apply -f - <<EOF
apiVersion: v1
kind: Secret
type: Opaque
metadata:
  name: "redis-certs"
  namespace: $GLOO_MESH_RELEASE_NAMESPACE
  labels:
    app.kubernetes.io/managed-by: Helm
  annotations:
    meta.helm.sh/release-name: $GLOO_MESH_RELEASE_NAME
    meta.helm.sh/release-namespace: $GLOO_MESH_RELEASE_NAMESPACE
data:
  ca.crt: $(cat ca.crt | base64 | tr -d '\n')
EOF
Prepare the
redis.certssection of the Helm values file that you previously retrieved.
Password authentication
For a username and password auth, complete the following steps.
Enable password auth for your Redis instance.
Save the following values as environment variables.
- Username: If your Redis instance does not have a username, use
default. - Password: Note the password string.
export REDIS_UN=default export REDIS_PW=<password>- Username: If your Redis instance does not have a username, use
Create a Kubernetes secret to store the credentials in the same namespace as the management server.
  kubectl apply -f- <<EOF
apiVersion: v1
kind: Secret
type: Opaque
metadata:
   name: redis-auth-secrets
   namespace: $GLOO_MESH_NAMESPACE
   labels:
     app.kubernetes.io/managed-by: Helm
   annotations:
     meta.helm.sh/release-name: $GLOO_MESH_RELEASE_NAME
     meta.helm.sh/release-namespace: $GLOO_MESH_NAMESPACE
stringData:
  #If Redis doesn't have an explicit username, specify ‘default’.
  username: "$REDIS_UN"
  password: "$REDIS_PW"
EOF
Prepare the
redis.authsection of the Helm values file that you previously retrieved.redis: auth: # Enable authentication for Redis with the username and password in the referenced secret. enabled: true # The name of the secret in the same namespace as the management server. secretName: redis-auth-secrets # The key name in the data section of the Kubernetes secret # that has the password. passwordKey: password # The key name in the data section of the Kubernetes secret # that has the username. usernameKey: username
Step 5: Configure other Redis settings
Complete the redis section of your Helm values file. For more settings, see the Helm reference.
To use your own Redis instance, disable the default Solo-provided Redis.
redis:
  deployment:
    # The default deployment of Redis.
    # Set to false to bring your own Redis instance.
    enabled: false
Include the address to use to connect to your Redis cluster.
- For local instances, this value is typically the Kubernetes service name that the management server can access, such as
gloo-mesh-redis.gloo-mesh:6379. - For a cloud instance, this value is typically the primary endpoint, such as
master.my-redis-name.cache.amazonaws.com:6379for AWS ElastiCache or10.xxx.xx.xx:6379for Google Cloud Memorystore.
redis: # Provide the address to your external Redis database, such as AWS ElastiCache or Google Cloud Memorystore. # The following example shows how to configure the address for a Redis instance that is deployed to the cluster. address: gloo-mesh-redis.gloo-mesh:6379- For local instances, this value is typically the Kubernetes service name that the management server can access, such as
Optionally override the default connection settings for Redis, such as the maximum number of retries.
redis:
  connection:
    # Dial timeout for establishing new connections. Default is 5 seconds.
    dialTimeout: 5s
    # Frequency of idle checks made by idle connections reaper. Default is 1 minute. -1 disables idle connections reaper, but idle connections are still discarded by the client if IdleTimeout is set.
    idleCheckFrequency: 1m0s
    # Amount of time after which client closes idle connections. Should be less than server's timeout. Default is 5 minutes. -1 disables idle timeout check.
    idleTimeout: 5m0s
    # Connection age at which client retires (closes) the connection. Default is to not close aged connections.
    maxConnAge: ""
    # Maximum number of retries before giving up. Default is 3. -1 disables retries.
    maxRetries: 3
    # Maximum backoff between each retry. Default is 512 milliseconds. -1 disables backoff.
    maxRetryBackoff: 512ms
    # Minimum number of idle connections which is useful when establishing new connection is slow.
    minIdleConns: 0
    # Minimum backoff between each retry. Default is 8 milliseconds. -1 disables backoff.
    minRetryBackoff: 8ms
    # Type of connection pool. true for FIFO pool. false for LIFO pool. Note that FIFO has higher overhead compared to LIFO.
    poolFifo: false
    # Maximum number of socket connections. Default is 10 connections per every available CPU as reported by runtime.GOMAXPROCS.
    poolSize: 0
    # Amount of time client waits for connection if all connections are busy before returning an error. Default is ReadTimeout + 1 second.
    poolTimeout: ""
    # Timeout for socket reads. if reached, commands will fail with a timeout instead of blocking. Default is 3 seconds. -1 disables timeout. 0 uses the default value.
    readTimeout: 3s
    # Timeout for socket writes. If reached, commands will fail with a timeout instead of blocking. Default is ReadTimeout.
    writeTimeout: ""
Step 6: Upgrade the Helm installation
Continue with the Upgrade guide to reinstall Gloo Mesh Gateway with your own Redis instance. Include the Helm values file that you prepared in the previous steps.
The following example Helm values file shows a simple installation with the Redis section filled out for an AWS ElastiCache instance.
  common:
  cluster: $CLUSTER_NAME
extAuthService:
  apiKeyStorage:
    enabled: false
  enabled: true
glooAgent:
  enabled: true
  extraEnvs:
    RELAY_DISABLE_SERVER_CERTIFICATE_VALIDATION:
      value: "true"
    RELAY_TOKEN:
      value: My token
  relay:
    serverAddress: gloo-mesh-mgmt-server.gloo-mesh:9900
glooMgmtServer:
  createGlobalWorkspace: true
  enabled: true
  extraEnvs:
    RELAY_DISABLE_CLIENT_CERTIFICATE_AUTHENTICATION:
      value: "true"
    RELAY_TOKEN:
      value: My token
  registerCluster: true
  serviceType: ClusterIP
glooUi:
  enabled: true
istioInstallations:
  enabled: true
licensing:
  glooGatewayLicenseKey: $GLOO_MESH_GATEWAY_LICENSE_KEY
prometheus:
  enabled: true
rateLimiter:
  enabled: true
redis:
  deployment:
    enabled: false
  address: master.my-redis.joolhr.use2.cache.amazonaws.com:6379
  # Optionally enable authentication for Redis with the username and password in the referenced secret.
  # The 'secretName', 'passwordKey', and 'usernameKey' are set to the default values,
  # which you must update if you changed these in your secret.
  auth:
    # Enable authentication for Redis with the username and password in the referenced secret.
    enabled: true
    # The name of the secret in the same namespace as the management server.
    secretName: redis-auth-secrets
    # The key name in the data section of the Kubernetes secret
    # that has the password.
    passwordKey: password
    # The key name in the data section of the Kubernetes secret
    # that has the username.
    usernameKey: username
  certs:
    # Enable TLS connections to the Redis instance.
    enabled: true
  connection:
    # Dial timeout for establishing new connections. Default is 5 seconds.
    dialTimeout: 5s
    # Frequency of idle checks made by idle connections reaper. Default is 1 minute. -1 disables idle connections reaper, but idle connections are still discarded by the client if IdleTimeout is set.
    idleCheckFrequency: 1m0s
    # Amount of time after which client closes idle connections. Should be less than server's timeout. Default is 5 minutes. -1 disables idle timeout check.
    idleTimeout: 5m0s
    # Connection age at which client retires (closes) the connection. Default is to not close aged connections.
    maxConnAge: ""
    # Maximum number of retries before giving up. Default is 3. -1 disables retries.
    maxRetries: 3
    # Maximum backoff between each retry. Default is 512 milliseconds. -1 disables backoff.
    maxRetryBackoff: 512ms
    # Minimum number of idle connections which is useful when establishing new connection is slow.
    minIdleConns: 0
    # Minimum backoff between each retry. Default is 8 milliseconds. -1 disables backoff.
    minRetryBackoff: 8ms
    # Type of connection pool. true for FIFO pool. false for LIFO pool. Note that FIFO has higher overhead compared to LIFO.
    poolFifo: false
    # Maximum number of socket connections. Default is 10 connections per every available CPU as reported by runtime.GOMAXPROCS.
    poolSize: 0
    # Amount of time client waits for connection if all connections are busy before returning an error. Default is ReadTimeout + 1 second.
    poolTimeout: ""
    # Timeout for socket reads. if reached, commands will fail with a timeout instead of blocking. Default is 3 seconds. -1 disables timeout. 0 uses the default value.
    readTimeout: 3s
    # Timeout for socket writes. If reached, commands will fail with a timeout instead of blocking. Default is ReadTimeout.
    writeTimeout: ""
telemetryCollector:
  enabled: true
Verify the connection
To review the data that is stored in Redis, you can connect to the local Redis instance. If you bring your own Redis, you must use those connection values. For more information, see your Redis provider docs, such as Amazon ElastiCache or Google Cloud Memorystore.
Choose between using the Redis CLI or RedisInsights.
Redis CLI
You can use the Redis CLI that is built into your deployment to review the data in your database.
Install Redis in your cluster so that you can use the
redis-clito connect to your Redis instance.From your terminal, log in to the Redis pod and open a Redis CLI shell.
Run Redis CLI commands, such as
monitororkeys. For more information, see the Redis docs.Example response of data populated by the management server:
  keys *
1) "$CLUSTER_NAME~apps~v1~Deployment"
2) "reports#$CLUSTER_NAME#httpbin#$CLUSTER_NAME"
3) "$CLUSTER_NAME~install.istio.io~v1alpha1~IstioOperator"
4) "reports#$CLUSTER_NAME#gloo-mesh#globalcccfde00-e4a9-4867-b6c0-5df8601f6e1e"
5) "$CLUSTER_NAME~admissionregistration.k8s.io~v1~MutatingWebhookConfiguration"
6) "reports#idx"
7) "reports#$CLUSTER_NAME#store#$CLUSTER_NAME"
8) "gloo.mesh.key.set"
Example response of rate limit counters:
  monitor
OK
1681223733.198361 [0 10.xxx.x.x:xxxxx] "INCRBY" "tree|solo.io|generic_key^gloo-mesh.rl-server-config-gloo-mesh-$CLUSTER_NAME-rate-limiter|generic_key^counter|1718236800" "1"
Example response of API keys for the external auth service and portal server add-ons. Note that the API key name and value are hashed based on the
apiKeyStorage.secretKeythat you configured when setting up the add-ons.keys * 1) "1bbe3f25-5a2a-4797-8ac0-d59c7480377a" 2) "abcmHk2Iwcy3VL+NNswyrs3B4YIEx39BG84jzwcoWB8=" get "1bbe3f25-5a2a-4797-8ac0-d59c7480377a" "xksmHk2Iwcy3VL+NNswyrs3B4YIEx39BG84jzwcoWB8=" get "abcmHk2Iwcy3VL+NNswyrs3B4YIEx39BG84jzwcoWB8=" "{\"api_key\":\"abcmHk2Iwcy3VL+NNswyrs3B4YIEx39BG84jzwcoWB8=\",\"labels\":[\"first.last@example.com\"],\"metadata\":{\"config_id\":\"gloo-mesh.api-key-auth-default-cluster-name-mgt-ext-auth-service\",\"created-ts-unix\":\"1718742070\",\"name\":\"gold-api-key-name\",\"usagePlan\":\"gold\",\"username\":\"first.last@example.com\"},\"uuid\":\"1bbe3f25-5a2a-4797-8ac0-d59c7480377a\"}"
RedisInsights
RedisInsights is a desktop application that you can install for UI- and CLI-based interactions. For more information, see the Redis docs.
- Install RedisInsights. The steps vary depending on where you want to install the app.
- On your local machine: Download RedisInsights.
- In your Kubernetes cluster: See the Redis docs.
- Enable port forwarding on the Redis deployment. Update the namespace and deployment to match the Redis instance in your cluster.
kubectl port-forward -n gloo-mesh deploy/gloo-mesh-redis 6379 - Launch the RedisInsights app.
- Click + Add Redis Database and enter in your localhost and port details, which by default are
127.0.0.1:6379. - Click the database that you just added.
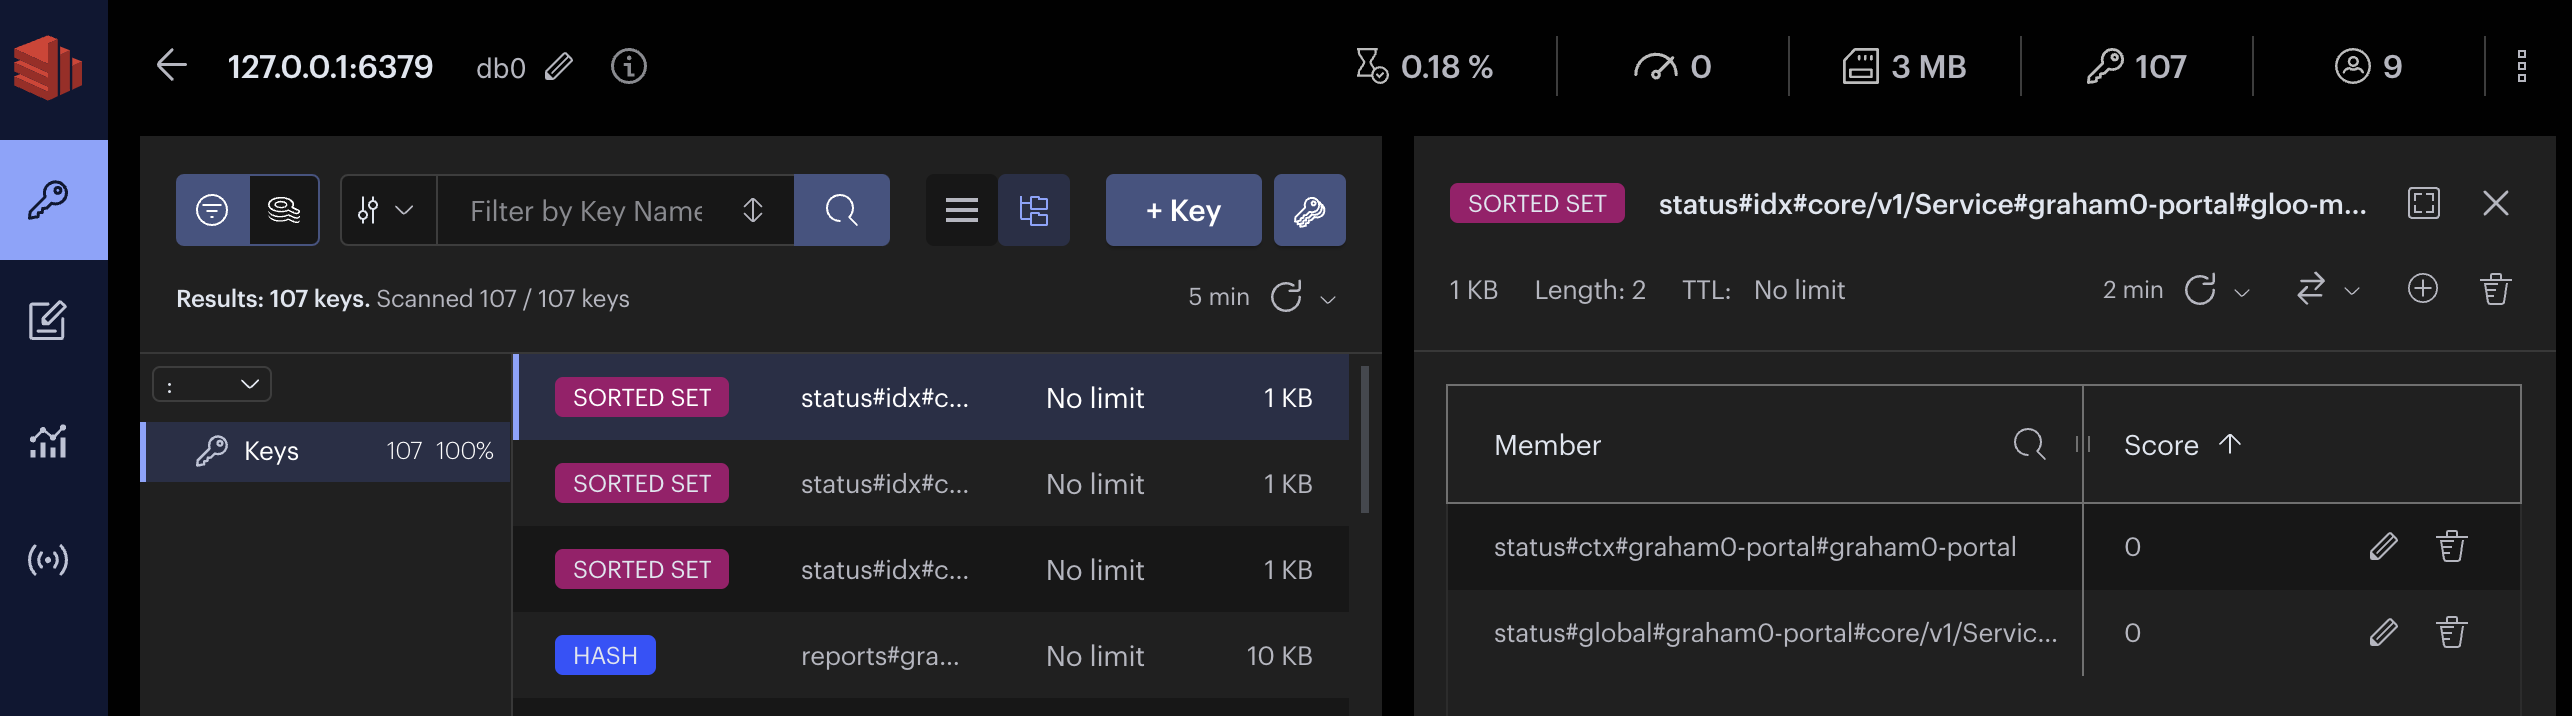
- Use the UI or CLI to explore the data. For example, you can click the Browser tab (the key icon) and toggle the Key view to explore all of the keys in the database instance, as shown in the following screenshot.
*Redis is a registered trademark of Redis Ltd. Any rights therein are reserved to Redis Ltd. Any use by Solo.io, Inc. is for referential purposes only and does not indicate any sponsorship, endorsement or affiliation between Redis and Solo.io. ↩︎