API keys
Require users to authenticate with an API key in requests to your API products.
After you set up the frontend portal, your users can generate API keys for themselves.
For more information about this type of external auth, see API keys.
Before you begin
Create your APIs, including the Gloo ApiDocs that describe the stitched schema.
Bundle your APIs into API products by using a route table.
Make sure that the external auth service is installed and running. If not, install the external auth service in your single or multicluster environment.
kubectl get pods -A -l app=ext-auth-serviceGet the labels of your routes to use to apply policies to, such as with the example query.
kubectl get rt -n gloo-mesh-gateways -o=jsonpath='{range .items[*]}[{.metadata.name}, {.spec.http[*].name}, {.spec.http[*].labels}]{"\n"}{end}'Example output:
- The
api-example-com-rtroute table does not have any route-level labels. To apply policies, you can add labels to those routes. - The
petstore-rtroute table has ausagePlans: dev-portallabel on itspets-api,users-api, andstore-apiroutes. - The
tracks-rtroute table has ausagePlans: dev-portallabel on itstracks-apiroute.
[api-example-com-rt, , ] [petstore-rt, pets-api users-api store-api, {"usagePlans":"dev-portal"} {"usagePlans":"dev-portal"} {"usagePlans":"dev-portal"} ] [tracks-rt, tracks-api, {"usagePlans":"dev-portal"}]- The
To verify API keys that Gloo Portal creates, set up the frontend app for the developer portal. Keep in mind that this step requires you to have applied a usage plan (external auth and rate limiting policies) as well as configured a backend Portal resource.
Get the external address of your ingress gateway. The steps vary depending on the type of load balancer that backs the ingress gateway.
export INGRESS_GW_ADDRESS=$(kubectl get svc -n gloo-mesh-gateways istio-ingressgateway -o jsonpath="{.status.loadBalancer.ingress[0]['hostname','ip']}") echo $INGRESS_GW_ADDRESSNote: Depending on your environment, you might see
<pending>instead of an external IP address. For example, if you are testing locally in kind or minikube, or if you have insufficient permissions in your cloud platform, you can instead port-forward the service port of the ingress gateway:kubectl -n gloo-mesh-gateways port-forward deploy/istio-ingressgateway-1-18 8081
Storage for API keys
Decide on a storage method for API keys. You can choose from the following options:
| Storage method | Use cases | Description |
|---|---|---|
| Kubernetes secrets | Quick tests and demos | By default, Gloo creates a Kubernetes secret for each API key that gets generated through the frontend developer portal that you configure later. If you do not have a frontend developer portal yet, you can manually create the secret. |
| Local Redis database | Development, staging, and single cluster environments | You can configure the local Redis database that Gloo Mesh Gateway sets up for you when you install Portal. Then, each API key that gets generated through the frontend developer portal gets stored in this local Redis database. |
| External Redis database | Production and multicluster environments | You can configure your own external backing Redis database when you install Portal. Then, each API key that gets generated through the frontend developer portal gets stored in this external Redis database. |
Create an API key policy
Follow the steps in the Protect your APIs to create an API key policy.
Verify API keys in a backing Redis storage database
After you set up your portal backend and frontend later, you can test out external authentication with the API keys that Gloo Portal generates upon user request. For more backing storage options, see the Backing Redis databases guide.
Before you begin:
- Deploy a frontend UI application. The following steps assume that you deployed the sample React app.
- Secure access to the portal by requiring an OIDC login.
Steps to verify API keys:
Generate an API key by using the developer portal frontend UI.
- Go to the host domain that your frontend developer portal is exposed on, such as
developer.example.com. - Click Login.
- Enter your username and password, such as
user1@example.comandpassword. - From your profile dropdown, click API Keys.
- Expand the API product that you want to create an API key for.
- For the usage plan of the API product that you want to create an API key for, click + Add Key.
- Give your API key a name and click Generate Key.
- Copy the key’s value. You won’t be able to see this value later.
- Click Close Window.
- Optional: To review the API key’s custom metadata that is automatically generated for you, click the View key details pencil icon. Details such as
nameandusagePlanare returned. - Optional: To delete the API key if you no longer need it, click the Delete key X icon.
- Go to the host domain that your frontend developer portal is exposed on, such as
Update your API key external auth policy to remove the local Kubernetes secret storage. Now, the external auth server uses the backing storage values that you set up, such as for Redis.
  kubectl apply -f - << EOF
apiVersion: security.policy.gloo.solo.io/v2
kind: ExtAuthPolicy
metadata:
  name: api-key-auth
  namespace: default
spec:
  applyToRoutes:
  - route:
      labels:
        usagePlans: dev-portal
  config:
    server:
      name: ext-auth-server
      namespace: gloo-mesh
      cluster: $CLUSTER_NAME
    glooAuth:
      configs:
        - apiKeyAuth:
            headerName: api-key
               headersFromMetadataEntry:
                 x-solo-plan:
                   name: usagePlan
                   required: true
EOF
Review the following table to understand this configuration. For more information, see the API docs.
Setting Description metadata.namespaceCreate the external auth policy in the same namespace or import it into the same Gloo workspace as the external auth server. In this example, the policy is in the default namespace. applyToRoutesApply the policy to the tracks-apiroute that you previously created in the API product’s route table. You apply policies by labels. Thetracks-apiroute has theusagePlans: dev-portallabel.config.serverSelect the external auth server that you configured earlier. headerNameSet the name of the header. In this example, requests must include the API key in the api-keyheader.Verify that the API key works to authenticate your request. Replace
$API_KEYwith the value of the API key that you previously created.curl -v -H 'api-key: $API_KEY' --resolve api.example.com:80:${INGRESS_GW_ADDRESS} http://api.example.com/trackapi/tracksExample output:
  < HTTP/1.1 200 OK
...
   [
  {
    "id": "c_0",
    "thumbnail": "https://res.cloudinary.com/dety84pbu/image/upload/v1598465568/nebula_cat_djkt9r.jpg",
    "topic": "Cat-stronomy",
    "authorId": "cat-1",
    "title": "Cat-stronomy, an introduction",
    "description": "Curious to learn what Cat-stronomy is all about? Explore the planetary and celestial alignments and how they have affected our space missions.",
    "numberOfViews": 163,
    "createdAt": "2018-09-10T07:13:53.020Z",
    "length": 2377,
    "modulesCount": 10,
    "modules": [
      "l_0",
      "l_1",
      "l_2",
      "l_3",
      "l_4",
      "l_5",
      "l_6",
      "l_7",
      "l_8",
      "l_9"
    ]
  },
...
Optional: Check that the API key exists in the backing storage database. For example, you might review the contents of the local Redis database with RedisInsights to find the API key that you just created, such as in the following screenshot. For more information, see Review data in Redis.
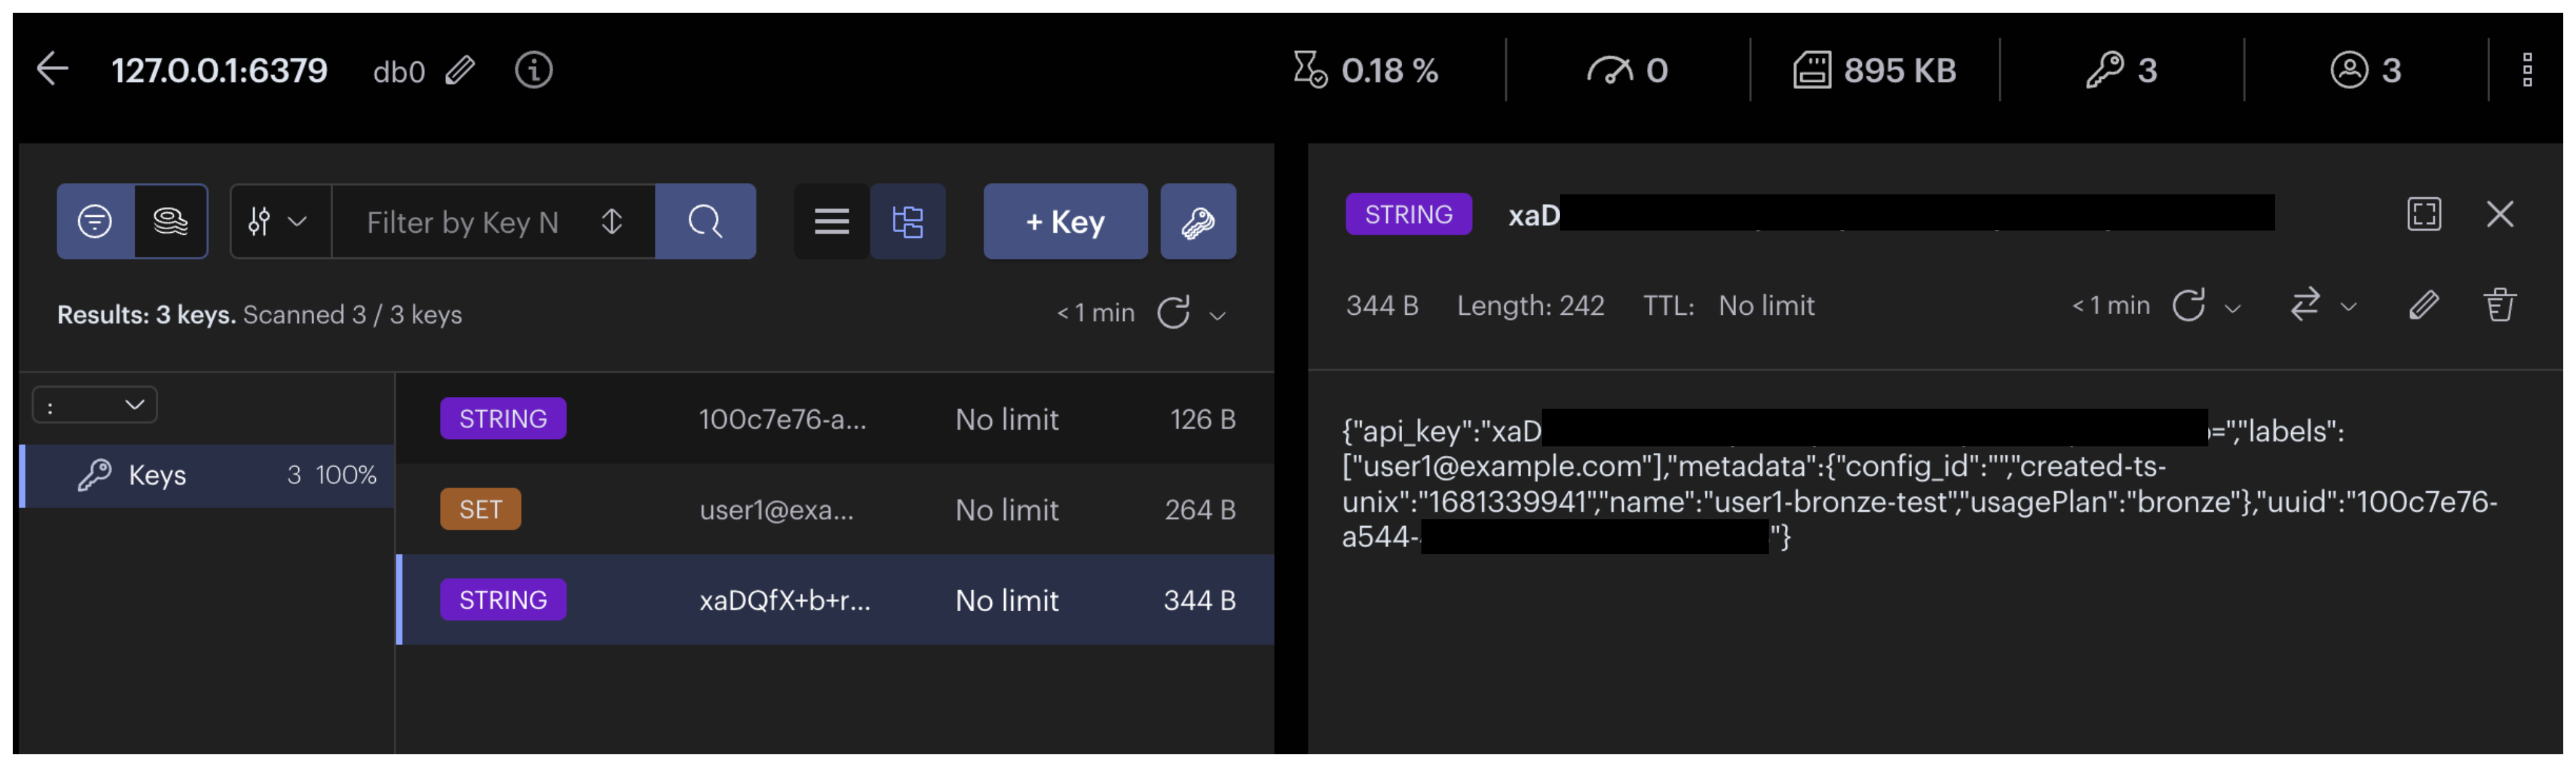
Figure: RedisInsight screenshot of the API key Figure: RedisInsight screenshot of the API key
Next steps
- If you haven’t already, set rate limits for your API products.
- Configure the developer portal.