On-prem instances
Onboard an on-premises machine to your Istio service mesh.
Before you begin
Install CLI tools
Install the following CLI tools.
helm, the Kubernetes package manager.kubectl, the Kubernetes command line tool. Download thekubectlversion that is within one minor version of the Kubernetes clusters you plan to use.istioctl, the Istio command line tool. Important: Versions 1.17.4 through 1.22.3-patch0 are supported in Gloo Mesh Enterprise for onboarding on-prem machines.meshctl, the Gloo command line tool for bootstrapping Gloo Mesh Enterprise, registering clusters, describing configured resources, and more. Be sure to download version2.6.0-rc2, which uses the latest Gloo Mesh installation values.curl -sL https://run.solo.io/meshctl/install | GLOO_MESH_VERSION=v2.6.0-rc2 sh - export PATH=$HOME/.gloo-mesh/bin:$PATH
Overview
This guide walks you through the following general steps:
- Create compute resources: Create two Kubernetes clusters and an on-premises machine.
- Set up the management cluster: Deploy the Gloo management plane to the management cluster. The installation settings enable the onboarding of external workloads to the service mesh.
- Set up the workload cluster: Set up your workload cluster to communicate with the management cluster and your on-prem machine, including deploying test apps, deploying Istio, and registering the workload cluster with the Gloo management plane. The registration settings include deploying a SPIRE server to the workload cluster, and using PostgreSQL as the default datastore for the SPIRE server.
- Onboard the on-prem machine: Onboard the on-prem machine to your Gloo Mesh environment by generating a bootstrap bundle that installs the Istio sidecar, OpenTelemetry (OTel) collector, and SPIRE agents on the on-prem machine.
- Test connectivity: Verify that the onboarding process was successful by testing the bi-directional connection between the apps that run in the service mesh in your workload cluster and a test app on your on-prem machine.
- Launch the UI (optional): To visualize the connection to your on-prem machine in your Gloo Mesh setup, you can launch the Gloo UI.
Step 1: Create compute resources
Create the on-prem machine, and in your cloud provider, create a management cluster and at least one workload cluster.
Create an on-premises machine that meets the following requirements:
- Use a Debian or RHEL image.
- The machine must be able to access your Kuberentes clusters on the same network or from a different network.
- For testing connectivity, allow all outbound traffic from the on-prem machine, and in the associated firewall rules for its network, permit inbound TCP traffic on ports 22 (SSH access) and 5000 (sample app).
In your cloud provider, create or use at least two clusters. In subsequent steps, you deploy the Gloo management plane to one cluster, and the Gloo data plane and an Istio service mesh to the other cluster.
- The cluster name must be alphanumeric with no special characters except a hyphen (-), lowercase, and begin with a letter (not a number). For more information, see the System requirements.
- AWS: Associate an IAM OIDC provider when you create the cluster that you plan to use as the workload cluster. The OIDC provider allows the Kubernetes service account for the SPIRE server in your workload cluster to act as an AWS IAM service account. The SPIRE server pod can then automatically authenticate as the IAM service account when accessing your on-prem machine.
- Azure: Enable Workload Identity when you create the cluster that you plan to use as the workload cluster. Workload Identity allows the Kubernetes service account for the SPIRE server in your workload cluster to act as a GCP IAM service account. The SPIRE server pod can then automatically authenticate as the IAM service account when accessing your on-prem machine.
- GCP: Enable Workload Identity when you create the cluster that you plan to use as the workload cluster. Workload Identity allows the Kubernetes service account for the SPIRE server in your workload cluster to act as a GCP IAM service account. The SPIRE server pod can then automatically authenticate as the IAM service account when accessing your on-prem machine.
- Set the names of your clusters from your infrastructure provider.
export MGMT_CLUSTER=<mgmt-cluster-name> export REMOTE_CLUSTER=<workload-cluster-name> - Save the kubeconfig contexts for your clusters. Run
kubectl config get-contexts, look for your cluster in theCLUSTERcolumn, and get the context name in theNAMEcolumn. Note: Do not use context names with underscores. The generated certificate that connects workload clusters to the management cluster uses the context name as a SAN specification, and underscores in SAN are not FQDN compliant. You can rename a context by runningkubectl config rename-context "<oldcontext>" <newcontext>.export MGMT_CONTEXT=<management-cluster-context> export REMOTE_CONTEXT=<workload-cluster-context>
Step 2: Set up the management cluster
Install the Gloo management plane in the management cluster. Note that the installation settings included in these steps are tailored for basic setups. For more information about advanced settings, see the setup documentation.
Set your Gloo Mesh Enterprise license key as an environment variable. If you do not have one, contact an account representative. If you prefer to specify license keys in a secret instead, see Licensing. To check your license’s validity, you can run
meshctl license check --key $(echo ${GLOO_MESH_LICENSE_KEY} | base64 -w0).export GLOO_MESH_LICENSE_KEY=<license_key>If you plan to deploy an ingress gateway to manage ingress traffic to mesh workloads and you want to apply policies, such as rate limits, external authentication, or Web Application Firewalls to that gateway, you must also have a Gloo Mesh Gateway license. Without a Gloo Mesh Gateway license, you can only set up simple routing rules to match and forward traffic to mesh workloads. Save the Gloo Mesh Gateway license key as an additional environment variable.
export GLOO_MESH_GATEWAY_LICENSE_KEY=<license-key>Install the Gloo management plane in your management cluster. This command uses a basic profile to create a
gloo-meshnamespace, install the management plane components in your management cluster, such as the management server, and enable the ability to add external workloads to your Gloo environment.meshctl install \ --kubecontext ${MGMT_CONTEXT} \ --version 2.6.0-rc2 \ --profiles mgmt-server \ --set common.cluster=${MGMT_CLUSTER} \ --set licensing.glooMeshLicenseKey=${GLOO_MESH_LICENSE_KEY} \ --set featureGates.ExternalWorkloads=trueVerify that the management plane pods are running.
kubectl get pods -n gloo-mesh --context ${MGMT_CONTEXT}Save the external address and port that were assigned by your cloud provider to the Gloo OpenTelemetry (OTel) gateway load balancer service. The OTel collector agents that collect logs in the workload cluster and in the on-prem machine send metrics to this address.
  export TELEMETRY_GATEWAY_HOSTNAME=$(kubectl get svc -n gloo-mesh gloo-telemetry-gateway --context ${MGMT_CONTEXT} -o jsonpath='{.status.loadBalancer.ingress[0].hostname}')
export TELEMETRY_GATEWAY_PORT=$(kubectl -n gloo-mesh get service gloo-telemetry-gateway --context ${MGMT_CONTEXT} -o jsonpath='{.spec.ports[?(@.name=="otlp")].port}')
export TELEMETRY_GATEWAY_ADDRESS=${TELEMETRY_GATEWAY_HOSTNAME}:${TELEMETRY_GATEWAY_PORT}
echo $TELEMETRY_GATEWAY_ADDRESS
Create a workspace that includes relevant namespaces in all clusters, and create workspace settings that enable communication through the east-west gateway. If you do not want to include the
gloo-meshnamespace in thisdemoworkspace, create a separateadminworkspace for thegloo-meshnamespace, and use the workspace import-export functionality to import thegloo-telemetry-collectorKubernetes service in thegloo-meshnamespace to the application workspace. For more information, see Organize team resources with workspaces.kubectl apply --context ${MGMT_CONTEXT} -f- <<EOF apiVersion: admin.gloo.solo.io/v2 kind: Workspace metadata: name: demo namespace: gloo-mesh spec: workloadClusters: - name: '*' namespaces: - name: sleep - name: httpbin - name: vm-config - name: istio-eastwest - name: gloo-mesh --- apiVersion: admin.gloo.solo.io/v2 kind: WorkspaceSettings metadata: name: demo namespace: gloo-mesh spec: options: eastWestGateways: - selector: labels: istio: eastwestgateway EOFDecide on the type of certificates for the Istio installations you deploy to your workload cluster in the next section.
- Default Istio certificates: To use the default self-signed certificates, no further steps are required. When you deploy Istio in the next section, the Istio components use the self-signed certificates by default.
- Custom Istio certificates: To set up your own certificates to deploy Istio, complete the following example steps. These steps show how to use Istio’s certificate generator tool to quickly generate self-signed root and intermediate CA certificates and keys. For more information and advanced certificate setup options, see Istio certificates.
Create the
istio-systemnamespace on the workload cluster, so that the certificate secret can be created in that namespace.kubectl create namespace istio-system --context ${REMOTE_CONTEXT}Navigate to the Istio certs directory.
cd istio-${ISTIO_VERSION}/tools/certsGenerate a self-signed root CA certificate and private key.
  make -f Makefile.selfsigned.mk \
ROOTCA_CN="Solo Root CA" \
ROOTCA_ORG=Istio \
root-ca
Store the root CA certificate, private key and certificate chain in a Kubernetes secret on the management cluster.
  cp root-cert.pem ca-cert.pem
cp root-key.pem ca-key.pem
cp root-cert.pem cert-chain.pem

kubectl --context ${MGMT_CONTEXT} -n gloo-mesh create secret generic my-root-trust-policy.gloo-mesh \
--from-file=./ca-cert.pem \
--from-file=./ca-key.pem \
--from-file=./cert-chain.pem \
--from-file=./root-cert.pem
Create the root trust policy in the management cluster and reference the root CA Kubernetes secret in the
spec.config.mgmtServerCa.secretRefsection. You can optionally customize the number of days the root and derived intermediate CA certificates are valid for by specifying thettlDaysin themgmtServerCA(root CA) andintermediateCertOptions(intermediate CA) of your root trust policy.The following example policy sets up the root CA with the credentials that you stored in the
my-root-trust-policy.gloo-meshsecret. The root CA certificate is valid for 730 days. The intermediate CA certificates that are automatically created by Gloo Mesh are valid for 1 day.kubectl apply --context ${MGMT_CONTEXT} -f- << EOF apiVersion: admin.gloo.solo.io/v2 kind: RootTrustPolicy metadata: name: root-trust-policy namespace: gloo-mesh spec: config: autoRestartPods: true intermediateCertOptions: secretRotationGracePeriodRatio: 0.1 ttlDays: 1 mgmtServerCa: generated: ttlDays: 730 secretRef: name: my-root-trust-policy.gloo-mesh namespace: gloo-mesh EOFVerify that the
cacertsKubernetes secret was created in theistio-systemnamespace on the workload cluster. This secret represents the intermediate CA and is used by the Istio control plane istiod to issue leaf certificates to the workloads in your service mesh.kubectl get secret cacerts -n istio-system --context ${REMOTE_CONTEXT}Verify the certificate chain for the intermediate CA. Because the intermediate CA was derived from the root CA, the root CA must be listed as the
root-certin thecacertsKubernetes secret.- Get the root CA certificate from the
my-root-trust-policy.gloo-meshsecret on the management cluster.kubectl get secret my-root-trust-policy.gloo-mesh -n gloo-mesh -o jsonpath='{.data.ca-cert\.pem}' --context ${MGMT_CONTEXT}| base64 --decode - In each workload cluster, get the root CA certificate that is listed as the
root-certin thecacertsKubernetes secret.kubectl get secret cacerts -n istio-system --context ${REMOTE_CONTEXT} -o jsonpath='{.data.root-cert\.pem}' | base64 --decode - Verify that the root CA certificate that is listed in the intermediate CA secret (8.2) matches the root CA certificate that was created by the Gloo root trust policy (8.1).
- Get the root CA certificate from the
Step 3: Set up the workload cluster
Set up your workload cluster to communicate with the management cluster and your on-prem machine, including deploying test apps, deploying Istio, and registering the workload cluster with the Gloo management plane.
Deploy test apps
To verify connectivity from the external workload to services that run in the workload cluster, deploy the sleep and test sample applications to your workload cluster.
Create the
sleepapp, and label thesleepnamespace for Istio sidecar injection.kubectl --context ${REMOTE_CONTEXT} create namespace sleep kubectl --context ${REMOTE_CONTEXT} label ns sleep istio-injection=enabled kubectl --context ${REMOTE_CONTEXT} apply -n sleep -f https://raw.githubusercontent.com/istio/istio/1.22.3/samples/sleep/sleep.yamlCreate the
httpbinapp, and label thehttpbinnamespace for Istio sidecar injection.kubectl --context ${REMOTE_CONTEXT} create namespace httpbin kubectl --context ${REMOTE_CONTEXT} label ns httpbin istio-injection=enabled kubectl --context ${REMOTE_CONTEXT} apply -n httpbin -f https://raw.githubusercontent.com/istio/istio/1.22.3/samples/httpbin/httpbin.yamlGet the IP address of the
httpbinpod.kubectl --context ${REMOTE_CONTEXT} get pods -n httpbin -o wideLog in to your on-prem machine, and curl the pod IP address. This ensures that the on-prem machine and workload cluster are available to each other, before you deploy Istio sidecars to either.
curl -s <httpbin_pod_ip>:80Note: If the curl is unsuccessful, verify that the security rules that you created for the on-prem machine allow outbound traffic and permit TCP traffic on ports 22 and 5000.
Deploy Istio
Set up the Istio control plane and gateways in the workload cluster. Note that the installation settings included in these steps are tailored for basic setups.
Create the following Istio namespaces, and label the
istio-systemnamespace withtopology.istio.io/network=${REMOTE_CLUSTER}.kubectl --context ${REMOTE_CONTEXT} create namespace istio-eastwest kubectl --context ${REMOTE_CONTEXT} create namespace istio-system kubectl --context ${REMOTE_CONTEXT} label namespace istio-system topology.istio.io/network=${REMOTE_CLUSTER}Download the IstioOperator resource, which contains Istio installation settings that are required for onboarding an on-prem machine to the service mesh.
curl -0L https://raw.githubusercontent.com/solo-io/gloo-mesh-use-cases/main/gloo-mesh/istio-install/vm-agent/azure.yaml > azure.yamlUpdate the file with your workload cluster name, and install the control plane and gateways.
  export CLUSTER_NAME=${REMOTE_CLUSTER}
envsubst < azure.yaml | istioctl install --context ${REMOTE_CONTEXT} -y -f -
Verify that the Istio pods are healthy.
kubectl --context ${REMOTE_CONTEXT} get pods -n istio-systemVerify that the load balancer service for the east-west gateway is created. Note that it might take a few minutes for an external IP address to be assigned. When your on-prem machine and workload cluster are in different VPC networks, the LoadBalancer service that exposes the east-west gateway allows the on-prem machine to access the cluster’s service mesh and be onboarded into the mesh. After the on-prem machine is onboarded, all traffic sent to and from the on-prem machine goes through the east-west gateway.
kubectl --context ${REMOTE_CONTEXT} get svc -n istio-eastwestRollout a restart to the test apps that you deployed prior to the Istio installation, so that they are re-deployed with an Istio sidecar.
  kubectl --context ${REMOTE_CONTEXT} rollout restart deploy/sleep -n sleep
kubectl --context ${REMOTE_CONTEXT} rollout restart deploy/httpbin -n httpbin
Enable telemetry for all workloads in the workload cluster.
  kubectl apply --context ${REMOTE_CONTEXT} -f - <<EOF
apiVersion: telemetry.istio.io/v1alpha1
kind: Telemetry
metadata:
  name: demo
  namespace: istio-system
spec:
  # no selector specified, applies to all workloads
  metrics:
  - providers:
    - name: prometheus
EOF
Register the workload cluster
Register the workload cluster with the Gloo management server. Note that the registration settings included in these steps are tailored for basic setups. For more information about advanced settings, see the setup documentation.
Save the settings that are required to deploy SPIRE and PostgreSQL when you register your workload cluster. The steps vary based on the certificates you used to deploy Istio.
Register the workload cluster with the management server. This command uses basic profiles to install the Gloo agent, rate limit server, and external auth server, as well the values file to install the SPIRE and PostgreSQL deployments.
  meshctl cluster register ${REMOTE_CLUSTER} \
  --kubecontext ${MGMT_CONTEXT} \
  --remote-context ${REMOTE_CONTEXT} \
  --version 2.6.0-rc2 \
  --profiles agent,ratelimit,extauth \
  --telemetry-server-address ${TELEMETRY_GATEWAY_ADDRESS} \
  --gloo-mesh-agent-chart-values data-plane.yaml \
  --set featureGates.ExternalWorkloads=true
Verify that the pods in your workload cluster are healthy.
kubectl --context ${REMOTE_CONTEXT} get pods -n gloo-meshExample output:
  NAME                                   READY   STATUS    RESTARTS   AGE
gloo-mesh-agent-d689d4544-g8fzn        1/1     Running   0          4m29s
gloo-spire-server-cd88fb77d-jk7mr      2/2     Running   0          53s
gloo-telemetry-collector-agent-7jzl4   1/1     Running   0          4m29s
gloo-telemetry-collector-agent-86ktk   1/1     Running   0          4m28s
gloo-telemetry-collector-agent-l8c99   1/1     Running   0          4m29s
gloo-telemetry-collector-agent-pkh2v   1/1     Running   0          4m28s
gloo-telemetry-collector-agent-pmqrh   1/1     Running   0          4m29s
gloo-telemetry-collector-agent-wnq7d   1/1     Running   0          4m28s
postgresql-0                           1/1     Running   0          4m28s
Verify that the Gloo data plane components are healthy, and that your Gloo Mesh setup is correctly installed.
  meshctl check --kubecontext ${REMOTE_CONTEXT}
meshctl check --kubecontext ${MGMT_CONTEXT}
Step 4: Onboard the on-prem machine
Onboard the on-prem machine to your Gloo Mesh setup by installing the Istio sidecar, OpenTelemetry (OTel) collector, and SPIRE agents on the on-prem machine.
On the workload cluster, create a namespace for the external workload configuration that you set up in subsequent steps.
kubectl --context ${REMOTE_CONTEXT} create namespace vm-configSave the following
ExternalWorkloadGloo resource to create an identity for apps that run on the on-prem machine. The following example resource provisions an identity in thevm-confignamespace of the workload cluster, for services that listen on port 5000 and that run on an on-prem machine of the specified identity selector. For more information and available options, see the API reference documentation.This example creates an identity for only the test app that you create on the VM in subsequent steps, which you select by specifying port5000. If you run multiple apps on your VM that you want to include in the service mesh, you can specify multiple ports to select each app. Then, when you create a virtual destination for the test app in subsequent steps, you can create additional virtual destinations for each of your other apps.cat >externalworkload.yaml <<EOF apiVersion: networking.gloo.solo.io/v2alpha1 kind: ExternalWorkload metadata: labels: # Label to use later when you create a virtual destination for the test app app: vm-ext-workload version: v1 name: vm-ext-workload namespace: vm-config spec: connectedClusters: # Map of workload cluster name to on-prem machine configuration namespace ${REMOTE_CLUSTER}: vm-config identitySelector: joinToken: enable: true # Port for each app to include ports: # Test app port - name: http number: 5000 EOFCreate the
ExternalWorkloadresource in the workload cluster.kubectl apply --context ${REMOTE_CONTEXT} -f externalworkload.yamlConfirm that a
WorkloadGroupIstio resource is created in your on-prem machine configuration namespace. This resource summarizes all workloads on the on-prem machine that you selected by port number in theExternalWorkload.kubectl --context ${REMOTE_CONTEXT} get workloadgroup -n vm-configExample output:
  NAME               AGE
vm-ext-workload    10s
Get the address of the east-west gateway in the workload cluster.
kubectl get svc --context ${REMOTE_CONTEXT} -n gloo-mesh-gateways istio-eastwestgateway -o jsonpath='{.status.loadBalancer.ingress[0].ip}'On your on-prem machine, save the following environment variables. Later in this section, you use these variables in a command to connect the on-prem machine to the workload cluster through the cluster’s east-west gateway.
  export EW_GW_ADDR=<eastwest_gateway_address>
export REMOTE_CLUSTER=<workload_cluster_name>
Get the URLs for the packages to install the Istio sidecar agent and Gloo workload agent on your VM, and save them as environment variables on the VM.
- Log in to the Support Center and review the Solo packages for external workload integration support article.
- Save the package URL for the Istio sidecar agent.
- For the same Istio version that you previously downloaded, open the link for the cloud storage bucket of the Solo distribution of Istio.
- In the storage bucket, open the
-solodirectory for the version you want to use, such as1.22.3-patch0-solo/. - Depending on your on-prem machine image type, open either the
deb/orrpm/directory. - On either the
istio-sidecaroristio-sidecar-arm64binary package, click the menu button, and click Copy Public URL. - On your on-prem machine, save the URL as an environment variable.
export ISTIO_URL=<istio_package_url>
- Save the package URL for the Gloo workload agent.
- Open the link for the Solo cloud storage bucket.
- In the storage bucket, open the directory for the Gloo Mesh version that you use.
- On the package for your VM type, click the menu button, and click Copy Public URL.
- On your VM, save the URL as an environment variable.
  export GLOO_AGENT_URL=<gloo_agent_package_url>
```t SPIRE_URL=<spire_package_url>
On your on-prem machine, download
meshctl. Be sure to download the same version that you use on your local machine, such as2.6.0-rc2(latest).curl -sL https://run.solo.io/meshctl/install | GLOO_MESH_VERSION=v2.6.0-rc2 sh - export PATH=$HOME/.gloo-mesh/bin:$PATHOn your workload cluster, generate a one-time token that the agent on the on-prem machine uses in the next step to attest itself to participate in the service mesh. This token is available for one-time use only, and expires by default after 10 minutes.
Do not share the attestation token publicly! Anyone who has this token can add a machine to your service mesh.meshctl external-workload gen-token --ext-workload vm-config/vm-ext-workload --kubecontext ${REMOTE_CONTEXT}On your on-prem machine, save the join token as an environment variable.
export JOIN_TOKEN=<token>On your VM, use
meshctlto install the Istio sidecar agent and Gloo workload agent. For more information about the options for this command, see the CLI reference.If your on-prem machine and workload cluster are in different networks, you must specify a tag in the--networkflag so that Istio can group workloads on the on-prem machine as "remote" workloads. This tag is different from the network tag for the cluster's "local" workloads, so that Istio can differentiate between local (cluster) and remote (on-prem machine) workloads, and use the east-west gateway to send traffic between the networks.Additionally, if your on-prem machine must accept inbound connections, you must specify the external IP address of the on-prem machine in the--external-ipflag.sudo meshctl external-workload onboard --install \ --attestor token \ --join-token ${JOIN_TOKEN} \ --cluster ${REMOTE_CLUSTER} \ --gateway-addr ${EW_GW_ADDR} \ --gateway istio-eastwest/istio-eastwestgateway \ --trust-domain cluster.local \ -i ${ISTIO_URL} -g ${GLOO_AGENT_URL} \ --ext-workload vm-config/vm-ext-workload
Step 5: Test connectivity
Verify that the onboarding process was successful by testing the bi-directional connection between the apps that run in the service mesh in your workload cluster and a test app on your on-prem machine.
On your on-prem machine, deploy a simple HTTP server that listens on port 5000. This app is represented by the
ExternalWorkloadidentity that you previously created.nohup python3 -m http.server 5000 &From the on-prem machine, curl the httpbin service in your workload cluster. Note that this curl command uses the app’s cluster DNS name instead of its pod IP address, because the on-prem machine is now connected to the Istio service mesh that runs in your workload cluster.
curl -s httpbin.httpbin:8000 -vExample output:
  *   Trying 10.XX.XXX.XXX:8000...
* Connected to httpbin.httpbin (10.XX.XXX.XXX) port 8000 (#0)
> GET / HTTP/1.1
> Host: httpbin.httpbin:8000
> User-Agent: curl/7.74.0
> Accept: */*
>
* Mark bundle as not supporting multiuse
< HTTP/1.1 200 OK
< server: envoy
< date: Mon, 10 Jul 2023 18:00:32 GMT
< content-type: text/html; charset=utf-8
< content-length: 9593
< access-control-allow-origin: *
< access-control-allow-credentials: true
< x-envoy-upstream-service-time: 4
<
<!DOCTYPE html>
...
In the workload cluster, create a Gloo
VirtualDestinationresource so that apps in the service mesh can also access the HTTP server test app that runs on the on-prem machine through thetestapp.vdhostname. Note that if you selected multiple apps that run on the on-prem machine in yourExternalWorkloadresource, you can create a virtual destination for each app by using the app’s port that you specified.kubectl --context ${REMOTE_CONTEXT} apply -f - <<EOF apiVersion: networking.gloo.solo.io/v2 kind: VirtualDestination metadata: labels: app: testapp name: testapp-vd namespace: vm-config spec: externalWorkloads: - labels: # Label that you gave to the ExternalWorkload resource app: vm-ext-workload hosts: # Hostname to use for the app - testapp.vd ports: # Port that you specified in the ExternalWorkload resource to select the test app - number: 5000 protocol: HTTP targetPort: name: http EOFFrom the sleep app in your workload cluster, curl the HTTP server on the on-prem machine by using the
testapp.vdhostname.kubectl --context ${REMOTE_CONTEXT} exec deploy/sleep -n sleep -- curl -s testapp.vd:5000 -vExample output:
  *   Trying 244.XXX.XXX.XX:5000...
* Connected to testapp.vd (244.XXX.XXX.XX) port 5000 (#0)
> GET / HTTP/1.1
> Host: testapp.vd:5000
> User-Agent: curl/8.1.2
> Accept: */*
>
<!DOCTYPE HTML PUBLIC "-//W3C//DTD HTML 4.01//EN" "http://www.w3.org/TR/html4/strict.dtd">
<html>
<head>
<meta http-equiv="Content-Type" content="text/html; charset=utf-8">
<title>Directory listing for /</title>
</head>
<body>
<h1>Directory listing for /</h1>
<hr>
<ul>
<li><a href=".bash_history">.bash_history</a></li>
<li><a href=".bash_logout">.bash_logout</a></li>
<li><a href=".bashrc">.bashrc</a></li>
<li><a href=".profile">.profile</a></li>
<li><a href=".ssh/">.ssh/</a></li>
<li><a href="gm-config/">gm-config/</a></li>
<li><a href="nohup.out">nohup.out</a></li>
</ul>
<hr>
</body>
</html>
< HTTP/1.1 200 OK
< server: envoy
< date: Mon, 10 Jul 2023 18:00:50 GMT
< content-type: text/html; charset=utf-8
< content-length: 600
< x-envoy-upstream-service-time: 3
<
{ [600 bytes data]
* Connection #0 to host testapp.vd left intact
Step 6 (optional): Launch the UI
To visualize the connection to your on-prem machine in your Gloo Mesh setup, you can launch the Gloo UI.
Access the Gloo UI.
meshctl dashboard --kubecontext ${MGMT_CONTEXT}Click the Graph tab to open the network visualization graph for your Gloo Mesh setup.
From the footer toolbar, click Layout Settings.
Toggle Group By to
INFRAto review the clusters, virtual machines, and Kubernetes namespaces that your app nodes are organized in. This view also shows details for the cloud provider infrastructure, such as the VPCs and subnets that your resources are deployed to.Verify that you see your on-prem machine connection to your workload cluster. In this example graph, the on-prem machine instance connects to the
httpbinapp in the workload cluster.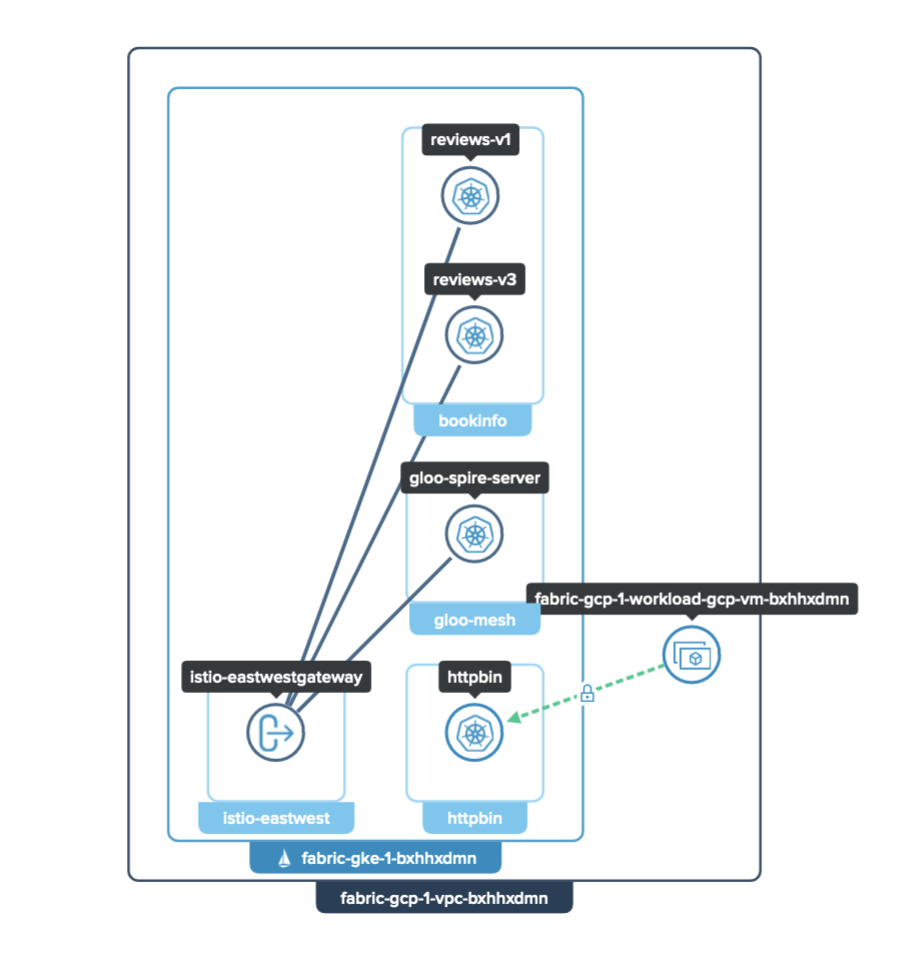
Figure: Graph for the workload cluster and on-prem machine connection You can also see more information about the on-prem machine instance by clicking on its icon, which opens the details pane for the connection. In this example details pane, the title
helloworld -> httpbindemonstrates that an external workload namedhelloworld, which represents apps on the on-prem machine, connects to thehttpbinapp in the workload cluster.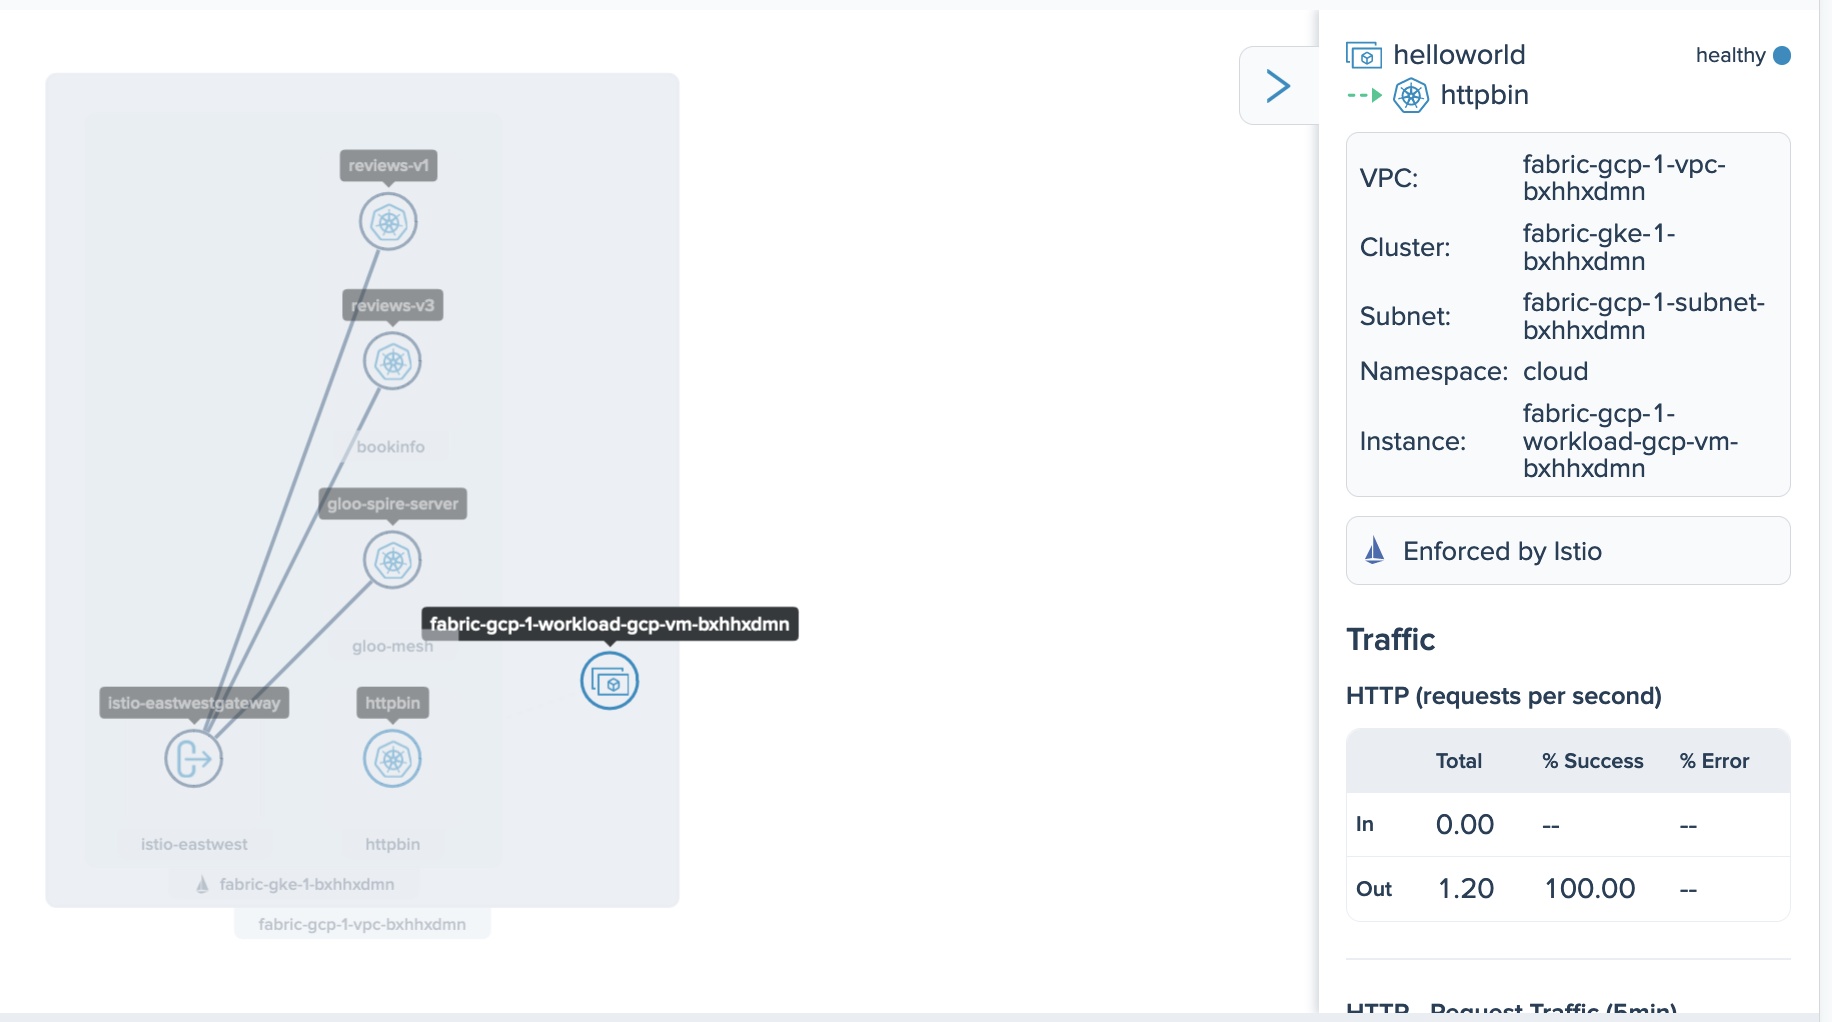
Figure: Details pane for the on-prem machine
Congratulations! Your on-prem machine is now registered with Gloo Mesh. You can now create Gloo resources for the workloads that you run on the on-prem machine, such as Gloo traffic policies. For example, if you selected multiple apps in your ExternalWorkload resource and want to apply a policy to all of those apps, you can use the label on the ExternalWorkload in the policy selector. Or, for policies that apply to destinations, you can select only the virtual destination for one of the apps. For more information, see Policy enforcement.
Uninstall
On the on-prem machine:
- Remove the Istio sidecar, OTel collector, and SPIRE agents.
sudo ./bootstrap.sh --uninstall - Remove the bootstrap script and bundle, the agent packages, and the test app data.
  cd ..
rm -r gloo-mesh-config
- Remove the Istio sidecar, OTel collector, and SPIRE agents.
On the workload cluster:
- Delete the
vm-config,sleep, andhttpbinnamespaces.kubectl --context ${REMOTE_CONTEXT} delete namespace vm-config kubectl --context ${REMOTE_CONTEXT} delete namespace sleep kubectl --context ${REMOTE_CONTEXT} delete namespace httpbin - Delete the
GatewayandVirtualServiceresources from theistio-eastwestnamespace.kubectl --context ${REMOTE_CONTEXT} delete Gateway istiod-gateway -n istio-eastwest kubectl --context ${REMOTE_CONTEXT} delete Gateway spire-gateway -n istio-eastwest kubectl --context ${REMOTE_CONTEXT} delete VirtualService istiod-vs -n istio-eastwest kubectl --context ${REMOTE_CONTEXT} delete VirtualService spire-vs -n istio-eastwest
- Delete the
Continue to use your Gloo Mesh setup, or uninstall it.
- To continue to use your Gloo Mesh setup, you can optionally remove the SPIRE and PostgreSQL servers by following the upgrade guide to remove their settings from the Helm values for your workload cluster.
- To uninstall your Gloo Mesh setup:
- Uninstall the Istio service mesh.
istioctl uninstall --context ${REMOTE_CONTEXT} --purge - Remove the Istio namespaces.
kubectl delete ns --context ${REMOTE_CONTEXT} istio-system kubectl delete ns --context ${REMOTE_CONTEXT} istio-eastwest - Follow the steps in Uninstall Gloo Mesh to deregister the workload cluster and uninstall the Gloo management plane.
- Uninstall the Istio service mesh.