Route within or across clusters
Route incoming requests to services within one cluster or across multiple clusters.
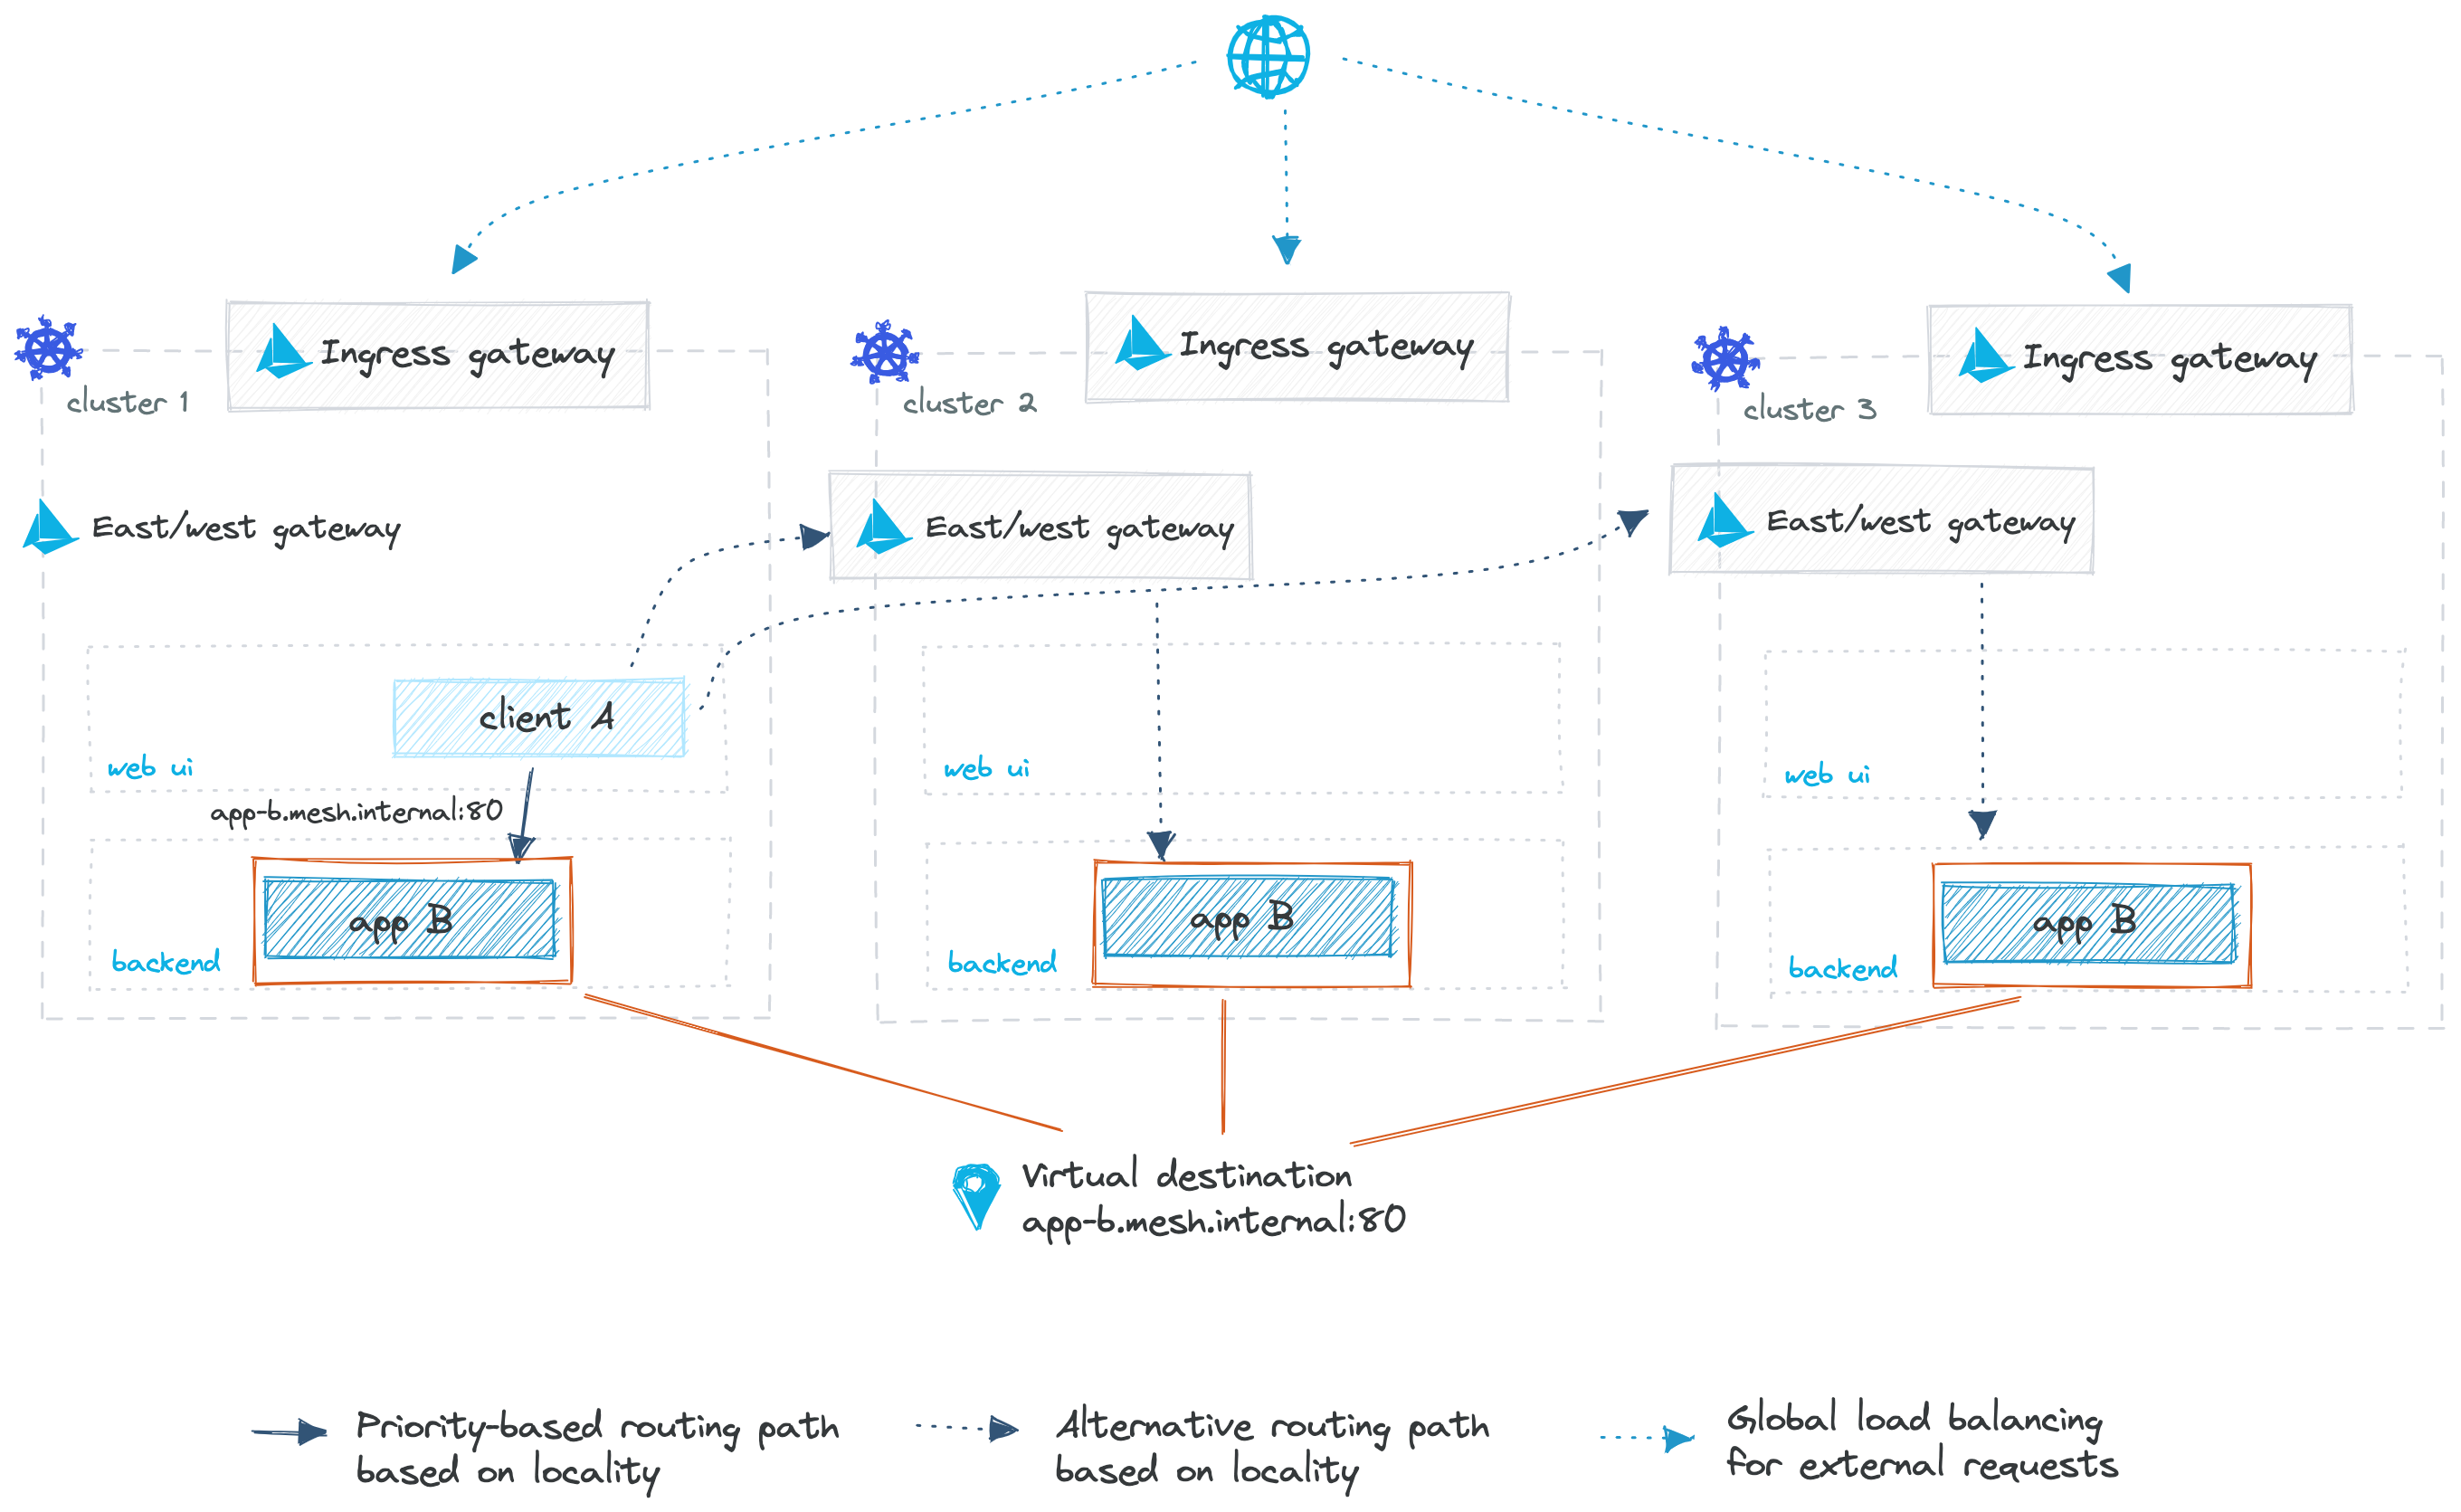
You can easily set up intelligent routing for active-active and active-passive workloads in one service mesh or across service meshes by using virtual destinations.
- Single-cluster routing: Although services can directly communicate with each other within a service mesh, virtual destinations allow you to apply routing rules for service-to-service communication to each destination in your servce mesh. For example, by creating a virtual destination for a service, you can apply rules to it that designate routing to different versions of the service by use of weighted subsets.
- Multicluster routing: With virtual destinations, you can define unique internal hostnames for apps that are spread across multiple clusters, and enable service discovery for these apps within the mesh by adding the hostnames to the service mesh registry.
For more information, see the following resources:
- Multicluster routing with virtual destinations concept doc
- Gloo Mesh Enterprise API docs for virtual destinations
The instructions in this guide assume that the services you want to route requests to are included in your service mesh. If you want to route to services or endpoints that are not included in your service mesh, see Route to services external to the mesh.
Before you begin
This guide assumes that you use the same names for components like clusters, workspaces, and namespaces as in the getting started. If you have different names, make sure to update the sample configuration files in this guide.
Complete the multicluster getting started guide to set up the following testing environment.
- Three clusters along with environment variables for the clusters and their Kubernetes contexts.
- The Gloo
meshctlCLI, along with other CLI tools such askubectlandistioctl. - The Gloo management server in the management cluster, and the Gloo agents in the workload clusters.
- Istio installed in the workload clusters.
- A simple Gloo workspace setup.
- Install Bookinfo and other sample apps.
In the workspace settings for each workspace that your services are in, ensure that you configure the following:
- Enable federation so that services in different clusters can communicate with each other.
- If you enable service isolation, services cannot communicate with services outside the mesh or in another workspace by default. If you want to set up multicluster routing across multiple workspaces, be sure to export the required resources from one workspace to the other workspaces that must access them. For example, if your ingress gateway is in a different workspace than your apps, be sure to export the app workspace resources to the gateway workspace.
Create a Gloo root trust policy to ensure that services in one cluster securely communicate with the services in other clusters. The root trust policy sets up the domain and certificates to establish a shared trust model across multiple clusters in your service mesh.
kubectl apply --context=$MGMT_CONTEXT -f - <<EOF apiVersion: admin.gloo.solo.io/v2 kind: RootTrustPolicy metadata: name: root-trust namespace: gloo-mesh spec: config: autoRestartPods: true mgmtServerCa: generated: {} EOF- Follow the other guides in this routing section to plan your routing table setup. For example, you might check out the path matching guide to decide how to match the incoming requests to your service paths, the redirect guide to set up any path or host rewrites, or the sub-table delegation guide to nest and sort multiple route tables. Note: Be sure that each route for one host is unique, such as by using prefix matching to determine which requests to the host should be forwarded to which destinations.
Decide what type of route you want to create. For more information, see Supported route types features.
Set up HTTP routing for east-west traffic
To route in-mesh requests from one app to another app that is deployed to one cluster or that is deployed across clusters, you create a virtual destination for your destination app. Then, you create a route table that forwards east-west traffic from the initiator app to that virtual destination along an HTTP route.
When you apply the Gloo custom resources in this guide to your cluster, Gloo Mesh Enterprise automatically checks the configuration against validation rules and value constraints. You can also run a pre-admission validation check by using the meshctl x validate resources command. For more information, see the resource validation overview and the CLI command reference.
Create a virtual destination resource for your destination app that receives requests from the initiator app. This virtual destination is configured to listen for incoming traffic on the internal-only, arbitrary hostname
destination-app.mesh.internal.com:8080. Incoming requests can then be routed to any service instances with the labelapp: destination-appon port 9080. Note that because virtual destinations are dynamic, the east-west gateway that handles the request routes it to the closest healthy app instance.kubectl apply --context $REMOTE_CONTEXT1 -n global -f- <<EOF apiVersion: networking.gloo.solo.io/v2 kind: VirtualDestination metadata: name: destination-app-vd namespace: global spec: hosts: # Arbitrary, internal-only hostname assigned to the endpoint - destination-app.mesh.internal.com ports: - number: 8080 protocol: HTTP targetPort: number: 9080 services: - labels: app: destination-app EOFRoute requests initiated from your initiator app to your destination app by using the virtual destination hostname. The routing method depends on whether your team can change the address that the initiator app sends requests to.
Test the route from the initiator app to your destination app. For example, log in to your initiator app and run
nslookup destination-app.mesh.internal.comto verify that the destination app is reachable through the virtual destination hostname. Or, if you can access your initiator app externally, you can curl the ingress gateway address and the path for your initiator app, and verify that information from the destination app is being successfully returned.
Good job! You set up east-west routing within your cluster along HTTP routes by using Gloo virtual destinations and route tables. When you use a virtual destination, any request to the virtual destination is load balanced across healthy app instance without leaving the service mesh. You can apply policies to further control which app instance returns a response. For more examples, check out the common Next steps.
Set up TCP routing for east-west traffic
To route in-mesh requests from one app to another app in your cluster along a TCP route, you can use a route table.
Optional: Before you begin, verify that a TCP connection between your apps does not exist.
- Log into the product page app.
kubectl -n bookinfo exec -it deploy/productpage-v1 -c netcat --context $REMOTE_CONTEXT1 -- sh - Use the
netcatcommand to test the connection to the TCP route on port 9000.nc -v httpbin.httpbin.svc.cluster.local 9000 - In the response, check that the connection request is refused.
nc: connect to httpbin.httpbin.svc.cluster.local port 9000 (tcp) failed: Connection refused - To log out of the pod, enter
exit.
- Log into the product page app.
Create a route table to route requests from the initiator app to your destination app by using the virtual destination hostname. The following route table listens for requests from any app with the label
app: productpageon thehttpbin.httpbin.svc.cluster.localhost. Then, it forwards the request to thehelloworlddestination that you created in the setup steps.kubectl --context ${REMOTE_CONTEXT1} apply -f - <<EOF apiVersion: networking.gloo.solo.io/v2 kind: RouteTable metadata: annotations: cluster.solo.io/cluster: "" name: bookinfo namespace: bookinfo spec: hosts: - httpbin.httpbin.svc.cluster.local tcp: - forwardTo: destinations: - port: number: 9000 ref: cluster: cluster-1 name: helloworld namespace: helloworld matchers: - port: 9000 workloadSelectors: - selector: labels: app: productpage EOFTest the TCP route from the initiator app to your destination app.
- Log into the product page app.
kubectl -n bookinfo exec -it deploy/productpage-v1 -c netcat --context $REMOTE_CONTEXT1 -- sh - Use the
netcatcommand to test the connection to the TCP route on port 9000.echo "Hello" | nc -v httpbin.httpbin.svc.cluster.local 9000 - In the response, check that the connection request succeeds and you get a message from either hello-v1 or hello-v2 in cluster 1.
Connection to httpbin.httpbin.svc.cluster.local 9000 port [tcp/*] succeeded! hello-v2 Hello - To log out of the pod, close the connection by entering
control+cand then enterexit.
- Log into the product page app.
Optional: Clean up the resources that you created.
kubectl delete -n bookinfo rt bookinfo --context $REMOTE_CONTEXT1
Good job! You set up east-west routing within your cluster along TCP routes by using Gloo virtual destinations and route tables. When you use a virtual destination, any request to the virtual destination is load balanced across healthy app instances without leaving the service mesh. You can apply policies to further control which app instance returns a response. For more examples, check out the common Next steps.
Set up HTTP and TCP routing in the same route table
You can configure HTTP and TCP routes in the same Gloo route table custom resource. This way, you can direct traffic on the same host to different apps, depending on the type of route you want to use.
- Route requests initiated from your initiator app to your destination app by using the virtual destination hostname. The following route table listens for requests from any app with the label
app: productpageon thehttpbin.httpbin.svc.cluster.localhost. Then, it forwards the request to different destinations depending on the request type.- HTTP requests on port 8000 are forwarded to the httpbin app that you created in the before you begin setup.
- TCP requests on port 9000 are forwarded to the hello world app that you created in the before you begin setup.
kubectl --context ${REMOTE_CONTEXT1} apply -f - <<EOF apiVersion: networking.gloo.solo.io/v2 kind: RouteTable metadata: annotations: cluster.solo.io/cluster: "" name: bookinfo namespace: bookinfo spec: hosts: - httpbin.httpbin.svc.cluster.local http: - forwardTo: destinations: - port: number: 8000 ref: cluster: cluster-1 name: httpbin namespace: httpbin matchers: - port: 8000 tcp: - forwardTo: destinations: - port: number: 9000 ref: cluster: cluster-1 name: helloworld namespace: helloworld matchers: - port: 9000 workloadSelectors: - selector: labels: app: productpage EOF - Test the TCP route from the initiator app to your destination app.
- Log into the product page app’s
netcatcontainer.kubectl -n bookinfo exec -it deploy/productpage-v1 -c netcat --context $REMOTE_CONTEXT1 -- sh - Use the
netcatcommand to test the connection to the hello world app along the TCP route on port 9000.echo "Hello" | nc -v httpbin.httpbin.svc.cluster.local 9000 - In the response, check that the connection request succeeds and you get a message from either hello-v1 or hello-v2 in cluster 1.
Connection to httpbin.httpbin.svc.cluster.local 9000 port [tcp/*] succeeded! hello-v1 Hello - To log out of the pod, close the connection by entering
control+cand then enterexit.
- Log into the product page app’s
- Test the HTTP route from the initiator app to your destination app.
- Log into the product page app’s
curlcontainer.kubectl -n bookinfo exec -it deploy/productpage-v1 -c curl --context $REMOTE_CONTEXT1 -- sh - Use the
curlcommand to test the connection to the httpbin app along the HTTP route on port 8000.Example output:curl -s -o /dev/null -w "%{http_code}" httpbin.httpbin.svc.cluster.local:8000200 - To log out of the pod, enter
exit.
- Log into the product page app’s
- Optional: Clean up the resources that you created.
kubectl delete -n bookinfo rt bookinfo --context $REMOTE_CONTEXT1
Good job! You set up east-west routing within your cluster along HTTP and TCP routes by using Gloo route tables. You can apply policies to further control which app instance returns a response. For more examples, check out the common Next steps.
Next steps
Now that you have a basic route set up, you can explore more advanced networking scenarios.
- Other routing actions: For HTTP routes, you can set up other actions besides forwarding requests. For example, you might check out the prefix matching guide to decide how to match the incoming requests to your service paths, the redirect guide to set up any path or prefix rewrites, or the sub-table delegation guide to nest and sort multiple route tables.
- Additional route settings: Configure additional route settings, such as weighted routing to version subsets or adding and removing headers.
- Policies: For more control over traffic behavior, apply traffic management, security, or resiliency policies to your service or route, such as for outlier detection, failover, fault injection, or keep alive connections.