Upgrade Istio
Upgrade your Istio service mesh in each workload cluster without downtime.
Overview
This upgrade process uses a canary upgrade model in which you run two versions of Istio simultaneously.
Istio recommends upgrading your Istio deployment by only one minor version at a time. If you want to upgrade multiple minor versions, such as from 1.18 to 1.20, upgrade incrementally from one version to the next minor version, such as first from 1.18 to 1.19, and then from 1.19 to 1.20.
The following steps upgrade the Istio architecture outlined in the [Deploy Istio in production](
/gloo-mesh-enterprise/main//istio/manual/manual_deploy/
) guide. This installation profile uses Istio revisions to facilitate the upgrade process, and deploys a gateway load balancer service that is not managed by Istio so that you can run multiple versions of one Istio gateway. For more information about the example resource files that are provided in the following steps, see the GitHub repository for Gloo Mesh Use Cases.Istio 1.22 is supported only as patch version 1.22.1-patch0 and later. Do not use patch versions 1.22.0 and 1.22.1, which contain bugs that impact several Gloo Mesh Enterprise routing features that rely on virtual destinations. Additionally, in Istio 1.22, the ISTIO_DELTA_XDS environment variable must be set to false. For more information, see this upstream Istio issue.
If you plan to upgrade to Istio 1.21, you must upgrade the Gloo management server to version 2.6 first. For more information, see the 2.6 release notes.
Istio 1.20 is supported only as patch version 1.20.1-patch1 and later. Do not use patch versions 1.20.0 and 1.20.1, which contain bugs that impact several Gloo Mesh Enterprise features that rely on Istio ServiceEntries.
If you have multiple external services that use the same host and plan to use Istio 1.20, 1.21, or 1.22, you must use patch versions 1.20.7, 1.21.3, or 1.22.1-patch0 or later to ensure that the Istio service entry that is created for those external services is correct.
Step 1: Gather mesh details and prepare revisions
Before you begin the upgrade process, take inventory of the Istio service mesh and prepare for the new Istio revision.
If you have not already, deploy the Bookinfo sample application for multicluster or single cluster environments with your existing Istio installations to keep track of changes during the upgrade.
Verify that the version you want to upgrade to is tested and supported by the Solo distribution of Istio. If not, you might be able to upgrade Gloo Mesh Enterprise, and then upgrade Istio.
Check the Istio release notes for the upgrade version to prepare for any breaking changes.
Note any resources that point to a specific Istio revision.
- Custom Envoy filters: As a recommended practice, Envoy filters often target a specific Istio revision. When you create the Istio revision for the upgrade process, you might need to create filters that target the new Istio revision.
- Namespaces: Note the Istio revisions that your service namespaces currently target.Example output:
kubectl get namespace -L istio.io/revNAME STATUS AGE REV kube-system Active 54m default Active 54m 1-21 bookinfo Active 14s 1-21
Save the existing and new Istio versions as environment variables. Versions are formatted such as
1.22.3-patch0-soloand revisions are formatted such as1-22.- For
REPO, use a Solo repo key for the new image that you can get by logging in to the Support Center and reviewing the Istio images built by Solo.io support article. - For
ISTIO_IMAGE, save the new version that you want to install, such as 1.22.3-patch0, and append thesolotag. You can optionally append other tags for the Solo distribution of Istio, as described in About the Solo distribution of Istio. If you downloaded a different version than the following, make sure to specify that version instead.
- For
REVISION, take the Istio major and minor version numbers and replace the period with a hyphen, such as1-22. - For
OLD_REVISION, take the Istio major and minor version numbers for your existing version, and replace the period with a hyphen, such as1-21.
REPO=<repo-key> ISTIO_IMAGE=<upgrade_version> REVISION=<upgrade_revision> OLD_REVISION=<existing_revision>- For
Save the name of the workload cluster that you want to upgrade Istio in as an environment variable. You reuse this variable when you repeat these steps for each workload cluster.
export CLUSTER_NAME=$REMOTE_CLUSTER1In a separate terminal, generate some traffic to the Bookinfo app to verify that access to the app is uninterrupted and zero downtime occurs during the upgrade.
- Install the HTTP load testing utility.
- Get the address of the Istio ingress gateway.
- Navigate to
http://$INGRESS_GW_IP/productpagein a web browser to verify that theproductpagefor Bookinfo is reachable.open http://$INGRESS_GW_IP/productpage - Run the 15 minute load test that sends 10rps to
localhost:8080/productpage.RUN_TIME_SECONDS=900 echo "GET http://$INGRESS_GW_IP/productpage" | vegeta attack -rate 10/1s -duration=${RUN_TIME_SECONDS}s | vegeta encode > stats.json vegeta report stats.json vegeta plot stats.json > plot.html
Step 2: Deploy the new Istio control plane
Deploy the Istio control plane for the new version that you want to upgrade to.
Download the Istio version that you want to upgrade to. The latest version supported by Solo, 1.22.3-patch0, is provided as an example.
Download the new version.
curl -L https://istio.io/downloadIstio | ISTIO_VERSION=1.22.3-patch0 sh -Navigate to the directory for the new version.
cd ./istio-1.22.3-patch0Add the
istioctlclient to your path.export PATH=$PWD/bin:$PATH
Update the Helm repository for Istio.
helm repo updateUpgrade the Istio CRDs.
kubectl apply -f manifests/charts/base/crdsPrepare a Helm values file for the
istiodcontrol plane. For example, you might update therevision,hub, andtagvalues in the existing values file that you used to install your current control plane. You can also use this sample command to download an example file,istiod.yaml, and update the environment variables with the values that you previously set.curl -0L https://raw.githubusercontent.com/solo-io/gloo-mesh-use-cases/main/gloo-mesh/istio-install/manual-helm/istiod.yaml > istiod.yaml envsubst < istiod.yaml > istiod-values.yamlDeploy the control plane that runs the new version to your cluster.
  helm upgrade --install istiod-${REVISION} istio/istiod \
  --version ${ISTIO_IMAGE} \
  --namespace istio-system \
  --wait \
  -f istiod-values.yaml
After the installation is complete, verify that the Istio control plane pods for the new revision are now running alongside the existing pods for the old revision.
kubectl get pods -n istio-systemExample output:
  NAME                           READY   STATUS    RESTARTS   AGE
istiod-1-21-668dd8cc4c-6d49g   1/1     Running   0          42m
istiod-1-21-668dd8cc4c-btx8d   1/1     Running   0          42m
istiod-1-22-76fbc7b85c-7hh7f   1/1     Running   0          42s
istiod-1-22-76fbc7b85c-m5mlc   1/1     Running   0          41s
Step 3: Update apps and Istio gateways
Now that all the components for the new Istio version are deployed, you can deploy new Istio ingress and east-west gateways, and upgrade your apps’ Istio sidecars.
If you created an Istio ingress gateway, prepare a Helm values file for the new revision. For example, you might update the
revision,hub, andtagvalues in the existing values file that you used to install your current gateway. You can also use this sample command to download an example file,ingress-gateway.yaml, and update the environment variables with the values that you previously set.curl -0L https://raw.githubusercontent.com/solo-io/gloo-mesh-use-cases/main/gloo-mesh/istio-install/manual-helm/ingress-gateway.yaml > ingress-gateway.yaml envsubst < ingress-gateway.yaml > ingress-gateway-values.yamlCreate an ingress gateway that runs the new revision.
helm upgrade --install istio-ingressgateway-${REVISION} istio/gateway \ --version ${ISTIO_IMAGE} \ --namespace istio-ingress \ --wait \ -f ingress-gateway-values.yamlNew load balancers are created for the canary gateways. To instead change the revision in use by the existing gateway load balancers, you can set the `istio.io/rev` label on the gateway deployment, which triggers a rolling restart.If you created an Istio east-west gateway, prepare a Helm values file for the new revision. For example, you might update the
revision,hub, andtagvalues in the existing values file that you used to install your current gateway. You can also use this sample command to download an example file,eastwest-gateway.yaml, and update the environment variables with the values that you previously set.curl -0L https://raw.githubusercontent.com/solo-io/gloo-mesh-use-cases/main/gloo-mesh/istio-install/manual-helm/eastwest-gateway.yaml > eastwest-gateway.yaml envsubst < eastwest-gateway.yaml > eastwest-gateway-values.yamlCreate an east-west gateway that runs the new revision.
  helm upgrade --install istio-eastwestgateway-${REVISION} istio/gateway \
  --version ${ISTIO_IMAGE} \
  --namespace istio-eastwest \
  --wait \
  -f eastwest-gateway-values.yaml
Verify that the ingress and east-west gateway pods for the new revision are running alongside the existing gateways, and the load balancer services are assigned addresses.
  kubectl get pods -n istio-ingress
kubectl get svc -n istio-ingress

kubectl get pods -n istio-eastwest
kubectl get svc -n istio-eastwest
Change the label on all workload namespaces, such as
bookinfo, to use the new revision.kubectl label ns bookinfo istio.io/rev=$REVISION --overwrite
If you did not previously use revision labels for your apps, you can upgrade your application’s sidecars by running ‘kubectl label ns bookinfo istio-injection-’ and ‘kubectl label ns bookinfo istio.io/rev=$REVISION’.
Update your workload apps, such as the Bookinfo sample app, by rolling out restarts to each of the microservices. The Istio sidecars for each microservice are updated to use the new Istio version. Make sure that you only restart one microservice at a time. For example, in the following commands, 20 seconds elapse between each restart to ensure that the pods have time to start running.
  kubectl rollout restart deployment -n bookinfo details-v1
sleep 20s
kubectl rollout restart deployment -n bookinfo ratings-v1
sleep 20s
kubectl rollout restart deployment -n bookinfo productpage-v1
sleep 20s
kubectl rollout restart deployment -n bookinfo reviews-v1
sleep 20s
kubectl rollout restart deployment -n bookinfo reviews-v2
sleep 20s
kubectl rollout restart deployment -n bookinfo reviews-v3
Verify that the Bookinfo pods now use the new revision.
istioctl proxy-status | grep "\.bookinfo "Verify that the
productpagefor Bookinfo is still reachable after the upgrade.open http://$INGRESS_GW_IP/productpage
Step 4: Validate traffic
Check the results of the load test to ensure traffic was uninterrupted throughout the upgrade process.
Once the 15 minute load test is complete in your other terminal, check the results of the traffic requests that were sent to Bookinfo during the upgrade. The following example output shows that 6000
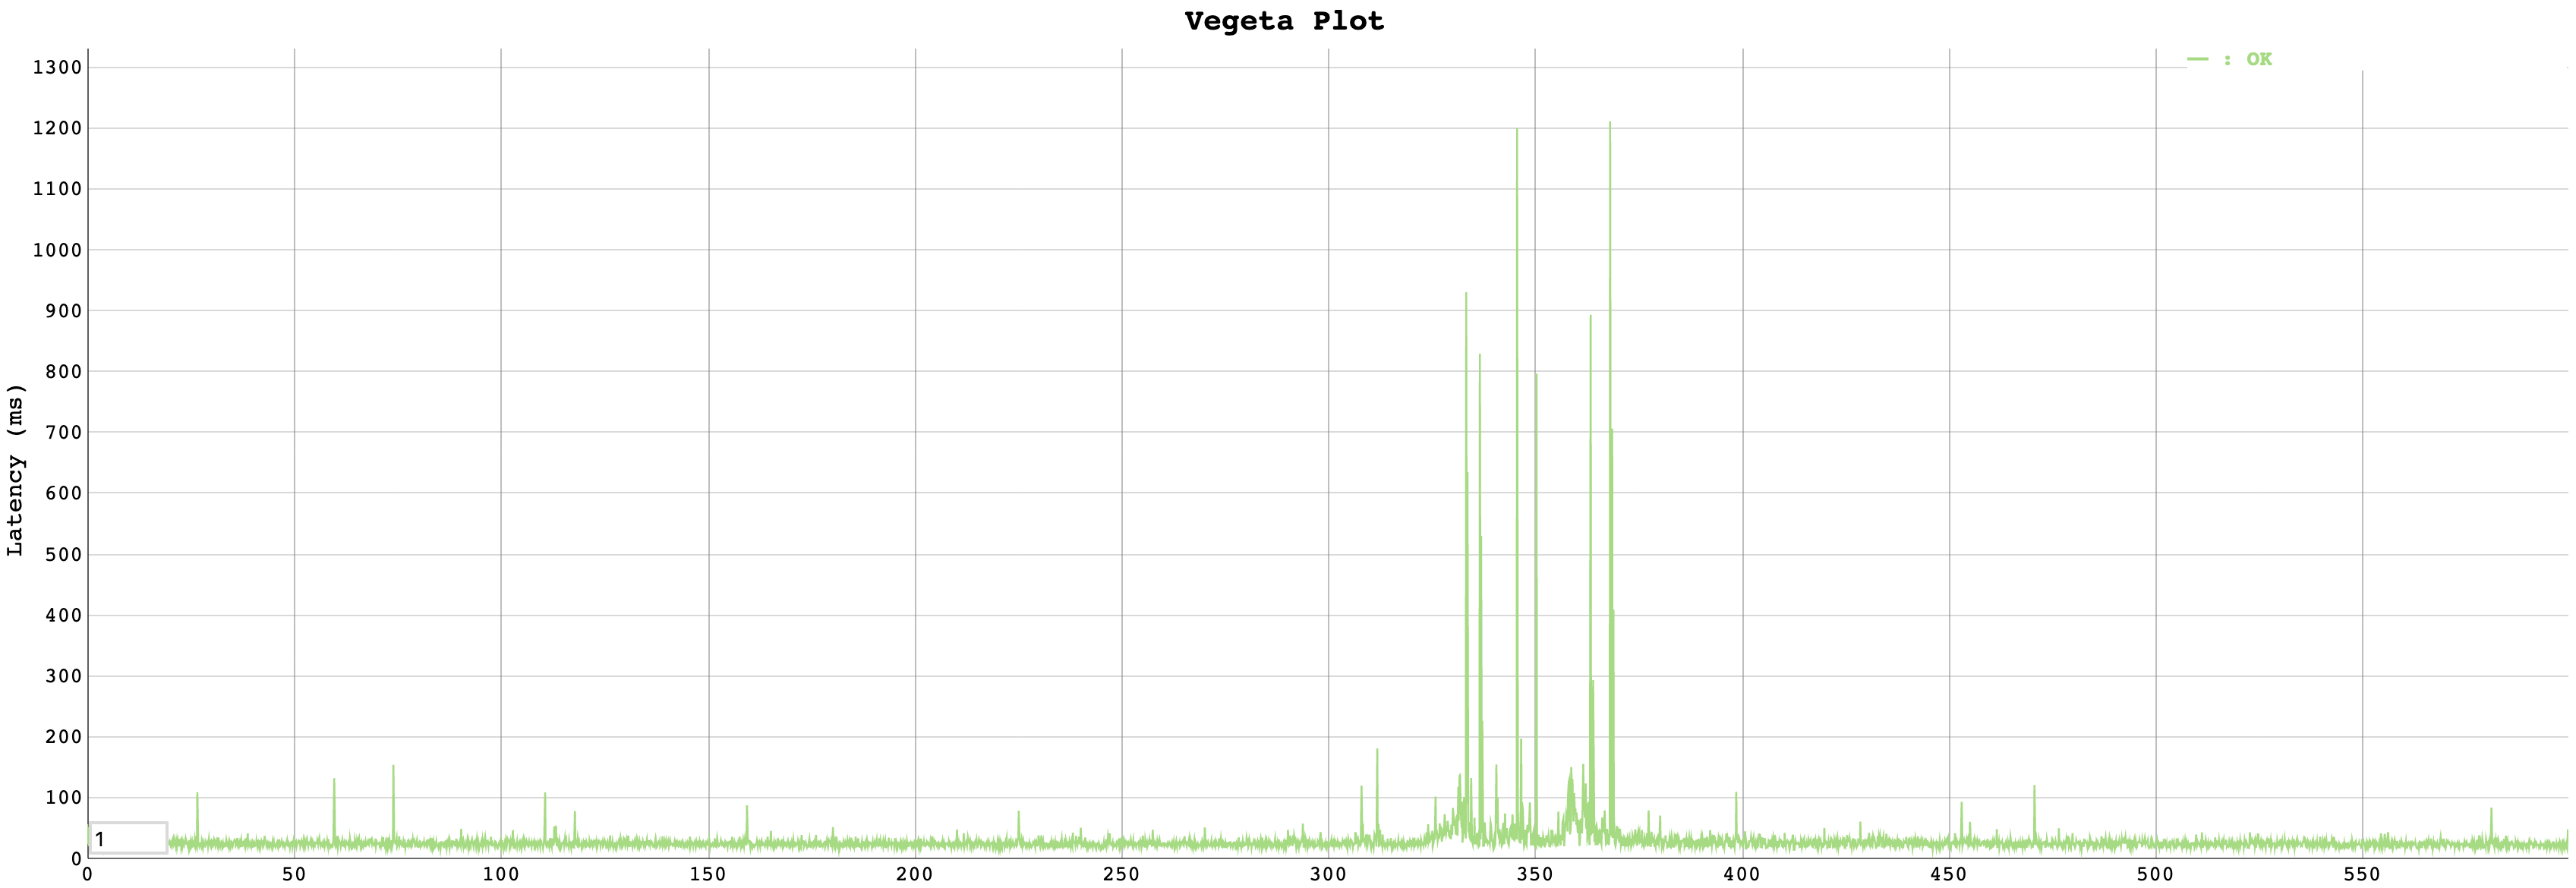
200response codes and no error codes were received.Requests [total, rate, throughput] 6000, 10.00, 10.00 Duration [total, attack, wait] 15m0s, 15m0s, 26.776ms Latencies [min, mean, 50, 90, 95, 99, max] 15.344ms, 29.06ms, 25.727ms, 33.811ms, 41.936ms, 85.286ms, 1.212s Bytes In [total, mean] 29091004, 4848.50 Bytes Out [total, mean] 0, 0.00 Success [ratio] 100.00% Status Codes [code:count] 200:6000 Error Set:You can also check the graph of the results that was generated.
open ./plot.html
In the following example graph, a spike in latency occured when the Bookinfo application sidecars were updating. You might remedy this latency by adjusting the application scaling properties.
Step 5: Clean up previous resources
After you validate your upgrade, clean up the Istio resources that run the previous version.
List the Istio Helm chart releases in the
istio-ingressnamespace. In the output, find the name of your old revision, such asistio-ingressgateway-1-21.helm ls -n istio-ingressDelete the Helm release for the old ingress gateway.
helm delete istio-ingressgateway-1-21 -n istio-ingressList the Istio Helm chart releases in the
istio-eastwestnamespace. In the output, find the name of your old revision, such asistio-eastwestgateway-1-21.helm ls -n istio-eastwestDelete the Helm release for the old east-west gateway.
helm delete istio-eastwestgateway-1-21 -n istio-eastwestVerify that only the new gateways are running.
  kubectl get pods -n istio-ingress
kubectl get pods -n istio-eastwest
List the Istio Helm chart releases in the
istio-systemnamespace. In the output, find the name of your old revision, such asistiod-1-21.helm ls -n istio-systemDelete the Helm release for the old control plane.
helm delete istiod-1-21 -n istio-systemVerify that only the control plane pods for the new revision are running.
kubectl get pods -n istio-system
Step 6: Repeat for each cluster
After you complete these steps, repeat the process for each workload cluster where you installed Istio. Be sure to change the CLUSTER_NAME environment variable to point to each workload cluster, and use each workload cluster’s Kubernetes context.