Manually deploy Istio
Use Istio Helm charts to configure and deploy an Istio control plane and gateways in each workload cluster.
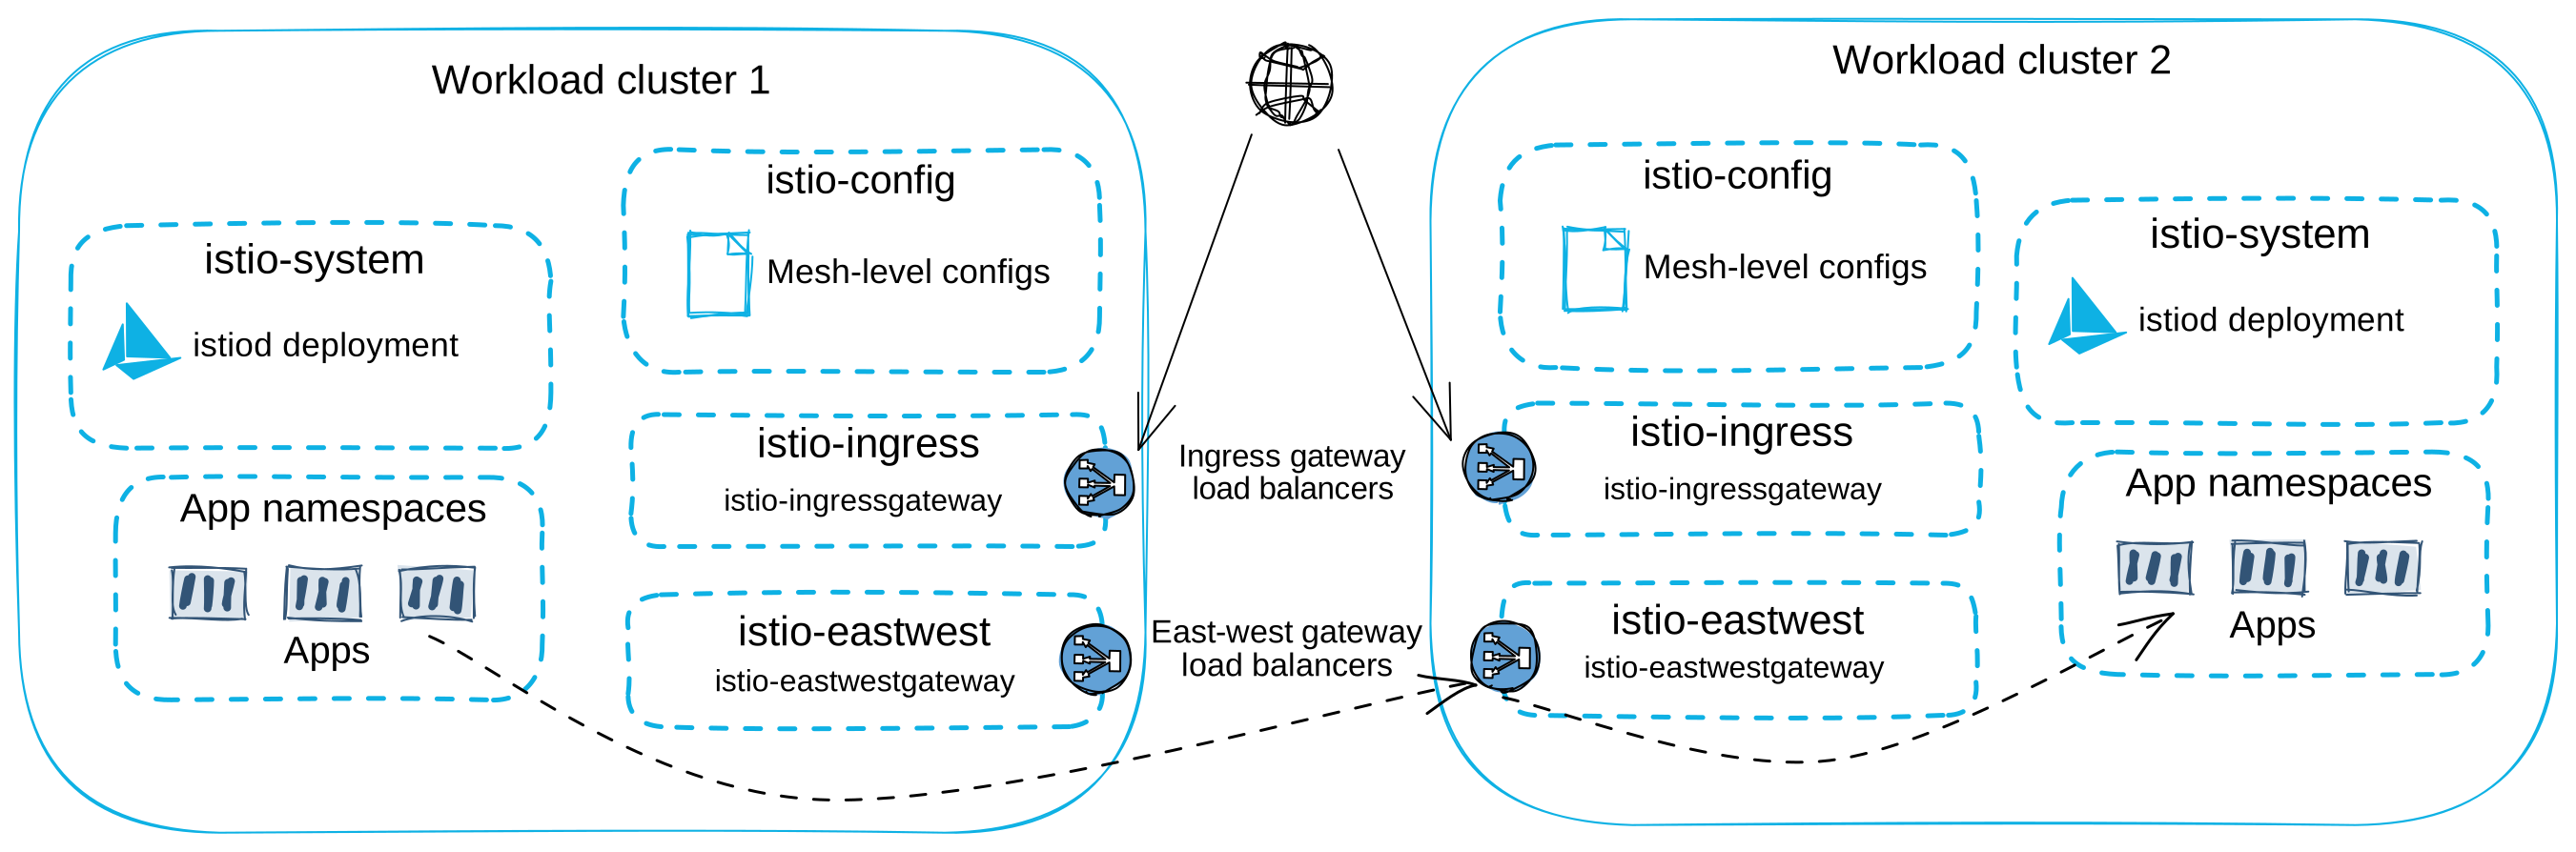
Overview
The deployments are created by using Helm to facilitate future version upgrades. For example, you can fork Istio’s existing Helm chart to add it to your existing CI/CD workflow.
For more information about manually deploying Istio, review the following:
- This installation guide installs a production-level Solo distribution of Istio, a hardened Istio enterprise image. For more information, see About the Solo distribution of Istio.
- For information about the namespaces that are used in this guide and other deployment recommendations, see Best practices for Istio in prod.
- The east-west gateways in this architecture allow services in one mesh to route cross-cluster traffic to services in the other mesh. If you install Istio into only one cluster for a single-cluster Gloo Mesh setup, the east-west gateway deployment is not required.
- The ingress gateway in this architecture allows traffic from outside the cluster to reach a workload in the mesh. Note that you can use the ingress gateway to set up simple routing rules. However, if you plan to apply policies to the ingress gateway, such as rate limits, external authentication, or a Web Application Firewall, a Gloo Mesh Gateway license is needed alongside the Gloo Mesh Enterprise license.
- For more information about using Istio Helm charts, see the Istio documentation.
- For more information about the example resource files that are provided in the following steps, see the GitHub repository for Gloo Mesh Use Cases.
Istio 1.21 is not supported in Gloo Mesh Enterprise version 2.5.
Istio 1.20 is supported only as patch version 1.20.1-patch1 and later. Do not use patch versions 1.20.0 and 1.20.1, which contain bugs that impact several Gloo Mesh Enterprise features that rely on Istio ServiceEntries.
If you have multiple external services that use the same host and plan to use Istio 1.20, you must use patch version 1.20.7 or later to ensure that the Istio service entry that is created for those external services is correct.
Step 1: Set up tools
Set up the following tools and environment variables.
Review Supported versions to choose the Solo distribution of Istio that you want to use, and save the version information in the following environment variables.
REPO: The repo key for the Solo distribution of Istio that you can get by logging in to the Support Center and reviewing the Istio images built by Solo.io support article.ISTIO_IMAGE: The version that you want to use with thesolotag, such as1.20.7-solo. You can optionally append other tags of Solo distributions of Istio as needed.REVISION: Take the Istio major and minor versions and replace the periods with hyphens, such as1-20.
ISTIO_VERSION: The version of Istio that you want to install, such as1.20.7.
  export REPO=<repo-key>
export ISTIO_IMAGE=1.20.7-solo
export REVISION=1-20
export ISTIO_VERSION=1.20.7
Install
istioctl, the Istio CLI tool.curl -L https://istio.io/downloadIstio | ISTIO_VERSION=${ISTIO_VERSION} sh - cd istio-$ISTIO_VERSION export PATH=$PWD/bin:$PATHAdd and update the Helm repository for Istio.
  helm repo add istio https://istio-release.storage.googleapis.com/charts
helm repo update
Step 2: Prepare the cluster environment
Prepare the workload cluster for Istio installation, including installing the Istio custom resource definitions (CRDs).
Save the name and kubeconfig context of a workload cluster in the following environment variables. Each time you repeat the steps in this guide, you change these variables to the next workload cluster’s name and context.
  export CLUSTER_NAME=<remote-cluster>
export REMOTE_CONTEXT=<remote-cluster-context>
Ensure that the Istio operator CRD (
istiooperators.install.istio.io) is not managed by the Gloo Platform CRD Helm chart.kubectl get crds -A --context $REMOTE_CONTEXT | grep istiooperators.install.istio.io- If the CRD does not exist on your cluster, you disabled it during the Gloo Mesh installation. Continue to the next step.
- If the CRD exists on your cluster, follow these steps to remove the Istio operator CRD from the
gloo-platform-crdsHelm release:- Update the Helm repository for Gloo Platform.
helm repo add gloo-platform https://storage.googleapis.com/gloo-platform/helm-charts helm repo update - Upgrade your
gloo-platform-crdsHelm release in the workload cluster by including the--set installIstioOperator=falseflag.helm upgrade gloo-platform-crds gloo-platform/gloo-platform-crds \ --kube-context $REMOTE_CONTEXT \ --namespace=gloo-mesh \ --set installIstioOperator=false
- Update the Helm repository for Gloo Platform.
Install the Istio CRDs.
  helm upgrade --install istio-base istio/base \
  -n istio-system \
  --version $ISTIO_VERSION \
  --kube-context $REMOTE_CONTEXT \
  --create-namespace
Create the
istio-confignamespace. This namespace serves as the administrative root namespace for Istio configuration. For more information, see Plan Istio namespaces.kubectl create namespace istio-config --context $REMOTE_CONTEXTOpenShift only: Deploy the Istio CNI plug-in, and elevate the
istio-systemservice account permissions.- Install the CNI plug-in, which is required for using Istio in OpenShift.
helm install istio-cni istio/cni \ --namespace kube-system \ --kube-context $REMOTE_CONTEXT \ --version $ISTIO_VERSION \ --set cni.cniBinDir=/var/lib/cni/bin \ --set cni.cniConfDir=/etc/cni/multus/net.d \ --set cni.cniConfFileName="istio-cni.conf" \ --set cni.chained=false \ --set cni.privileged=true - Elevate the permissions of the following service accounts that will be created. These permissions allow the Istio sidecarsgateways to make use of a user ID that is normally restricted by OpenShift. For more information, see the Istio on OpenShift documentation.
oc adm policy add-scc-to-group anyuid system:serviceaccounts:istio-system --context $REMOTE_CONTEXT oc adm policy add-scc-to-group anyuid system:serviceaccounts:istio-config --context $REMOTE_CONTEXT oc adm policy add-scc-to-group anyuid system:serviceaccounts:istio-ingress --context $REMOTE_CONTEXT oc adm policy add-scc-to-group anyuid system:serviceaccounts:istio-eastwest --context $REMOTE_CONTEXT - Create a NetworkAttachmentDefinition custom resource for the
istio-ingressproject. If you plan to create the Istio gateways in a different namespace, such asistio-gateways, make sure to create the NetworkAttachmentDefinition in that namespace instead.cat <<EOF | oc create -n istio-ingress --context $REMOTE_CONTEXT -f - apiVersion: "k8s.cni.cncf.io/v1" kind: NetworkAttachmentDefinition metadata: name: istio-cni EOF
- Install the CNI plug-in, which is required for using Istio in OpenShift.
Step 3: Deploy the Istio control plane
Deploy an Istio control plane in your workload cluster. The provided Helm values files are configured with production-level settings; however, depending on your environment, you might need to edit settings to achieve specific Istio functionality.
Prepare a Helm values file for the
istiodcontrol plane. You can further edit the file to provide your own details for production-level settings.Download an example file,
istiod.yaml, and update the environment variables with the values that you previously set.curl -0L https://raw.githubusercontent.com/solo-io/gloo-mesh-use-cases/main/gloo-mesh/istio-install/manual-helm/istiod.yaml > istiod.yaml envsubst < istiod.yaml > istiod-values.yamlOptional: Trust domain validation is disabled by default in the profile that you downloaded in the previous step. If you have a multicluster mesh setup and you want to enable trust domain validation, add all the clusters that are part of your mesh in the
meshConfig.trustDomainAliasesfield, excluding the cluster that you currently prepare for the istiod installation. For example, let’s say you have 3 clusters that belong to your mesh:cluster1,cluster2, andcluster3. When you install istiod incluster1, you set the following values for your trust domain:... meshConfig: trustDomain: cluster1 trustDomainAliases: ["cluster2","cluster3"]Then, when you move on to install istiod in
cluster2, you settrustDomain: cluster2andtrustDomainAliases: ["cluster1","cluster3"]. You repeat this step for all the clusters that belong to your service mesh. Note that as you add or delete clusters from your service mesh, you must make sure that you update thetrustDomainAliasesfield for all of the clusters.If you plan to run multiple revisions of Istio in your cluster and usediscoverySelectorsin each revision to discover the resources in specific namespaces, enable theglooMgmtServer.extraEnvs.IGNORE_REVISIONS_FOR_VIRTUAL_DESTINATION_TRANSLATIONenvironment variable on the Gloo management server. For more information, see Multiple Istio revisions in the same cluster.
Create the
istiodcontrol plane in your cluster.helm upgrade --install istiod-$REVISION istio/istiod \ --version $ISTIO_VERSION \ --namespace istio-system \ --kube-context $REMOTE_CONTEXT \ --wait \ -f istiod-values.yamlAfter the installation is complete, verify that the Istio control plane pods are running.
kubectl get pods -n istio-system --context $REMOTE_CONTEXTExample output for 2 replicas:
  NAME                          READY   STATUS    RESTARTS   AGE
istiod-1-20-7b96cb895-4nzv9   1/1     Running   0          30s
istiod-1-20-7b96cb895-r7l8k   1/1     Running   0          30s
Step 4 (multicluster setups): Deploy the Istio east-west gateway
If you have a multicluster Gloo Mesh Enterprise setup, deploy an Istio east-west gateway into each workload cluster. An east-west gateway lets services in one mesh communicate with services in another.
Prepare a Helm values file for the Istio east-west gateway. This sample command downloads an example file,
eastwest-gateway.yaml, and updates the environment variables with the values that you previously set. You can further edit the file to provide your own details for production-level settings.curl -0L https://raw.githubusercontent.com/solo-io/gloo-mesh-use-cases/main/gloo-mesh/istio-install/manual-helm/eastwest-gateway.yaml > eastwest-gateway.yaml envsubst < eastwest-gateway.yaml > eastwest-gateway-values.yamlCreate the east-west gateway.
  helm upgrade --install istio-eastwestgateway-$REVISION istio/gateway \
  --version $ISTIO_VERSION \
  --create-namespace \
  --namespace istio-eastwest \
  --kube-context $REMOTE_CONTEXT \
  --wait \
  -f eastwest-gateway-values.yaml
Verify that the east-west gateway pods are running and the load balancer service is assigned an external address.
  kubectl get pods -n istio-eastwest --context $REMOTE_CONTEXT
kubectl get svc -n istio-eastwest --context $REMOTE_CONTEXT
Example output:
NAME READY STATUS RESTARTS AGE istio-eastwestgateway-1-20-7f6f8f7fc7-ncrzq 1/1 Running 0 11s istio-eastwestgateway-1-20-7f6f8f7fc7-ncrzq 1/1 Running 0 48s NAME TYPE CLUSTER-IP EXTERNAL-IP PORT(S) AGE istio-eastwestgateway-1-20 LoadBalancer 10.96.166.166 <externalip> 15021:32343/TCP,80:31685/TCP,443:30877/TCP,31400:31030/TCP,15443:31507/TCP,15012:30668/TCP,15017:30812/TCP 13sAWS clusters only: For the Elastic Load Balancer (ELB) instance that is automatically created for you to back the east-west gateway service, verify that the health check shows a healthy state. Gloo Mesh configures the east-west gateway to listen on HTTPS port 15443. However, when the ELB is created, the first port that is defined in the Kubernetes service manifest is used to perform the health check. This port might be different from the port that Gloo Mesh configures. For your ELB health check to pass, you might need to configure the load balancer to run the health check on port 15443.
Step 5 (optional): Deploy the Istio ingress gateway
If you want to allow traffic from outside the cluster to enter your mesh, create a GatewayLifecycleManager resource to deploy and manage an ingress gateway. The ingress gateway allows you to specify basic routing rules for how to match and forward incoming traffic to a workload in the mesh. However, to also apply policies, such as rate limits, external authentication, or a Web Application Firewall to the gateway, you must have a Gloo Mesh Gateway license. For more information about Gloo Mesh Gateway, see the docs. If you want a service mesh-only environment without ingress, you can skip this step.
Prepare a Helm values file for the Istio ingress gateway. This sample command downloads an example file,
ingress-gateway.yaml, and updates the environment variables with the values that you previously set. You can further edit the file to provide your own details for production-level settings.curl -0L https://raw.githubusercontent.com/solo-io/gloo-mesh-use-cases/main/gloo-mesh/istio-install/manual-helm/ingress-gateway.yaml > ingress-gateway.yaml envsubst < ingress-gateway.yaml > ingress-gateway-values.yamlCreate the ingress gateway.
  helm upgrade --install istio-ingressgateway-$REVISION istio/gateway \
  --version $ISTIO_VERSION \
  --create-namespace \
  --namespace istio-ingress \
  --kube-context $REMOTE_CONTEXT \
  --wait \
  -f ingress-gateway-values.yaml
Verify that the ingress gateway pods are running and the load balancer service is assigned an external address.
  kubectl get pods -n istio-ingress --context $REMOTE_CONTEXT
kubectl get svc -n istio-ingress --context $REMOTE_CONTEXT
Example output:
NAME READY STATUS RESTARTS AGE istio-ingressgateway-1-20-665d46686f-nhh52 1/1 Running 0 106s istio-ingressgateway-1-20-665d46686f-tlp5j 1/1 Running 0 2m1s NAME TYPE CLUSTER-IP EXTERNAL-IP PORT(S) AGE istio-ingressgateway-1-20 LoadBalancer 10.96.252.49 <externalip> 15021:32378/TCP,80:30315/TCP,443:32186/TCP,31400:30313/TCP,15443:31632/TCP 2m2sAWS clusters only: For the Elastic Load Balancer (ELB) instance that is automatically created for you to back the ingress gateway service, verify that the health check shows a healthy state. Gloo Mesh configures the ingress gateway to listen on HTTPS port 15443. However, when the ELB is created, the first port that is defined in the Kubernetes service manifest is used to perform the health check. This port might be different from the port that Gloo Mesh configures. For your ELB health check to pass, you might need to configure the load balancer to run the health check on port 15443.Optional for OpenShift: Expose the load balancer by using an OpenShift route.
oc -n istio-ingress expose svc istio-ingressgateway-1-20 --port=http2 --context $REMOTE_CONTEXT
Step 6 (multicluster setups): Repeat steps 2 - 5
If you have a multicluster Gloo Mesh setup, repeat steps 2 - 5 for each workload cluster that you want to install Istio on. Remember to change the cluster name and context variables each time you repeat the steps.
  export CLUSTER_NAME=<remote-cluster>
export REMOTE_CONTEXT=<remote-cluster-context>
Step 7: Deploy workloads
Now that Istio is up and running on all your workload clusters, you can create service namespaces for your teams to run app workloads in.
OpenShift only: In each workload project, create a NetworkAttachmentDefinition and elevate the service account.
- Create a NetworkAttachmentDefinition custom resource for each project where you want to deploy workloads, such as the
bookinfoproject.cat <<EOF | oc -n bookinfo --context $REMOTE_CONTEXT create -f - apiVersion: "k8s.cni.cncf.io/v1" kind: NetworkAttachmentDefinition metadata: name: istio-cni EOF - Elevate the permissions of the service account in each project where you want to deploy workloads, such as the
bookinfoproject. This permission allows the Istio sidecars to make use of a user ID that is normally restricted by OpenShift.oc adm policy add-scc-to-group anyuid system:serviceaccounts:bookinfo --context $REMOTE_CONTEXT
- Create a NetworkAttachmentDefinition custom resource for each project where you want to deploy workloads, such as the
For any workload namespace, such as
bookinfo, label the namespace with the revision so that Istio sidecars are deployed to your app pods.kubectl label ns bookinfo istio.io/rev=$REVISION --overwrite --context $REMOTE_CONTEXTDeploy apps and services to your workload namespaces. For example, you might start out with the Bookinfo sample application for multicluster or single cluster environments. Those steps guide you through creating workspaces for your workloads, deploying Bookinfo across workload clusters, and using ingress and east-west gateways to shift traffic across clusters.
Next steps
- If you haven’t already, install Gloo Mesh Enterprise so that Gloo can manage your Istio resources. You don’t need to directly configure any Istio resources going forward.
- Review how Gloo Mesh custom resources are automatically translated into Istio resources.
- Apply Gloo policies to manage the security and resiliency of your service mesh environment.