Secure access to the portal
Require end users to log in to discover API products in the portal.
Previously, you protected the APIs that end users access through your frontend portal. Now, secure access to the portal itself by requiring end users to log in. You can also change the visibility of your API products. This way, end users can see the API products only after logging in.
Before you begin
Complete the portal setup tutorial.
Complete the API product tutorial.
Complete the portal tutorial.
Get the labels of your routes to use to apply policies to, such as with the example query.
kubectl get rt -n gloo-mesh-gateways -o=jsonpath='{range .items[*]}[{.metadata.name}, {.spec.http[*].name}, {.spec.http[*].labels}]{"\n"}{end}'Example output:
- The
api-example-com-rtroute table does not have any route-level labels. To apply policies, you can add labels to those routes. - The
petstore-rtroute table has ausagePlans: dev-portallabel on itspets-api,users-api, andstore-apiroutes. - The
tracks-rtroute table has ausagePlans: dev-portallabel on itstracks-apiroute.
[api-example-com-rt, , ] [petstore-rt, pets-api users-api store-api, {"usagePlans":"dev-portal"} {"usagePlans":"dev-portal"} {"usagePlans":"dev-portal"} ] [tracks-rt, tracks-api, {"usagePlans":"dev-portal"}]- The
Step 1: Set up Okta as an OIDC provider
To enforce external authentication to Gloo Portal, you must set up an OpenID Connect (OIDC) provider. The OIDC provider provides an OAuth access token that authenticates users to the portal. The following example uses Okta. For other OIDC providers, you can adapt these steps.
Set up an Okta OIDC app
Configure an Okta OIDC app to get the information that you need to create external auth policies to secure your resources.
Open the Okta dashboard. If you don’t have an Okta account that you can use, sign up for an Okta developer account.
From the Applications menu, click Applications > Create New App. Note that you might see a Create App Integration button instead.
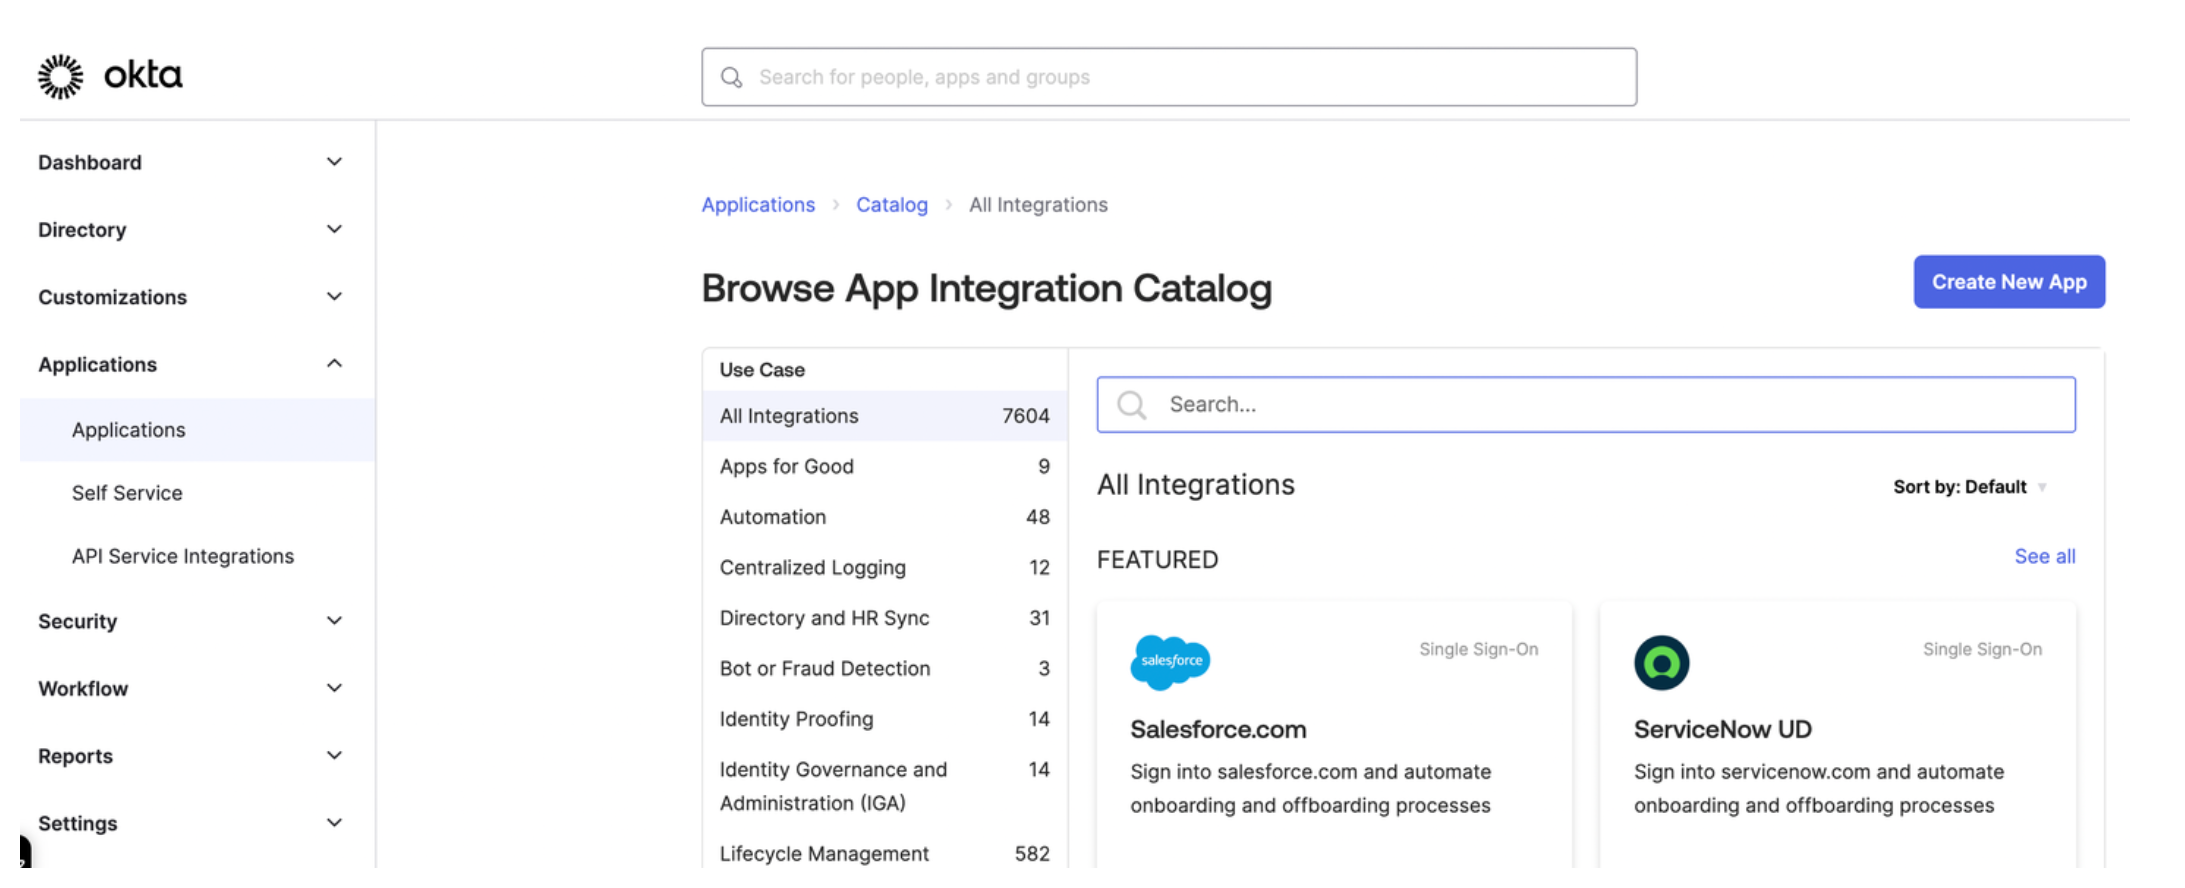
Figure: Okta application dashboard Select OIDC - OpenID Connect as the sign-in method for your app and Single-Page Application as your application type. Then, click Next.
Enter a name for your app and optionally upload a logo.
For Grant type, check both Authorization Code and Refresh Token.
For Sign-in redirect URIs, enter the location from which you want to allow users to log in. The URL is composed of hostname that you set up for your Portal resources and the
/callbackpath. For example, for the developer portal frontend app, you might enter:https://developer.example.comto let a user log in from the secured home page.- React starter app:
https://developer.example.com/apisto let a user log in from the APIs page. - Backstage frontend plug-in:
https://developer.example.com/gloo-platform-portalto let a user log in from the Gloo Portal Backstage plug-in page. https://developer.example.com/callbackfor the callback path.
For the Sign-out redirect URIs, enter the location to redirect the user after logging out, such as the following examples:
- React starter app:
https://developer.example.com/logout. - Backstage frontend plug-in:
https://developer.example.com/gloo-platform-portal/logout
- React starter app:
From the Assignments section, select Allow everyone in your organization to access. This way, you do not need to assign a user or group to this app. Instead, you can use your Okta developer account credentials to test the Okta authentication flow.
Click Save to save your changes. You are redirected to the Okta app details page.
From the General tab on the Okta app details page, note the Client ID.
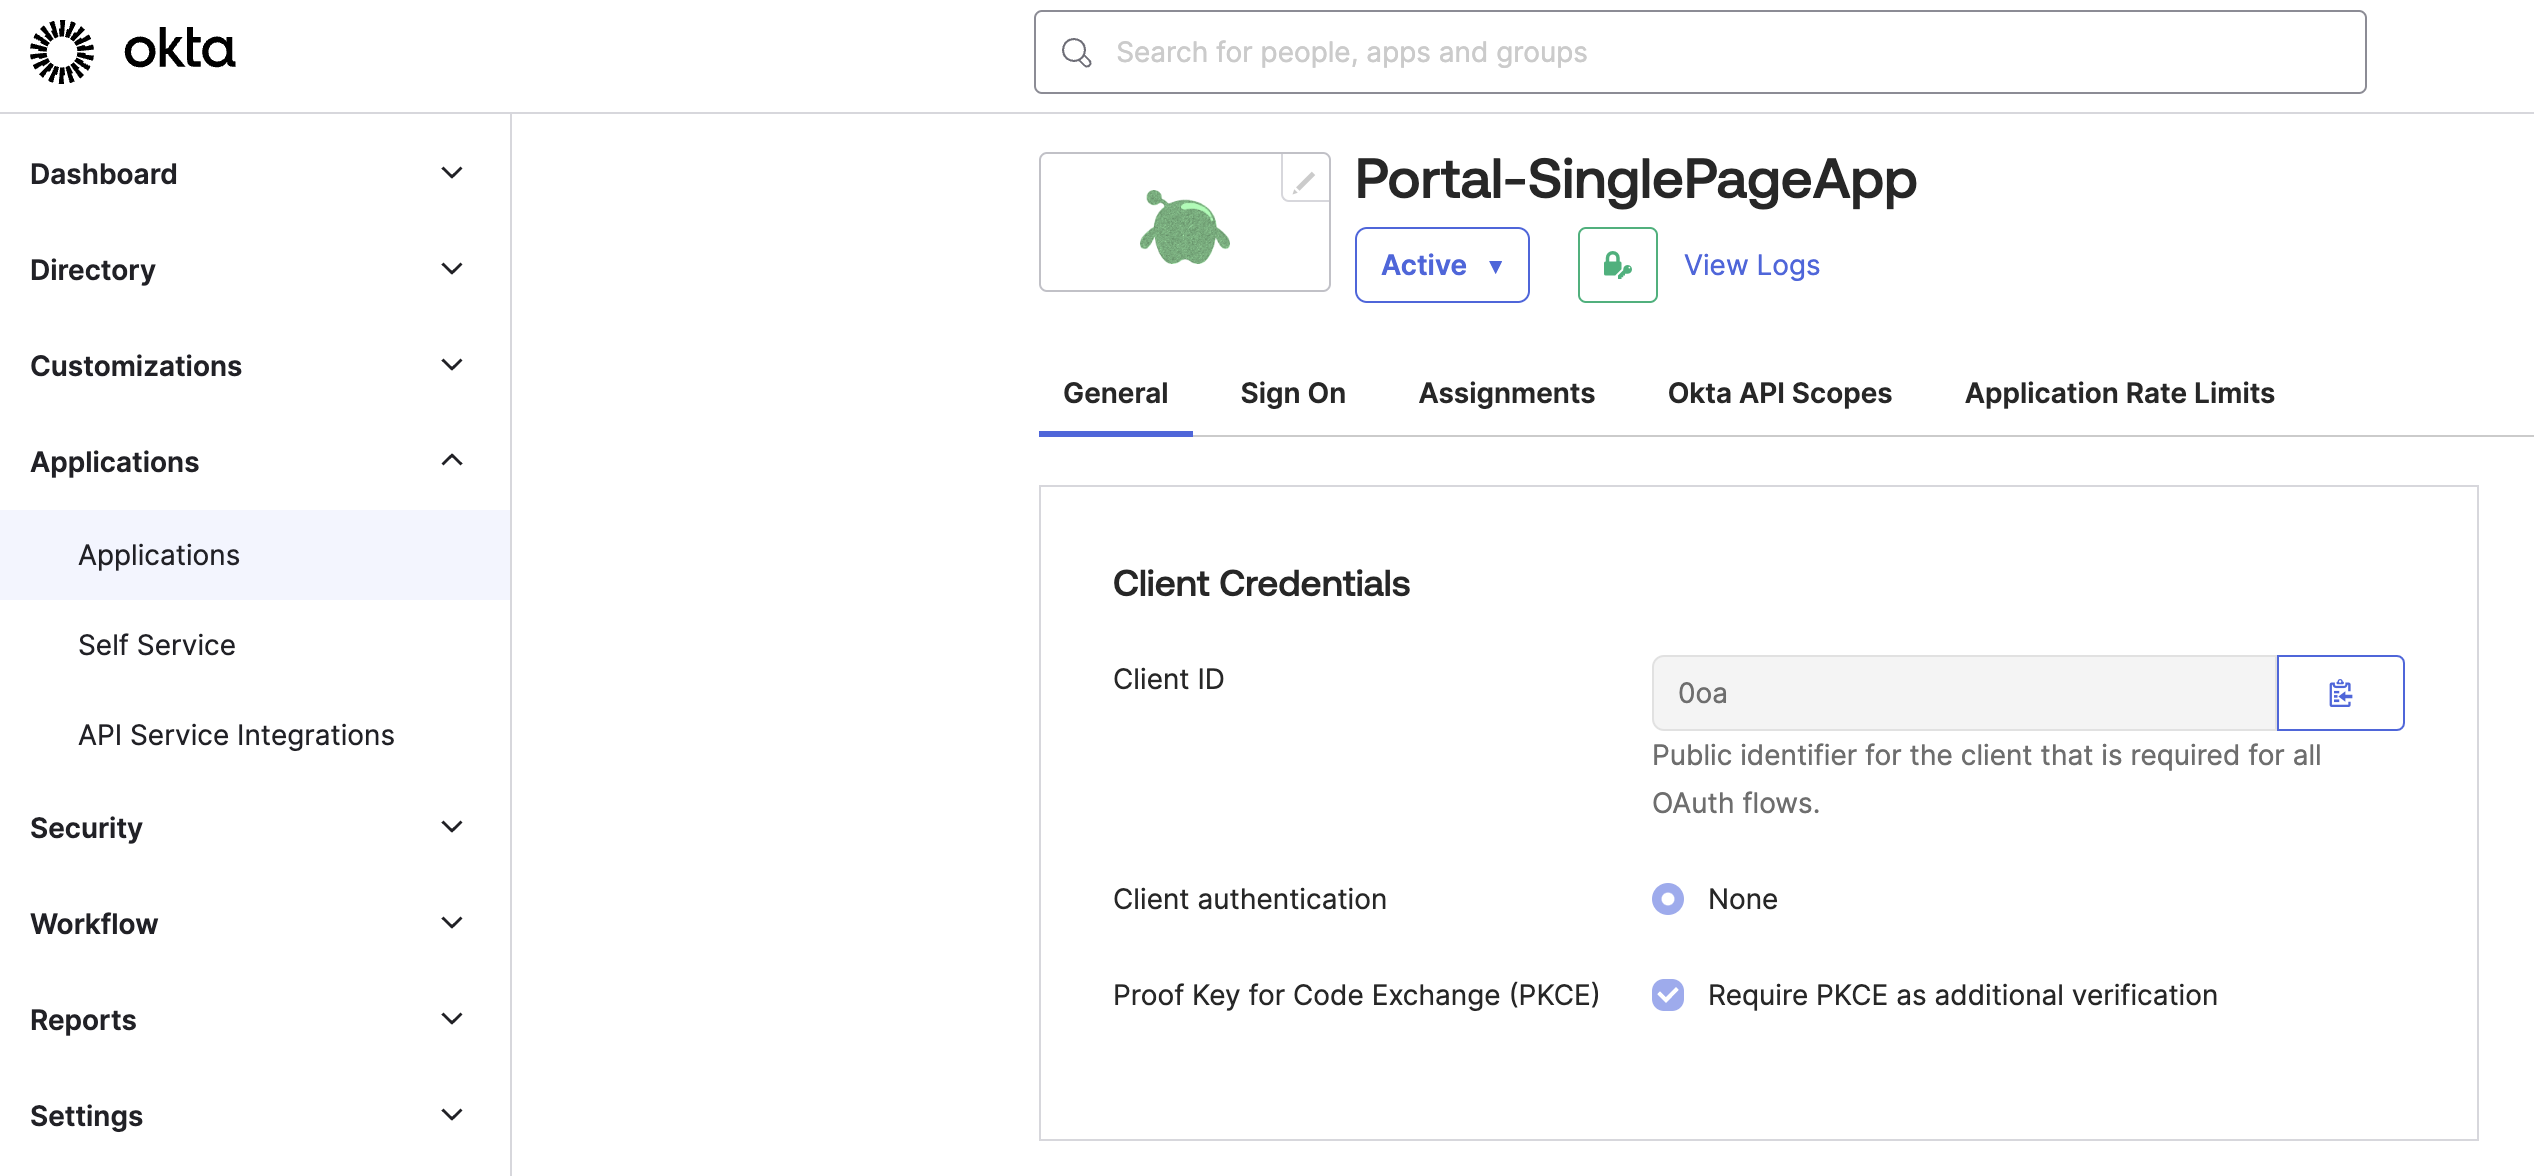
Figure: Okta General tab Store the Client ID as an environment variable.
export CLIENT_ID=<client-id>
Configure other Okta account details
Configure other Okta account details, such as the claims that you want to include in the access token.
From the navigation menu, click Security > API.
Click the Authorization Server that you want to use, such as
default.From the Settings tab, click the Metadata URI. In a new tab, your browser opens to a URL similar to
https://dev-1234567.okta.com/oauth2/default/.well-known/oauth-authorization-server.From the metadata URI, search for and save the endpoints that you need as environment variables.
The
token_endpointis where to get the OAuth token.export TOKEN_ENDPOINT=https://dev-1234567.okta.com/oauth2/default/v1/tokenThe
authorization_endpointis where to get the PKCE authorization code.export AUTH_ENDPOINT=https://dev-1234567.okta.com/oauth2/default/v1/authorizeThe
end_session_endpointis where to end the session.export LOGOUT_ENDPOINT=https://dev-1234567.okta.com/oauth2/default/v1/logout
Get the JSON Web Key Set (JWKS) that you use later for an inline access token external auth policy.
From the metadata URI, find the
jwks_uriendpoint. In a new tab, open this endpoint, such ashttps://dev-1234567.okta.com/oauth2/default/v1/keys.Copy and save the entire value of these keys as an environment variable.
export CERT_KEYS={"keys":[{"kty":"RSA","alg":"RS256","kid":"sKv...","use":"sig","e":"AQAB","n":"kdhR..."}]}
Return to the authorization server page in Okta.
From the Claims tab, click Add Claim to add any claims that you want the access token to include. Later, you can use these claims in your portal groups. For example, the portal group might require a member of
organization: solo.ioto access certain API products. For more information about claims, see JWT structure. For example, you might configure the following claims:- email: Return the user’s email as configured in the user’s profile.
- organization: Return the user’s organization as configured in the user’s profile.
- group: Include any group (match regex
*) for theopenidscope.
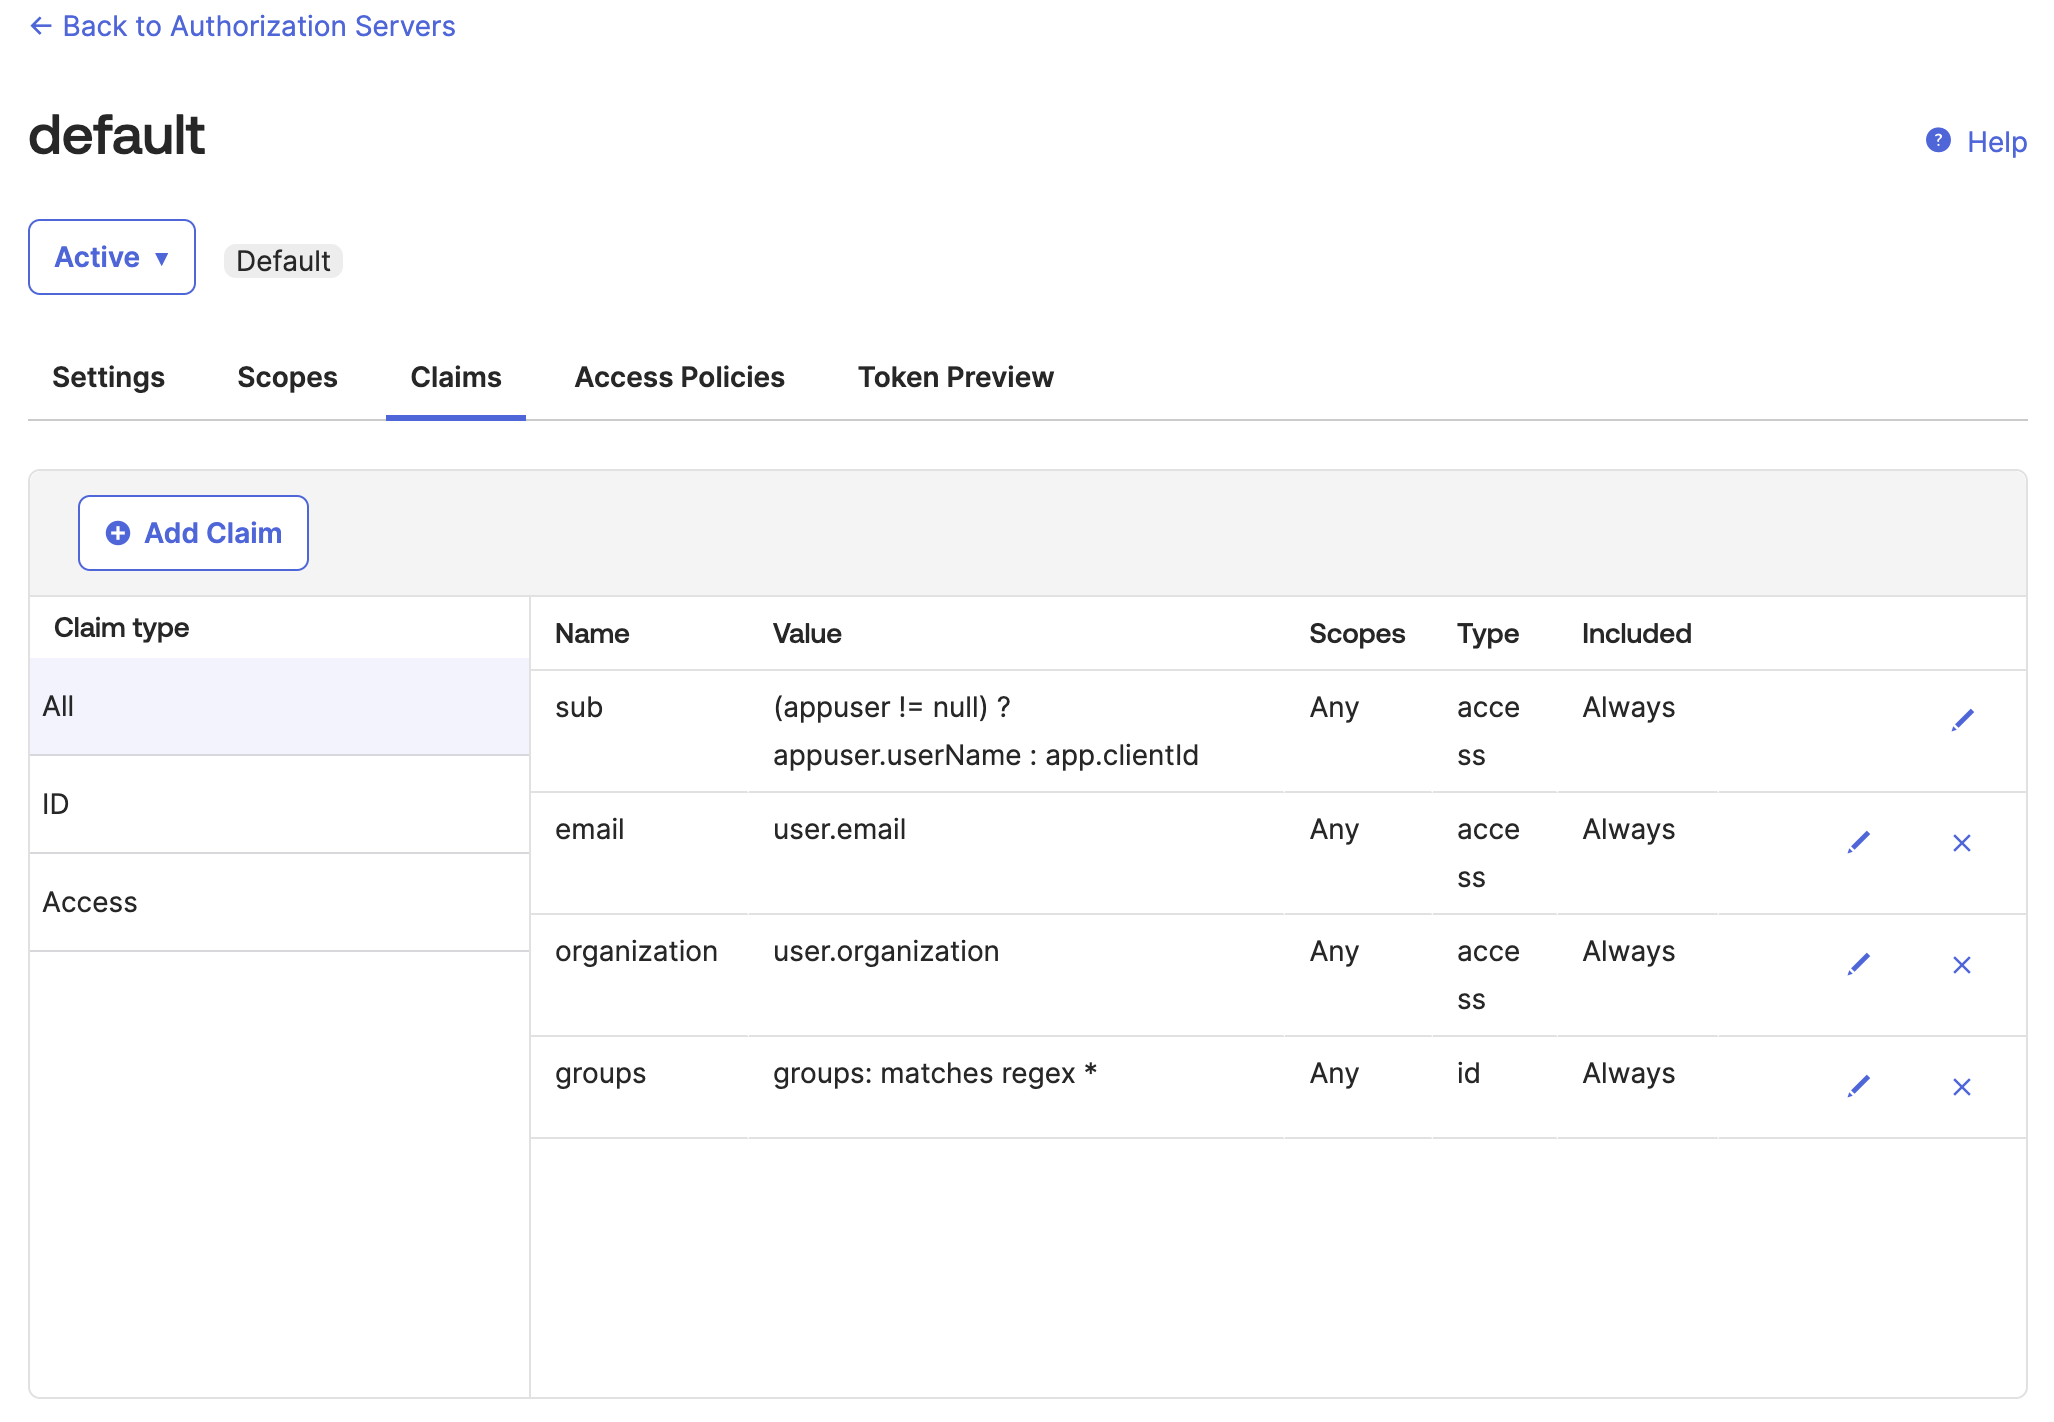
Figure: Okta default auth server Claims tab From the Token Preview tab, verify that the tokens return the information that you expect, such as the same
kidas$CERT_KEYSvalue that you previously saved and the claims that you configured.- In OAuth/OIDC client, enter the name of your app.
- In Grant type, select Authorization Code.
- In User, enter your username or the name of the user that you want to log in to the frontend developer portal.
- In Scopes, enter
openid. - Click Preview Token, then flip between the
id_tokenandtokenpreviews. - If you do not see the claim information that you expect, click your profile > My settings and review your personal information. For example, you might not have an
organizationorgroupset. You can edit your profile to include this information, then preview the token again.
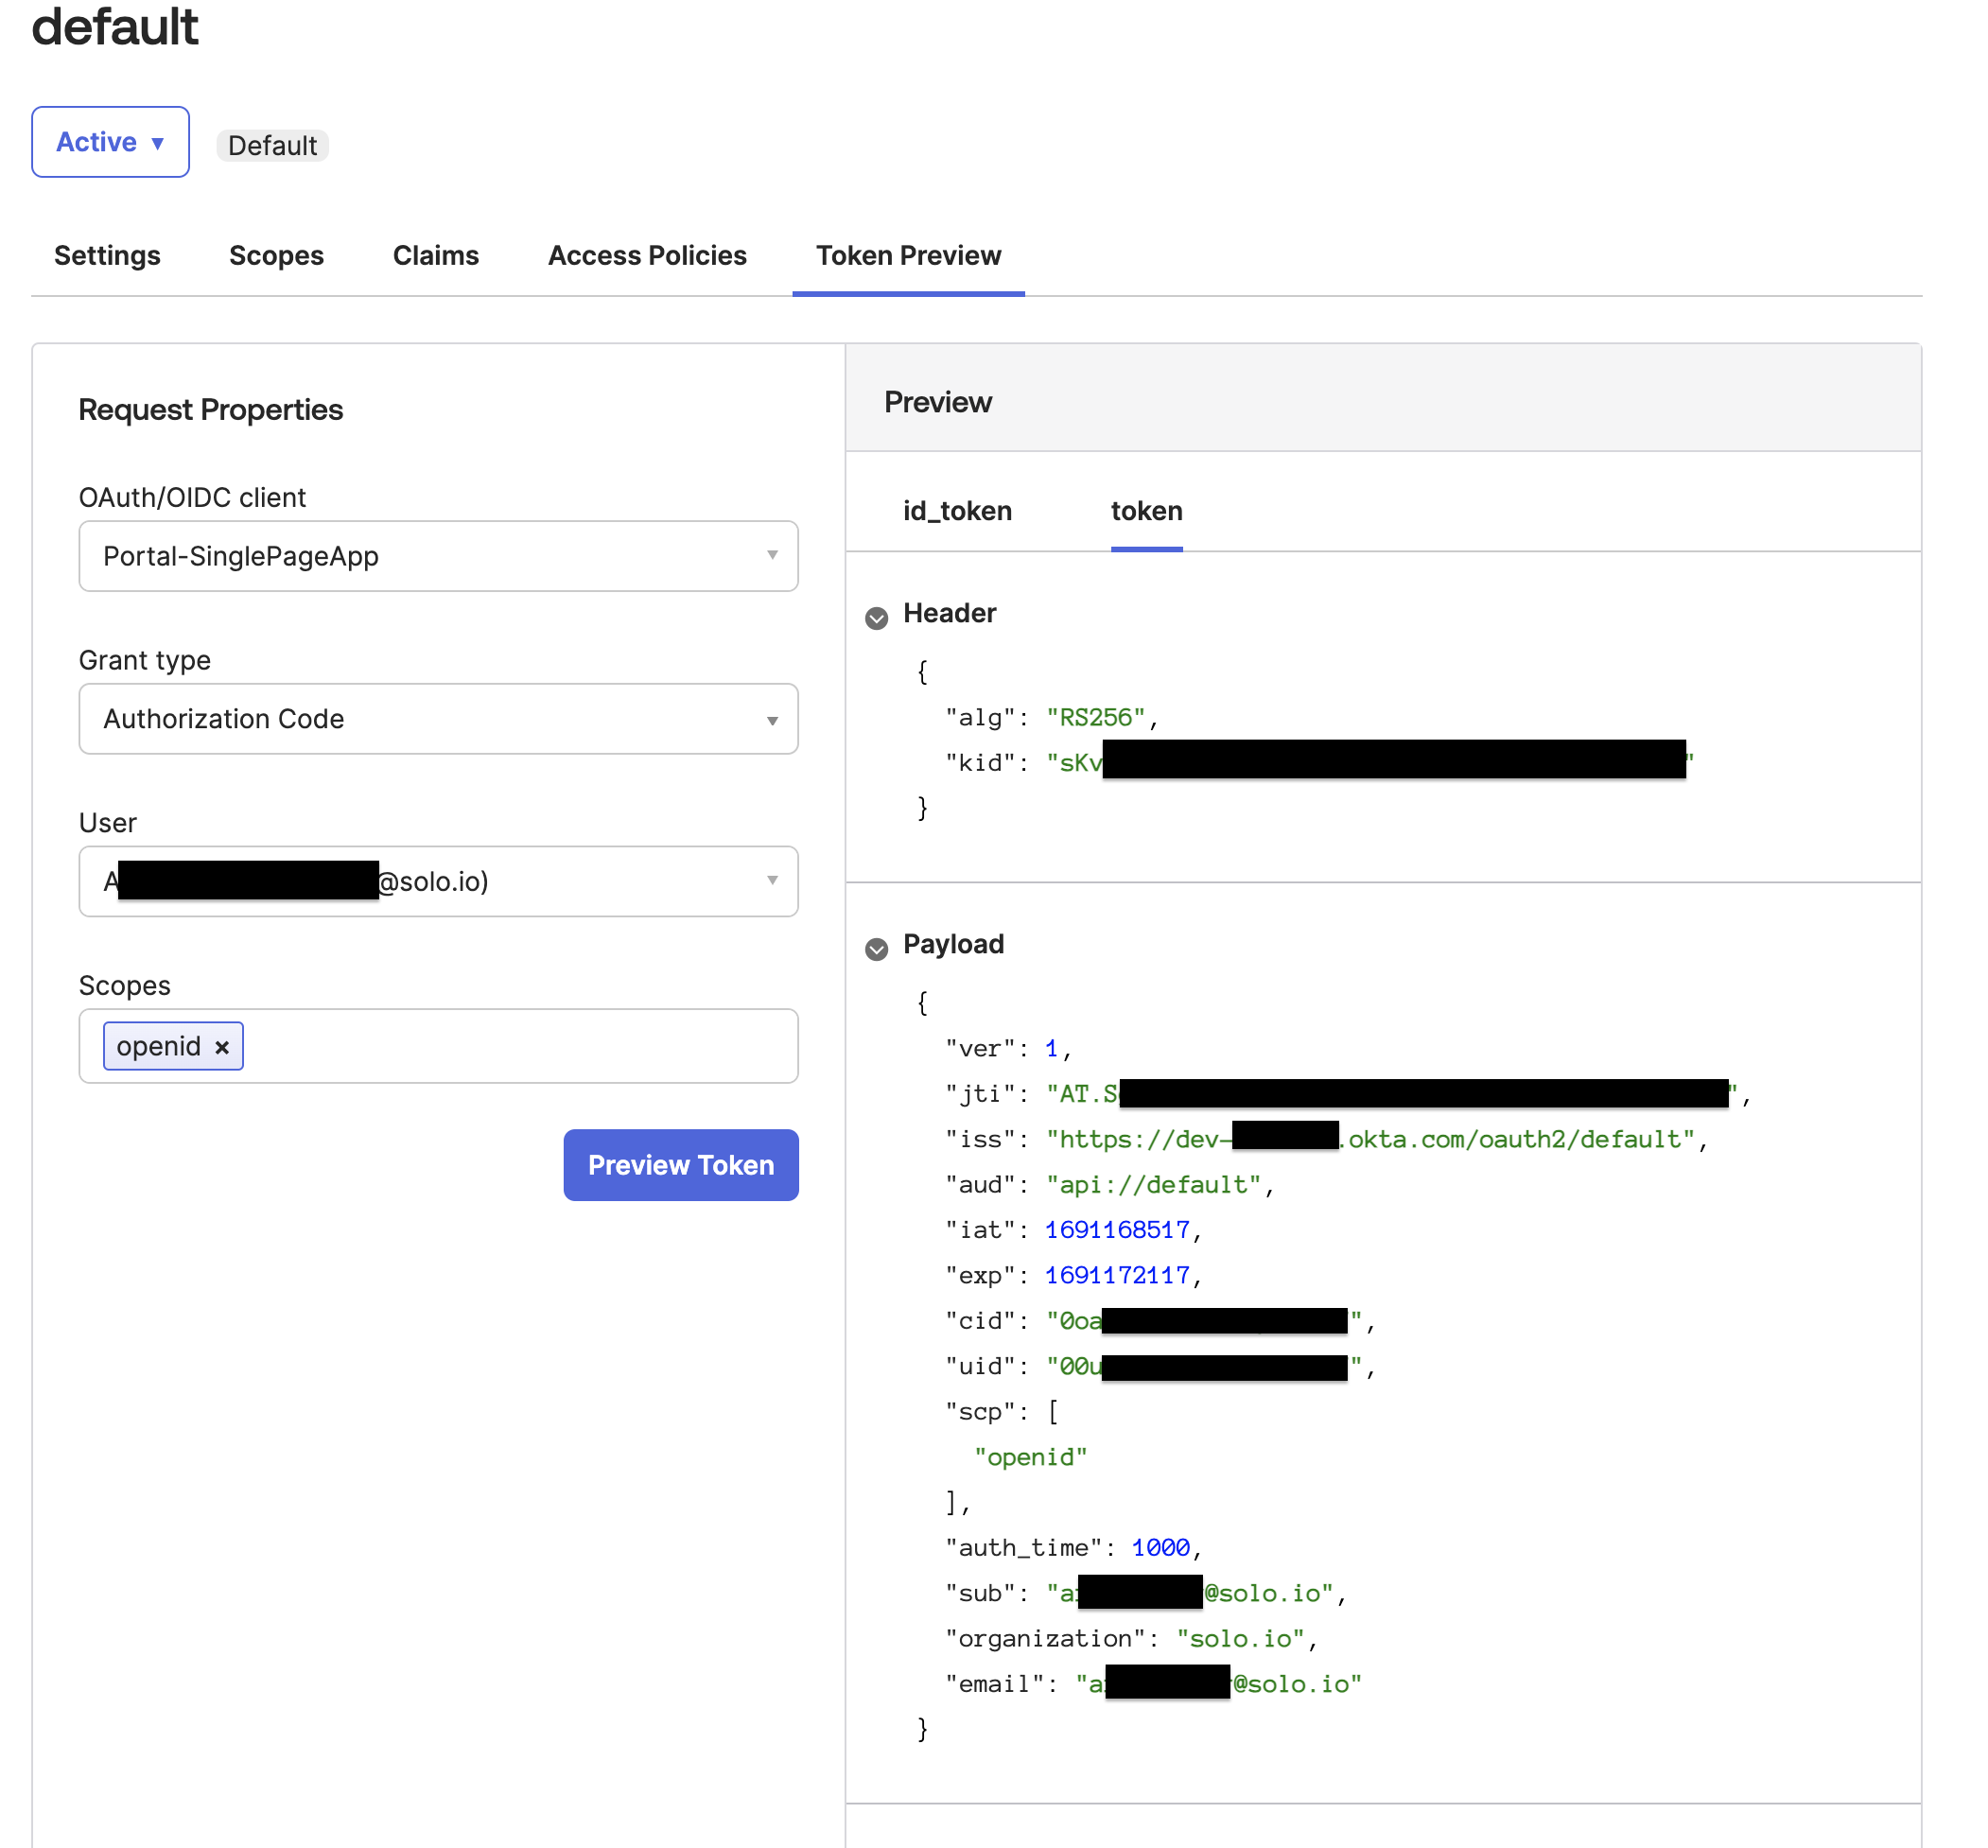
Figure: Okta Token Preview tab
Step 2: Create the OAuth policy
Set up external auth resources with Okta as the OIDC provider.
Create an external auth server that enforces your extauth policy.
  kubectl apply -f - <<EOF
apiVersion: admin.gloo.solo.io/v2
kind: ExtAuthServer
metadata:
  name: ext-auth-server
  namespace: gloo-mesh
spec:
  destinationServer:
    ref:
      cluster: $CLUSTER_NAME
      name: ext-auth-service
      namespace: gloo-mesh
    port:
      name: grpc
EOF
Create an external auth policy for the
oauth: "true"routes to enforce authentication via an access token from the Okta OIDC provider that you set up. Make sure to replace$CERT_KEYSwith the entire{"keys":[{"kid":"_YYA...","kty":"RSA","alg":"RSA-OAEP","use":"enc","n":"r4AXlC9sR..."}]}value that you previously retrieved.kubectl apply -f -<<EOF apiVersion: security.policy.gloo.solo.io/v2 kind: ExtAuthPolicy metadata: name: oauth-okta namespace: gloo-mesh spec: applyToRoutes: - route: labels: oauth: "true" config: server: name: ext-auth-server namespace: gloo-mesh cluster: $CLUSTER_NAME glooAuth: configs: - oauth2: accessTokenValidation: jwt: localJwks: inlineString: >- $CERT_KEYS EOFReview the following table to understand this configuration. For more information, see the API docs.
Setting Description spec.applyToRoutes Select the routes that you want to apply this policy to. In this example, you want to require external authentication for all routes with the oauth: "true"label.spec.config.server The external auth server to use for the policy. glooAuth.configs.oauth2.accessTokenValidation.jwt Set up the policy to enforce authentication via an access token that conforms to the JWT specification. glooAuth.configs.oauth2.accessTokenValidation.jwt.localJwks Use the local JWKS that you provide inline to validate the JWT access token. glooAuth.configs.oauth2.accessTokenValidation.jwt.localJwks.inlineString Provide the JWKS keys that you retrieved from your OIDC provider inline. Verify that the external auth policy is applied successfully.
Review the status of the external auth policy and make sure that it shows
ACCEPTED.kubectl get extauthpolicy oauth-okta -n gloo-mesh -o yamlGet the authconfig resource that was created for your policy and make sure that it shows
ACCEPTED.kubectl get authconfig -n gloo-mesh -o yamlIf you see a
REJECTEDerror similar toinvalid character 'k' looking for beginning of object key string, try copying the$CERT_KEYSvalue manually again.
Step 3: Configure the routes to secure
Decide on the portal server APIs that you want to enforce authentication for. Then update the route table to the backend portal server that you created in a previous tutorial.
In the following example, you set up two forward actions for authn and no-auth that allow access to different API methods.
authn: To apply an external auth policy to these APIs and enforce authentication, you add theoauth: "true"label on this route. Users must authenticate before they can perform certain API methods, such asGET /v1/me,POST /v1/api-keys, andDELETE /v1/api-keys. The access token for authentication is extracted from theAuthorizationheaderno-auth: Users do not have to authenticate before they can perform certain read-only API methods, such asGET /v1/apis,GET /v1/usage-plans, andGET /v1/api-keys.
  kubectl apply -f - <<EOF
apiVersion: networking.gloo.solo.io/v2
kind: RouteTable
metadata:
  name: dev-portal-rt
  namespace: gloo-mesh-gateways
spec:
  hosts:
  - developer.example.com
  virtualGateways:
  - name: istio-ingressgateway-portal
    namespace: gloo-mesh-gateways
  defaultDestination:
    port:
      number: 8080
    ref:
      name: gloo-mesh-portal-server
      namespace: gloo-mesh
      cluster: $CLUSTER_NAME
  http:
    #
    # Portal server routes that require authentication.
    #
    - forwardTo: {}
      name: authn
      labels:
        oauth: "true" # Use this label to apply an OAuth external auth policy
        route: portal-api
      matchers:
        #
        # /v1/me
        - uri:
            prefix: /v1/me
          method: OPTIONS
        - uri:
            prefix: /v1/me
          method: GET
          headers:
            - name: Authorization
              value: "Bearer.*"
              regex: true
        #
        # /v1/apis
        - uri:
            prefix: /v1/apis
          method: GET
          headers:
            - name: Authorization
              value: "Bearer.*"
              regex: true
        #
        # /v1/usage-plans
        - uri:
            prefix: /v1/usage-plans
          method: GET
          headers:
            - name: Authorization
              value: "Bearer.*"
              regex: true
        #
        # /v1/api-keys
        - uri:
            prefix: /v1/api-keys
          method: GET
          headers:
            - name: Authorization
              value: "Bearer.*"
              regex: true
        - uri:
            prefix: /v1/api-keys
          method: POST
          headers:
            - name: Authorization
              value: "Bearer.*"
              regex: true
        - uri:
            prefix: /v1/api-keys
          method: DELETE
          headers:
            - name: Authorization
              value: "Bearer.*"
              regex: true
    #
    # Portal server routes that are public and do not require authentication.
    #
    - forwardTo: {}
      name: no-auth
      labels:
        route: portal-api
      matchers:
        - uri:
            prefix: /v1/apis
          method: GET
        - uri:
            prefix: /v1/usage-plans
          method: GET
        - uri:
            prefix: /v1/api-keys
          method: GET
        #
        # Allow OPTION requests without authentication.
        #
        - uri:
            prefix: /v1/api-keys
          method: OPTIONS
        - uri:
            prefix: /v1/usage-plans
          method: OPTIONS
        - uri:
            prefix: /v1/apis
          method: OPTIONS
EOF
Step 4: Update the frontend app with the Okta details
Now that you have the backend portal server secured, update the frontend portal app. You can provide the Okta details as environment variables. Then, you redeploy the frontend portal app that you created in a previous tutorial.
Create a secret with the details of the OAuth identity provider that you use for external authentication to your portal. Replace the variables with the values that you previously retrieved when you set up Okta.
VITE_PORTAL_SERVER_URL: The URL that the Gloo Portal REST server is available on. This URL matches the host in the route table for thegloo-mesh-portal-server, such ashttp://developer.example.com. You can check the hostnames of your route tables with the following command. For local development, use the default valuehttp://localhost:31080/v1. Format this variable with a/v1path, such as:http://developer.example.com/v1.VITE_CLIENT_ID: The OAuth identity provider’s Client ID.- In your OAuth provider, access the well-known OpenID config path for your authorization server. Okta OpenID config path example:
$OKTA_URL/oauth2/default/.well-known/openid-configuration - From the OpenID config path, get the values for the following endpoints:
VITE_TOKEN_ENDPOINT: The endpoint to get the OAuth token.VITE_AUTH_ENDPOINT: The endpoint to get the PKCE authorization code.VITE_LOGOUT_ENDPOINT: The endpoint to end the session.
Keep in mind that the Portal URL and OAuth endpoints that you set in the deployment configuration must match. For example, if you use a secure HTTPS gateway, then the Portal URL and OAuth endpoints should begin with `https://` instead of `http://`.kubectl apply -f- <<EOF apiVersion: v1 kind: Secret metadata: name: portal-oauth-secrets namespace: gloo-mesh type: Opaque stringData: VITE_PORTAL_SERVER_URL: "http://developer.example.com/v1" VITE_CLIENT_ID: "$CLIENT_ID" VITE_TOKEN_ENDPOINT: "$TOKEN_ENDPOINT" VITE_AUTH_ENDPOINT: "$AUTH_ENDPOINT" VITE_LOGOUT_ENDPOINT: "$LOGOUT_ENDPOINT" EOFRedeploy the Kubernetes resources that you need to run your portal frontend app. The deployment is now configured to load the OAuth details from the secret that you created in the previous step.
kubectl apply -n gloo-mesh -f https://raw.githubusercontent.com/solo-io/gloo-mesh-use-cases/main/gloo-gateway/portal/frontend-deployment.yaml
Step 5: Verify that login is required
Try to access the frontend portal to verify that external auth is enforced by Okta.
Terminal
From the terminal, you can send curl requests.
Get the external address of your ingress gateway. The steps vary depending on the type of load balancer that backs the ingress gateway.
- LoadBalancer IP address:
export INGRESS_GW_IP=$(kubectl get svc -n gloo-mesh-gateways istio-ingressgateway -o jsonpath='{.status.loadBalancer.ingress[0].ip}') echo $INGRESS_GW_IP - LoadBalancer hostname:
  export INGRESS_GW_IP=$(kubectl get svc -n gloo-mesh-gateways istio-ingressgateway -o jsonpath='{.status.loadBalancer.ingress[0].hostname}')
echo $INGRESS_GW_IP
Note: Depending on your environment, you might see
<pending>instead of an external IP address. For example, if you are testing locally in kind or minikube, or if you have insufficent permissions in your cloud platform, you can instead port-forward the service port of the ingress gateway:kubectl -n gloo-mesh-gateways port-forward deploy/istio-ingressgateway-1-20 8081- LoadBalancer IP address:
Send a request to the portal server. Verify that you get back a 200 from an API that does not require authentication, such as
GET /v1/apis.curl -vik --resolve developer.example.com:80:$INGRESS_GW_IP http://developer.example.com:80/v1/apisExample output:
  HTTP/1.1 200 OK
...
[{"apiProductDisplayName":"Catstronauts Course Tracks","apiProductId":"tracks","apiVersions":[{"apiId":"tracks-v1","apiVersion":"v1","contact":"support@example.com","customMetadata":{"compatibility":"None"},"description":"REST API for Catstronauts to retrieve data for tracks, authors and modules.","license":"License info, such as MIT","lifecycle":"Supported","termsOfService":"You must authenticate to use this API! And other Terms of Service.","title":"Catstronauts REST API","usagePlans":["bronze","gold","silver"]}]},{"apiProductDisplayName":"Pet Store","apiProductId":"petstore","apiVersions":[{"apiId":"petstore-v1","apiVersion":"v1","contact":"support@example.com","customMetadata":{"compatibility":"None"},"description":"Totally awesome API for all things pets!","license":"License info, such as MIT","lifecycle":"Supported","termsOfService":"You must authenticate to use this API! And other Terms of Service.","title":"Pet Store REST API","usagePlans":["bronze","gold","silver"]}]}]
Send another request to the portal server. Verify that you get back a 401 from an API that requires authentication, such as
GET /v1/api-keys.curl -vik --resolve developer.example.com:80:$INGRESS_GW_IP http://developer.example.com:80/v1/api-keys?usagePlans=bronze-planExample output:
  HTTP/1.1 401 Unauthorized
...
{"message":"user is not authenticated"}
Frontend portal app
From your browser, you can open the frontend app for the portal.
Open the URL to your frontend app. Make sure that you are redirected to the Okta login screen.
http://portal.example.com:8080/Enter your Okta developer account credentials. If successfully authenticated, Okta issues an ID token and redirects you to the frontend app.
Figure: Okta login screen
Next steps
Excellent! You completed all the tutorials that showcase basic Portal functionality.
- Try out the Portal guides for more in-depth options, such as configuring dynamic rate limit policies or OAuth instead of API key external auth policies.
- Having trouble getting OAuth to work? Try debugging OAuth issues.
- When you are done trying out Portal, you can clean up all of the resources that you created.