JWT claim- and scope-based auth
Authorize requests based on claims or scopes in a JWT.
For each route in your virtual gateway, you can require specific JWT claims or scopes for authorization. These rules can match values extracted from the JWT for allowed issuers, expiries, audiences, scopes, or other valid JSON claims from the JWT payload.
About claim-based JWT policies
You can restrict a request’s access based on the claims and scopes in a JWT. For more information about JWTs, see the JWT overview and API docs.
Claims
Claims are key-value pairs that provide identity details, such as the subject’s user ID, the entity that issued the token, and expiration time. RFC 7519 spec reserves seven claims, and the IANA JSON Web Token Claims outline many more registered claims to encourage interoperability across providers. Further, your OIDC provider might have custom claims, such as described in the Auth0 docs.
For Gloo JWT policies, claims have the following features:
- When you require multiple claims, the JWT must have all of the specified claims to be allowed. Claims are logically
AND’d together. - You can optionally specify required
valuesornotValuesfor a claim’s key, which are logicallyOR’d together.- For
values, the claim can have any of the specified values to be allowed. - For
notValues, the claim cannot have any of the specified values to be allowed.
- For
The claims field does not support the following features:
- Multiple list entries with the same key.
- Requiring each scope in the claim. For the following example policy, a JWT with
is:developerorread:secretsscopes would be allowed. To require the JWT to have both scopes, use therequiredScopesfield instead.claims: - key: scope values: - is:developer - read:secrets - Nested claims are not supported. In the following JWT payload example, you can create a rule for the
emailclaim, but not thelocationclaim.{ "email": "user2@solo.io", "location": { "city": "Cambridge", "state": "MA", "country": "USA" } }
Scopes
Scopes are a special type of claim that represent specific permissions that a client has. These scopes might be returned from an Identity and Access Management (IAM) provider, and are typically formatted similar to is:developer or read:profile.
For Gloo JWT policies, scopes have the following features:
- Scopes are specified as a list, not key-value pairs.
- When you require multiple scopes, the JWT must have all of the specified scopes to be allowed. Scopes are logically
AND’d together.
Scopes do not support the following features:
- Listing scopes that, if present in the claim, are not allowed. Instead, you can use the
claimsfield with thenotValuesetting. - Requiring that only one of the listed scopes is present (logical
OR). Instead, you can useclaims.
More considerations for JWT policies
As you develop your JWT authorization policies, keep in mind the following considerations about how claims, scopes, and other policy features work together.
- The main difference between
requiredScopesandclaimsfor configuring scopes is that therequiredScopesvalue sets a list of scopes that must all be included in the request (logicalAND). On the other hand,claimslets you set several scopes that can be accepted (logicalOR), or scopes that will be denied (notValue). - You can use claims and scopes together. A request must meet all of the claim and scope conditions that you specify.
- If your policy has multiple providers, the claims and scopes apply to all the providers. If one of your providers does not return a claim or scope value, consider using a separate policy for that provider.
- Because you use the JWT policy for authorization, you cannot set the policy’s phase to
postAuthz. - You cannot apply multiple JWT policies to the same route in a route table, so make sure to keep all your rules for a route in the same policy.
- If you import or export resources across workspaces, your policies might not apply. For more information, see Import and export policies.
Before you begin
This guide assumes that you use the same names for components like clusters, workspaces, and namespaces as in the getting started. If you have different names, make sure to update the sample configuration files in this guide.
- Set up Gloo Mesh Gateway in a single cluster.
- Install Bookinfo and other sample apps.
Configure an HTTP listener on your gateway and set up basic routing for the sample apps.
Configure JWT policies with claims
Review the following examples for claim- and scope-based JWT authorization. You can apply a JWT policy at the destination or route level, but you cannot apply multiple JWT policies to the same destination or to the same route in a route table. If you try to apply multiple policies, only the policy that you created first takes effect. In general, you apply policies to routes to protect ingress traffic through the gateway, and to destinations to protect traffic within the service mesh. For more information, see Applying policies and the API docs.
Try out JWT policies with claims
To test claims-based JWT authorization, you can create a JWT policy that requires certain claims and scopes. Then, you can create two JWT tokens. One token has the required claims and scope, while the other token does not.
Save the example JWT policy for the
httpbinroute. For more information about this policy, see the configuration example.cat << EOF > jwt-policy_authz.yaml apiVersion: security.policy.gloo.solo.io/v2 kind: JWTPolicy metadata: annotations: cluster.solo.io/cluster: "" name: jwt-policy namespace: httpbin spec: applyToRoutes: - route: labels: route: httpbin config: claims: - key: "email" values: - "*@solo.io" - key: "org" values: - "internal" - "partner" requiredScopes: - "is:developer" providers: provider1: issuer: https://localhost local: inline: |- -----BEGIN PUBLIC KEY----- MIIBIjANBgkqhkiG9w0BAQEFAAOCAQ8AMIIBCgKCAQEAnknfKiIDREaE/vxu8rtz oMaPop6rsiX7GANCRcqFks0j96Gb+UssKD8zJs2JBvEe4n0wNKVeLRbOctII+ZEO G8b+Dqig/1ubq3xiGbDBbZqHiFKjFQVUnII3Un9VRtDcJdgaaPGHnhlPs79sJNgQ e6AWJmfAasdT7i3MVEW7/dXcROiMRGapmxv+nQbKdoeiCJDULRdMSodhg/WJw2sH LLVxh4fPSF7cRxj36Y9FKWcGUH+YKe7n4gufAeEsHk+tPBndymYpmcMjb6W9HrJO 39vvyMTjLAUyElCEfeMqCpFBCElhaGbF8ZncbV6vvDEkOxMX/m1TYhoJr1E2U8y/ NwIDAQAB -----END PUBLIC KEY----- tokenSource: headers: - name: X-Auth prefix: 'Bearer ' queryParams: - auth_token EOFCreate a private-public key pair by using OpenSSL. You use this pair to create your own JWT token.
- Create a private key to sign the JWT.
openssl genrsa 2048 > private-key.pem - Extract the public key from the private key.
openssl rsa -in private-key.pem -pubout
- Create a private key to sign the JWT.
Open the downloaded JWT policy.
open jwt-policy_authz.yamlRun the following command to copy the public key value again.
openssl rsa -in private-key.pem -pubout | pbcopyPaste the public key value in the
inlinesection of the YAML configuration file. Make sure the indentation is kept.Create the JWT policy with your new public key value, which is used to verify the JWT token in subsequent requests.
kubectl apply -f jwt-policy_authz.yamlCreate a JWT that uses your private key. Refer to the following image to help understand the UI location of the steps.
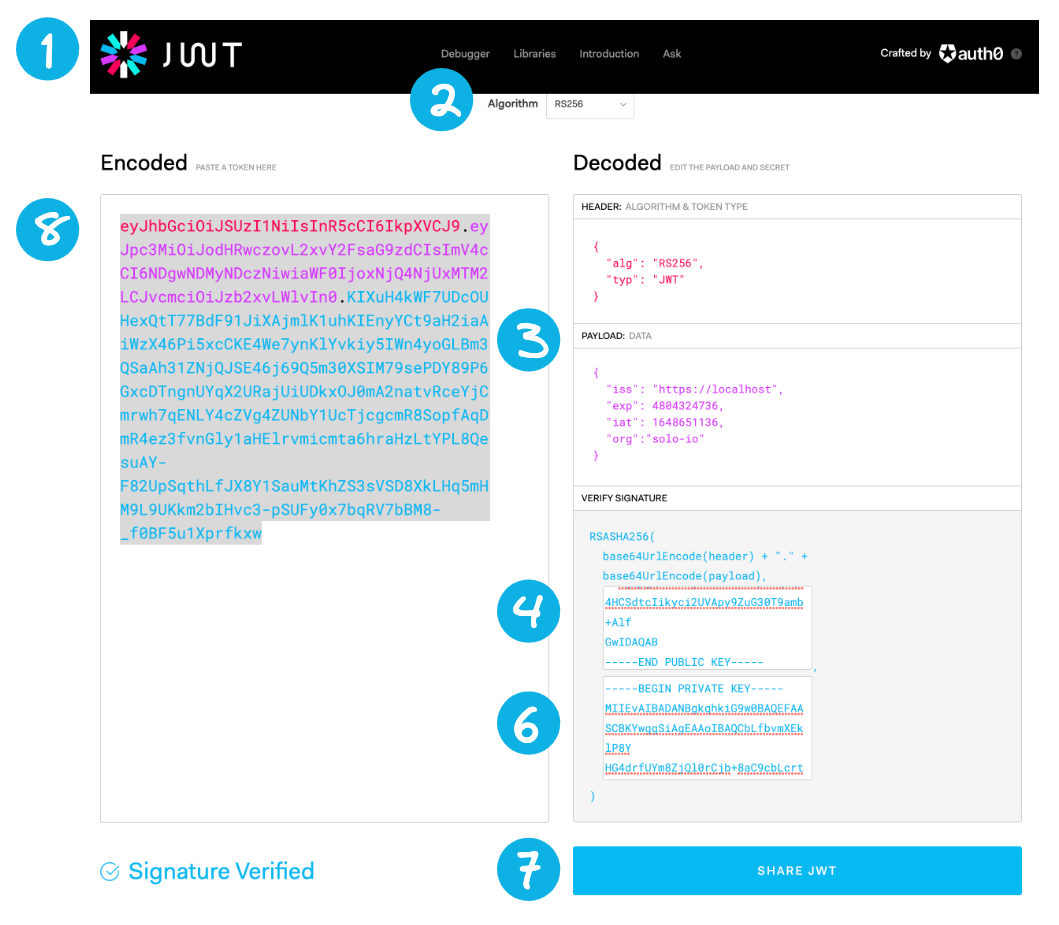
JWT token - In your browser, go to https://jwt.io/. For the subsequent steps, you can refer to the following image.
- From the Algorithm dropdown, select
RS256. - From the Decoded section, scroll to the Payload: Data pane. Replace the content by pasting the following JWT payload information.
{ "iss": "https://localhost", "exp": 4804324736, "iat": 1648651136, "org": "internal", "email": "user2@solo.io", "scope": "is:developer" } - From the Decoded section, scroll to the Verify Signature pane. In the first input box for
-----BEGIN PUBLIC KEY-----, replace the content by pasting the value of your public key from the previous output of your terminal. - In your terminal, copy the contents of your private key.
cat private-key.pem | pbcopy - Return to your browser and go to the Verify Signature pane in the Decoded section. In the second input box for
-----BEGIN PRIVATE KEY-----, replace the content by pasting the value of your private key. - Optional: Click Share JWT and paste the JWT values into a file to refer to later.
- From the Encoded section, copy the token value to your clipboard, such as
eyJhbG..... - Add the token value to an environment variable on your local machine.
export TOKEN_DEV="Bearer <token_value>"
Repeat the previous step to create another JWT that does not include the correct claim and scope data.
- For the Payload: Data section, use the following details. Note that the org, email, and scope details differ from the required claims in your JWT policy.
{ "iss": "https://localhost", "exp": 4804324736, "iat": 1648651136, "org": "external", "email": "user1@example.com", "scope": "is:user" } - After filling out the rest of the details and getting the encoded token, set the token as a different environment variable.
export TOKEN_USER="Bearer <token_value>"
- For the Payload: Data section, use the following details. Note that the org, email, and scope details differ from the required claims in your JWT policy.
Try the request to the
httpbinapp without any authentication. Notice that your request is denied with a401error.- HTTP:
curl -vik -H "X-httpbin: true" --resolve www.example.com:80:${INGRESS_GW_IP} http://www.example.com:80/get - HTTPS:
curl -vik -H "X-httpbin: true" --resolve www.example.com:443:${INGRESS_GW_IP} https://www.example.com:443/get
Example output:
  HTTP/1.1 401 Unauthorized
www-authenticate: Bearer realm="http://www.example.com/get"
...
Jwt is missing
Example output:
HTTP/1.1 401 Unauthorized www-authenticate: Bearer realm="http://www.example.com/get" ... Jwt is missing- HTTP:
Try the request to the
httpbinapp again, this time with your developer token (${TOKEN_DEV}). Notice that your request is now accepted!- HTTP:
curl -vik -H "X-Auth: ${TOKEN_DEV}" -H "X-httpbin: true" --resolve www.example.com:80:${INGRESS_GW_IP} http://www.example.com:80/get - HTTPS:
curl -vik -H "X-Auth: ${TOKEN_DEV}" -H "X-httpbin: true" --resolve www.example.com:443:${INGRESS_GW_IP} https://www.example.com:443/get
In the example output you get back a
200response.HTTP/1.1 200 OK ...- HTTP:
Try the request to the
httpbinapp again, this time with your user token (${TOKEN_USER}). Notice that your request is denied as expected, because this token does not have the required claim data.- HTTP:
curl -vik -H "X-Auth: ${TOKEN_USER}" -H "X-httpbin: true" --resolve www.example.com:80:${INGRESS_GW_IP} http://www.example.com:80/get - HTTPS:
curl -vik -H "X-Auth: ${TOKEN_USER}" -H "X-httpbin: true" --resolve www.example.com:443:${INGRESS_GW_IP} https://www.example.com:443/get
In the example output you get back a
403response.HTTP/1.1 403 Forbidden ... RBAC: access denied%- HTTP:
Cleanup
You can optionally remove the resources that you set up as part of this guide.
kubectl -n httpbin delete jwtpolicy jwt-policy