Basic JWT example
Secure access to routes with a basic JWT example.
For more information about JWTs, see the JWT overview and API docs. For examples that select destinations or east-west service mesh routes, see the Gloo Mesh Enterprise docs.
If you import or export resources across workspaces, your policies might not apply. For more information, see Import and export policies.
Before you begin
This guide assumes that you use the same names for components like clusters, workspaces, and namespaces as in the getting started. If you have different names, make sure to update the sample configuration files in this guide.
- Set up Gloo Mesh Gateway in a single cluster.
- Install Bookinfo and other sample apps.
Configure an HTTP listener on your gateway and set up basic routing for the sample apps.
Get the external address of your ingress gateway. The steps vary depending on the type of load balancer that backs the ingress gateway.
- LoadBalancer IP address:
export INGRESS_GW_IP=$(kubectl get svc -n gloo-mesh-gateways istio-ingressgateway -o jsonpath='{.status.loadBalancer.ingress[0].ip}') echo $INGRESS_GW_IP - LoadBalancer hostname:
  export INGRESS_GW_IP=$(kubectl get svc -n gloo-mesh-gateways istio-ingressgateway -o jsonpath='{.status.loadBalancer.ingress[0].hostname}')
echo $INGRESS_GW_IP
Note: Depending on your environment, you might see <pending> instead of an external IP address. For example, if you are testing locally in kind or minikube, or if you have insufficent permissions in your cloud platform, you can instead port-forward the service port of the ingress gateway:
kubectl -n gloo-mesh-gateways port-forward deploy/istio-ingressgateway-1-20 8081
Configure JWT policies
You can apply a JWT policy at the destination or route level, but you cannot apply multiple JWT policies to the same destination or to the same route in a route table. If you try to apply multiple policies, only the policy that you created first takes effect. In general, you apply policies to routes to protect ingress traffic through the gateway, and to destinations to protect traffic within the service mesh. For more information, see Applying policies.
The following example is for a basic JWT policy with a local JWT issuer and inline public key. The policy does the following:
- Enables JWT authentication for the selected routes.
- Adds the value of an
orgclaim from the JWT payload to anX-Orgheader in the request, if present. - Adds the value of an
emailclaim from the JWT payload to anX-Emailheader in the request, if present. - Checks requests by using the token found in the
X-Authheader with the prefixBearer <token>, or in a query parameterauth_token=<token>. Note that if a request has both the header and query parameter, both tokens must be valid for Gloo Mesh Gateway to accept the request.
Review the following table to understand this configuration. For more information, see the API docs.
| Setting | Description |
|---|---|
applyToRoutes | Use labels to configure which routes to apply the policy to. This example label matches the app and route from the example route table that you apply separately. If omitted and you do not have another selector such as applyToDestinations, the policy applies to all routes in the workspace. |
phase | Set when to apply the JWT filter in the request chain, either before (preAuthz) or after (postAuthz) authorization to have access to the JWT token. You can also set the priority if you have multiple policies in the same phase. The lowest numbered priority is run first. For more information, see Phase considerations. This example sets no priority, so the default value of zero is used. |
providers | Set up the JWT providers for the policy. You can name the providers to help you map the provider when viewing logs to debug. However, the provider name does not affect the policy’s behavior and cannot be used by other resources to select the policy. In this example, only one provider is set up, with the name dev-example. For an example with more than one provider, see Multiple JWT providers. |
claimsToHeaders | Optionally set the claims from the JWT payload that you want to extract and add as headers to the request before the request is forwarded to the upstream destination. This example extracts one claim and adds it as a header. |
claimsToHeaders.append | Enter a boolean value to add a claim’s value if the header exists in the request. Use true to append the claim’s value to the header, and false to overwrite any existing value in the header. |
claimsToHeaders.claim | Enter the name of the claim in the JWT payload to get the value for the header. In this example, the claim is org. |
claimsToHeaders.header | Enter the request header that the value of the claim is copied to. In this example, the header is x-org. |
issuer | Optionally, set the JWT issuer, usually as a URL or email address. If set, the iss field in the JWT token must match this field, or else the request is denied. If unset, the iss field in the JWT token is not checked. In this example, the issuer is an internal developer portal, https://dev-example.com. |
local | Provide the PEM-formatted public key to verify the JWT token. In this example, the public key is written inline to the policy for testing purposes. For production scenarios, you can set a remote reference to your JSON Web Key Set (JWKS) server instead of this local setting. |
tokenSource | Specify where Gloo Mesh Gateway looks for the token to use for JWT authentication. If unset, the default locations are tried in the following order:
|
tokenSource.headers | Specify the header to get the JWT from. By default, Gloo Mesh Gateway uses the authorization header X-Auth and expects a value with a prefix of Bearer <token>. In this example, the header and prefix are explicitly set to the default values, X-Auth and 'Bearer '. |
tokenSource.queryParameters | Specify a query parameter to get the token from. The default value is access_token. This example uses a different query parameter, auth_token. |
Try out JWT policies
To verify that the JWT policy protects your routes, you must have a JWT and a set of keys to validate the JWT. Choose from the following options:
- Use sample keys and JWT: For quick testing, you can use sample keys and a JWT.
- Create your own keys and JWT: To learn more about the basics, you can walk through steps to create your own private-public key pair with OpenSSL. Then, you use
jwt.ioto configure a JWT. - For a more production-ready example of using a remote JWKS with keys from an OIDC provider, see the JWT and external auth policies guide.
Use sample keys and JWT
For quick testing, you can use sample keys and a dev-example JWT. For more details about the sample JWT, see the GitHub readme.
Apply the JWT policy. For more information about this policy, see the configuration example.
kubectl apply -f https://gist.githubusercontent.com/artberger/674bab05350c9a048303cc7daaffe730/raw/daf7d9b64e5e9ecf309f17123e01f5a6cbb6c7eb/jwt-policy-basic.yamlSend a request to the
httpbinapp without any authentication. Notice that your request is denied with a401error.- HTTP:
curl -vik -H "X-httpbin: true" --resolve www.example.com:80:${INGRESS_GW_IP} http://www.example.com:80/get - HTTPS:
curl -vik -H "X-httpbin: true" --resolve www.example.com:443:${INGRESS_GW_IP} https://www.example.com:443/get
Example output:
HTTP/1.1 401 Unauthorized www-authenticate: Bearer realm="http://httpbin.httpbin:8000/get" ... Jwt is missing- HTTP:
Get a sample JWT that is preconfigured to meet the validation requirements that you set in the JWT policy for the
dev-exampleprovider.TOKEN=$(curl https://raw.githubusercontent.com/solo-io/gloo-mesh-use-cases/main/gloo-gateway/jwt/dev-example.jwt -s) && echo "$TOKEN" | cut -d '.' -f2 - | base64 --decodeExample output:
{"iss":"https://dev.example.com","exp":4804324736,"iat":1648651136,"org":"internal","email":"dev1@solo.io","group":"engineering","scope":"is:developer%Try the request to the
httpbinapp again, this time with your JWT token. Notice that your request is now accepted!- HTTP:
curl -vik -H "X-Auth: Bearer ${TOKEN}" -H "X-httpbin: true" --resolve www.example.com:80:${INGRESS_GW_IP} http://www.example.com:80/get - HTTPS:
curl -vik -H "X-Auth: Bearer ${TOKEN}" -H "X-httpbin: true" --resolve www.example.com:443:${INGRESS_GW_IP} https://www.example.com:443/get
In the example output you get back a
200response. You also can see theX-EmailandX-Orgheaders that you appended in theclaimsToHeaderssection of the policy.HTTP/1.1 200 OK ... { "args": {}, "headers": { "Accept": "*/*", "Host": "www.example.com", "X-Email": "dev1@solo.io", "X-Envoy-Attempt-Count": "1", "X-Envoy-Decorator-Operation": "httpbin.default.svc.cluster.local:8000/*", "X-Envoy-Internal": "true", "X-Httpbin": "true", "X-Org": "internal" }, ...- HTTP:
- You can optionally remove the resources that you set up as part of this guide.
kubectl delete jwtpolicy -n httpbin jwt-policy
Create your own keys and JWT
To learn more about the basics, you can walk through steps to create your own private-public key pair with OpenSSL. Then, you use jwt.io to configure a JWT.
Save the example JWT policy for the
httpbinroute. For more information about this policy, see the configuration example.wget -L https://gist.githubusercontent.com/artberger/674bab05350c9a048303cc7daaffe730/raw/daf7d9b64e5e9ecf309f17123e01f5a6cbb6c7eb/jwt-policy-basic.yamlCreate a private-public key pair by using OpenSSL. You use this pair to create your own JWT token.
- Create a private key to sign the JWT.
openssl genrsa 2048 > private-key.pem - Extract the public key from the private key.
openssl rsa -in private-key.pem -pubout
- Create a private key to sign the JWT.
Open the downloaded JWT policy.
open jwt-policy_basic.yamlIn the
inlinesection, copy in the public key value from the output of the previous step, including theBEGIN/ENDparts. Make sure the indentation is kept.Create the JWT policy with your new public key value, which is used to verify the JWT token in subsequent requests.
kubectl apply -f jwt-policy_basic.yamlCreate a JWT that uses your private key. Refer to the following image to help understand the UI location of the steps.
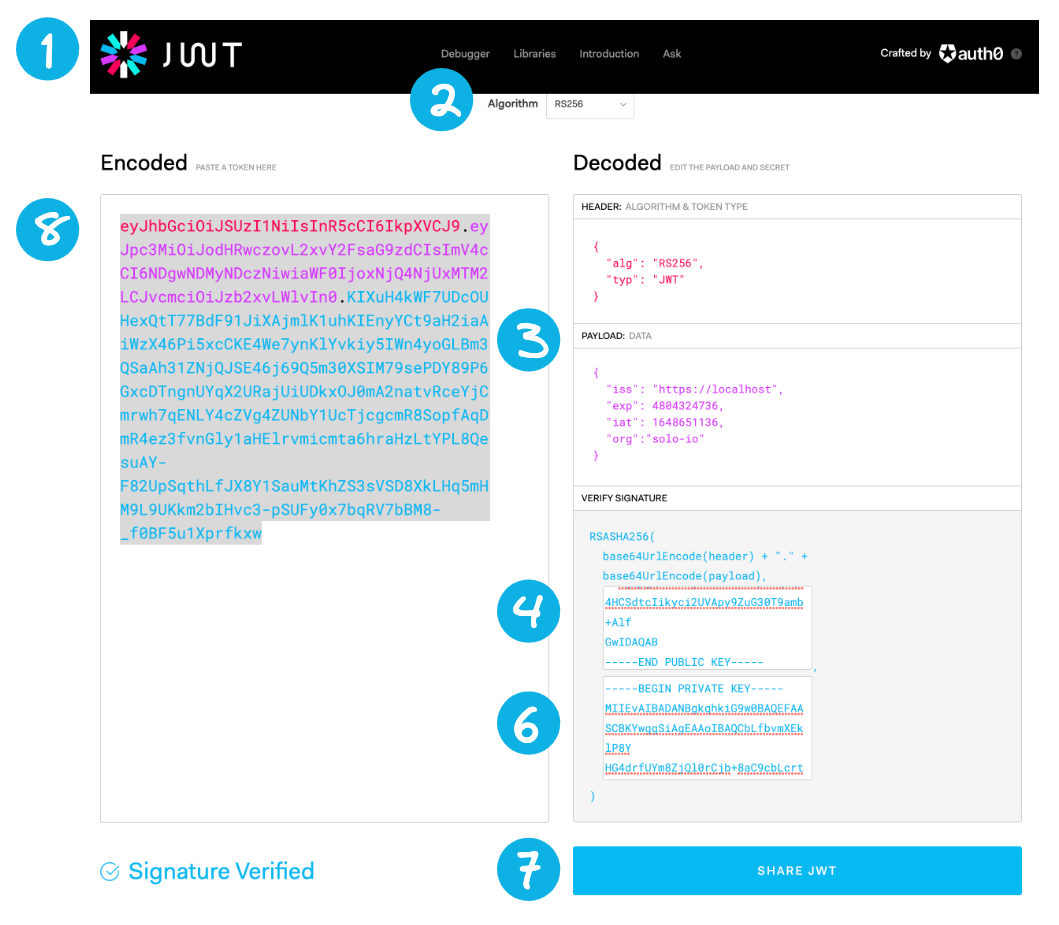
JWT token - In your browser, go to https://jwt.io/. For the subsequent steps, you can refer to the following image.
- From the Algorithm dropdown, select
RS256. - From the Decoded section, scroll to the Payload: Data pane. Replace the content by pasting the following JWT payload information.
{ "iss": "https://dev.example.com", "exp": 4804324736, "iat": 1648651136, "org": "internal", "email": "dev1@solo.io", "group": "engineering", "scope": "is:developer" } - From the Decoded section, scroll to the Verify Signature pane. In the first input box for
-----BEGIN PUBLIC KEY-----, replace the content by pasting the value of your public key from the previous output of your terminal. - In your terminal, copy the contents of your private key.
cat private-key.pem | pbcopy - Return to your browser and go to the Verify Signature pane in the Decoded section. In the second input box for
-----BEGIN PRIVATE KEY-----, replace the content by pasting the value of your private key. - Optional: Click Share JWT and paste the JWT values into a file to refer to later.
- From the Encoded section, copy the token value to your clipboard, such as
eyJhbG..... - Add the token value to an environment variable on your local machine.
export TOKEN="Bearer <token_value>"
Send a request to the
httpbinapp without any authentication. Notice that your request is denied with a401error.- HTTP:
curl -vik -H "X-httpbin: true" --resolve www.example.com:80:${INGRESS_GW_IP} http://www.example.com:80/get - HTTPS:
curl -vik -H "X-httpbin: true" --resolve www.example.com:443:${INGRESS_GW_IP} https://www.example.com:443/get
Example output:
HTTP/1.1 401 Unauthorized www-authenticate: Bearer realm=“<a href="http://www.example.com/get%22">http://www.example.com/get"</a> ... Jwt is missing- HTTP:
Try the request to the
httpbinapp again, this time with your JWT token. Notice that your request is now accepted!- HTTP:
curl -vik -H "X-Auth: Bearer ${TOKEN}" -H "X-httpbin: true" --resolve www.example.com:80:${INGRESS_GW_IP} http://www.example.com:80/get - HTTPS:
curl -vik -H "X-Auth: Bearer ${TOKEN}" -H "X-httpbin: true" --resolve www.example.com:443:${INGRESS_GW_IP} https://www.example.com:443/get
In the example output you get back a
200response. You also can see theX-EmailandX-Orgheaders that you appended in theclaimsToHeaderssection of the policy.HTTP/1.1 200 OK ... { "args": {}, "headers": { "Accept": "*/*", "Host": "www.example.com", "X-Email": "dev1@solo.io", "X-Envoy-Attempt-Count": "1", "X-Envoy-Decorator-Operation": "httpbin.default.svc.cluster.local:8000/*", "X-Envoy-Internal": "true", "X-Httpbin": "true", "X-Org": "internal" }, ...- HTTP:
Cleanup
You can optionally remove the resources that you set up as part of this guide.
kubectl delete jwtpolicy -n httpbin jwt-policy