Amazon EKS add-on
Install Gloo Gateway with the Amazon Elastic Kubernetes Service (EKS) add-on.
About
The Gloo Gateway add-on for Amazon EKS simplifies the process of installing, configuring, and updating Gloo Gateway on your EKS clusters. Amazon ensures that this add-on is compatible with EKS, providing you with a secure and reliable release. Using the add-on can help your organization meet internal compliance standards and manage account spending efficiently. For more details, refer to the AWS documentation.
The EKS add-on functions without a license key, just like the OSS version of Gloo Gateway. For enterprise users, you can add a license key after installation, as described later in this guide.
Before you begin
Create or use existing EKS clusters.
Install any CLI tools that you might need to work with your cluster, such as the following:
aws cli, the Amazon Web Services command line tool.eksctl, the AWS EKS command line tool.kubectl, the Kubernetes command line tool. Download thekubectlversion that is within one minor version of the Kubernetes clusters you plan to use.istioctl, the Istio command line tool.terraform, the infrastructure-as-code configuration language command line tool from HashiCorp.
If you plan to install the add-on via automation such as Terraform, you must first accept the subscription terms in the AWS Marketplace console.
Install the EKS add-on
You can install the EKS add-on via the AWS console, the eksctl or aws CLI tools, or a GitOps tool such as Terraform.
Install the EKS add-on by using the EKS console. For complete EKS add-on instructions, see the AWS docs.
Open the Amazon EKS console.
From the cluster list, select your cluster.
Click the Add-ons tab.
Click Get more add-ons.
Scroll down to the AWS Marketplace add-ons section. In the search box, enter gateway into the search field to filter the results for the Gloo Gateway add-on.
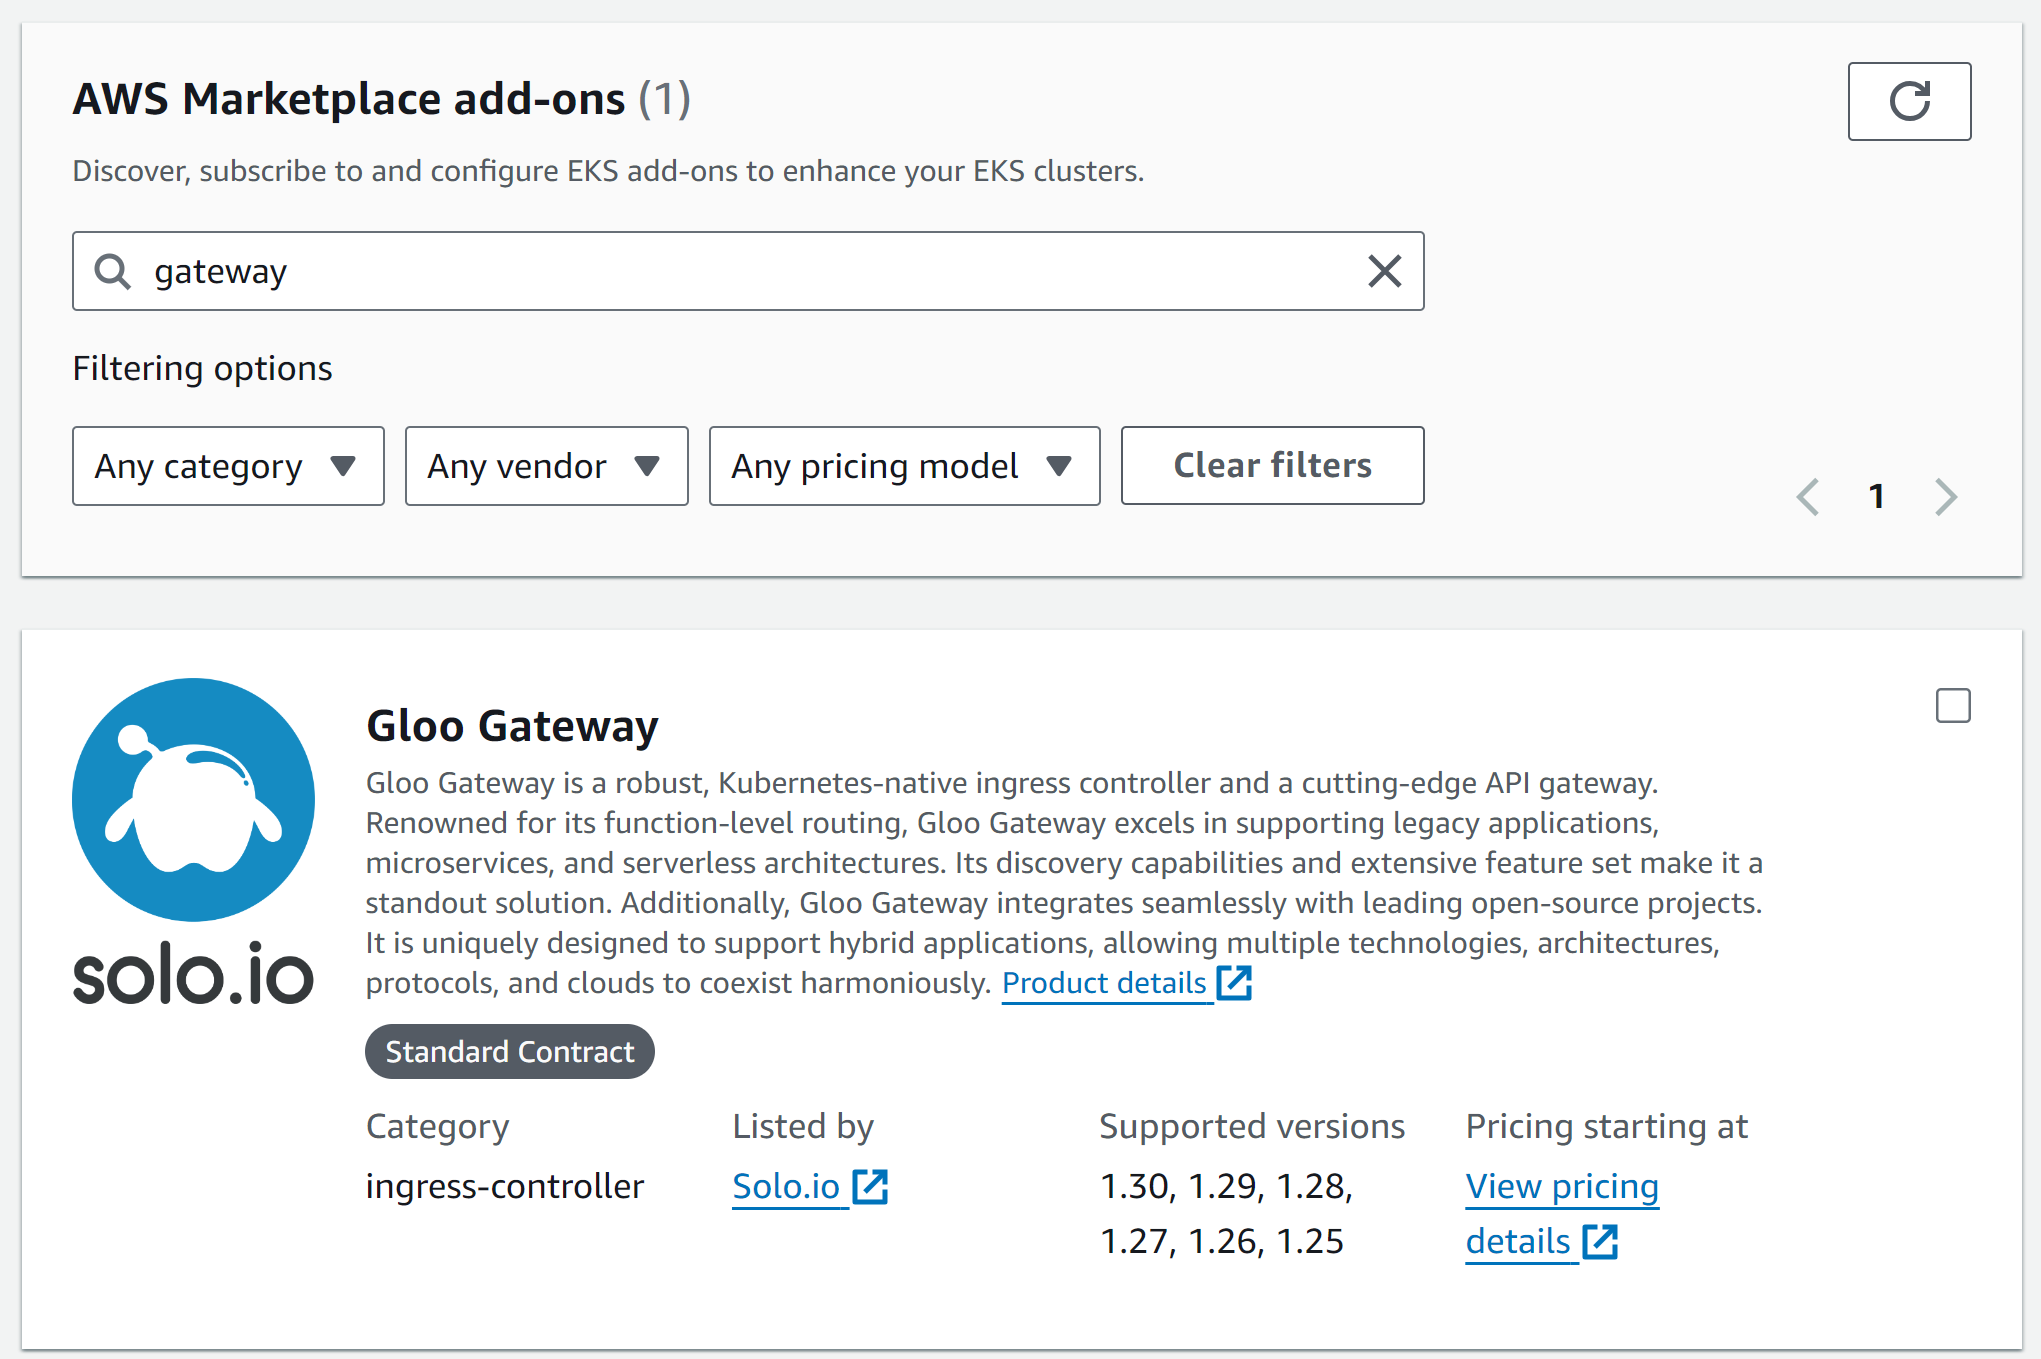
Figure: Find the Gloo Gateway add-on for EKS Figure: Find the Gloo Gateway add-on for EKS Click the checkbox for the add-on, and then click Next.
If the Status field shows
Requires subscription, click the View subscribtion options button and follow the AWS Marketplace prompts to subscribe to the add-on.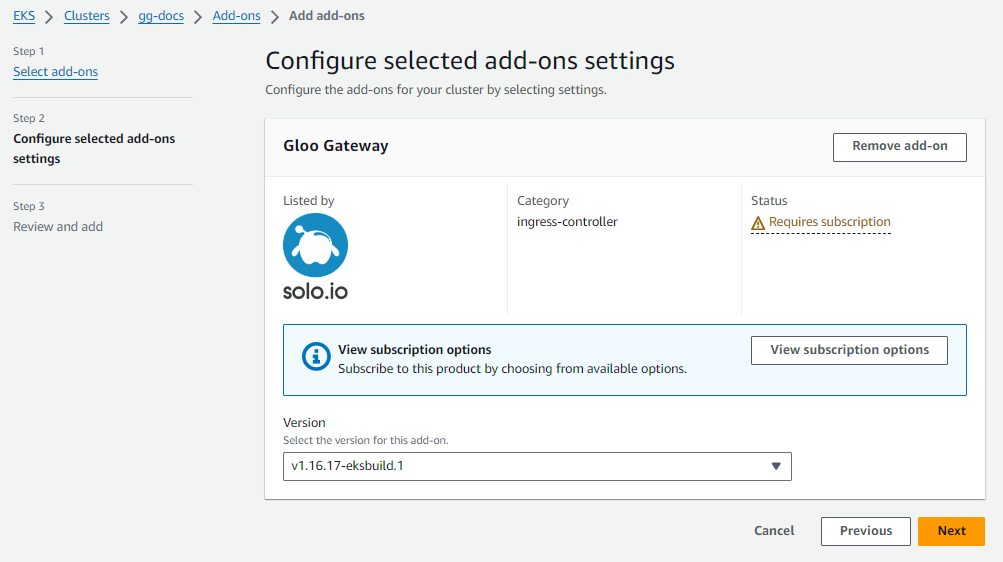
Figure: Required subscription status Figure: Required subscription status When the Status displays
Ready to install, select the desired version to install.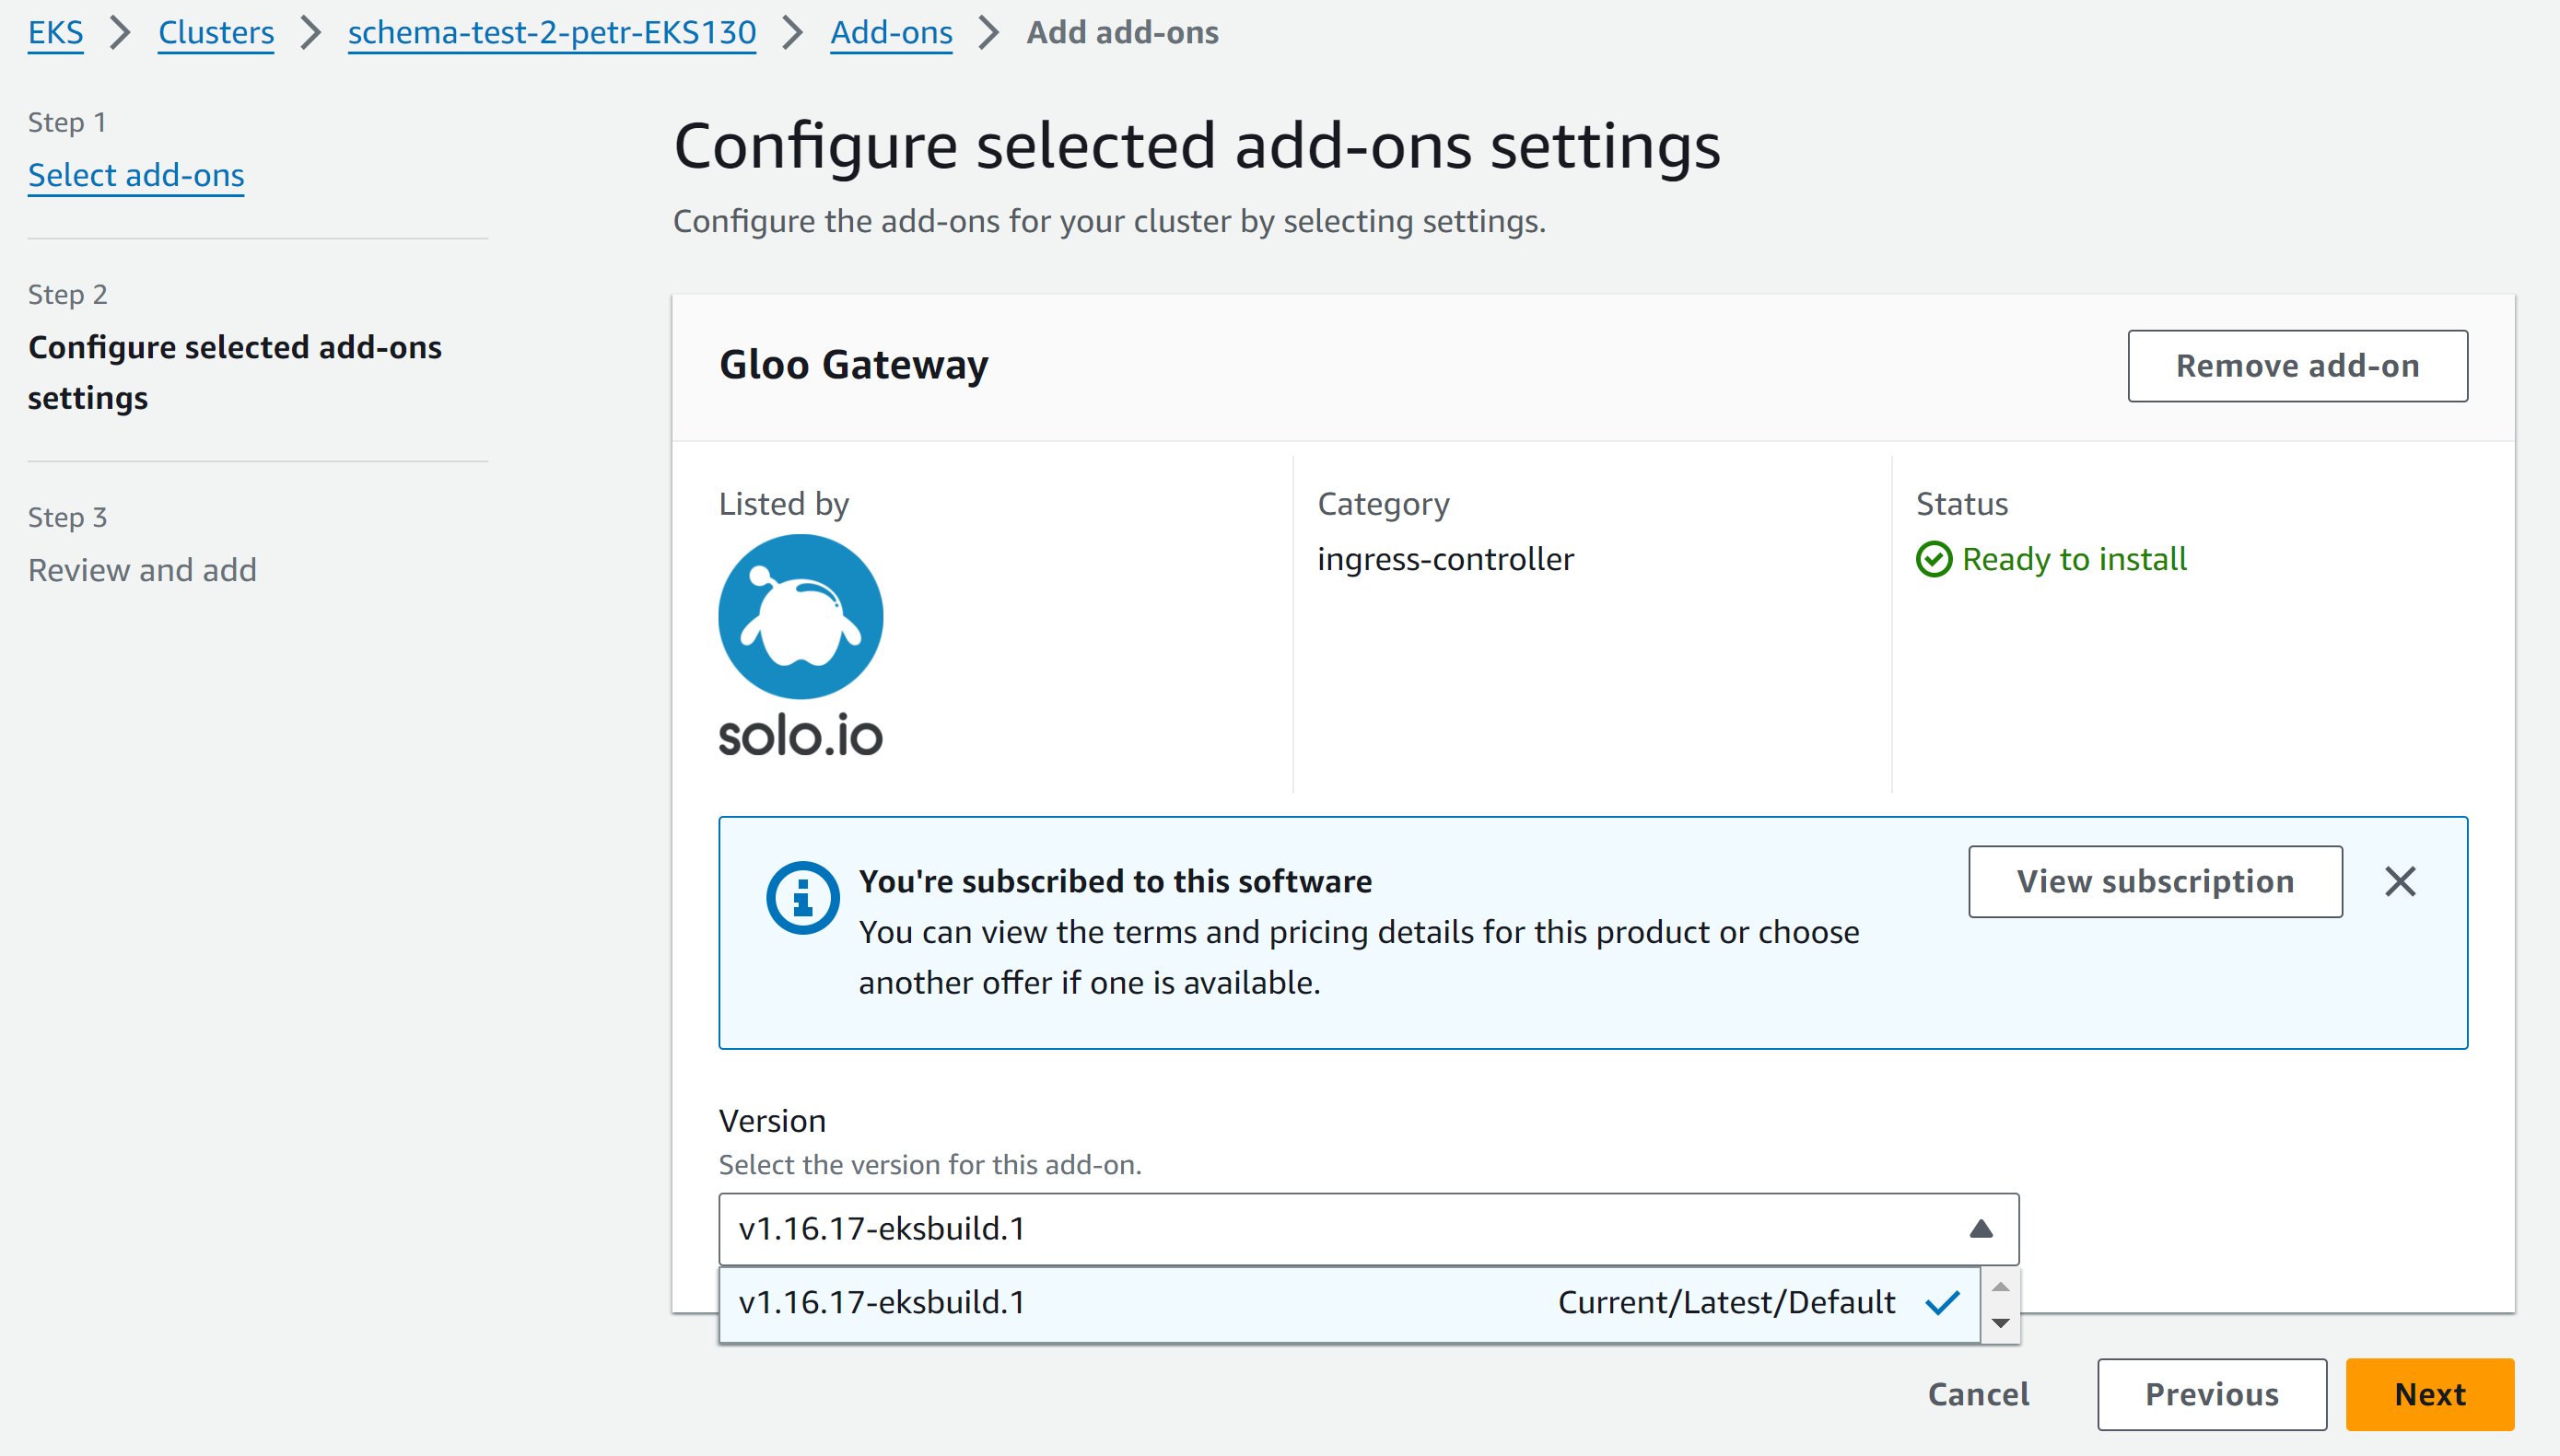
Figure: Configure the Gloo Gateway add-on for EKS Figure: Configure the Gloo Gateway add-on for EKS Optional: In the Optional configuration settings section, you can customize the add-on by providing a YAML snippet in the bottom window. The
Add-on configuration schemawindow in JSON format lists the settings that you can customize. In theConfiguration valueswindow, you can customize the settings in YAML or JSON format, such as shown in the following example. For a complete list of settings, refer to the Helm reference docs.gloo: gateway: # For multiple gateways: read Gateway config in all 'watchNamespaces', # not just the namespace that the gateway controller is deployed to readGatewaysFromAllNamespaces: true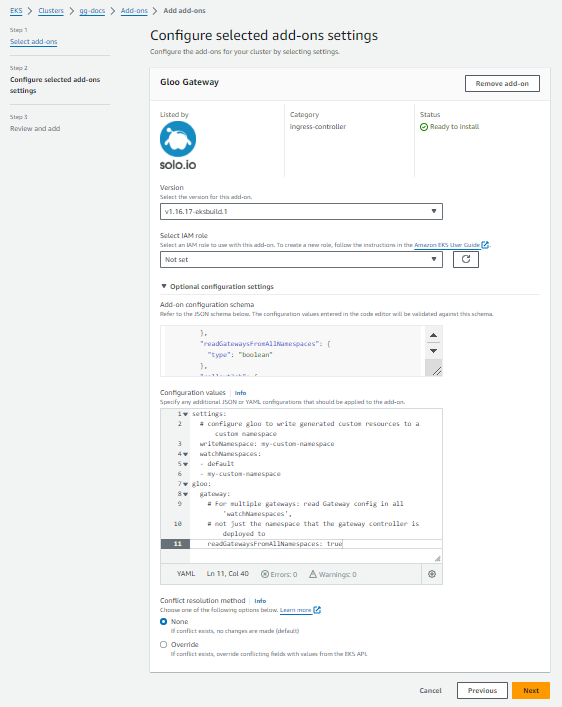
Figure: YAML snippet provided to customize the add-on Figure: YAML snippet provided to customize the add-on In the Conflict resolution method section, choose how to prioritize any custom settings that you added.
To proceed to the next page, click Next.
Review the add-on details, and then click Create.
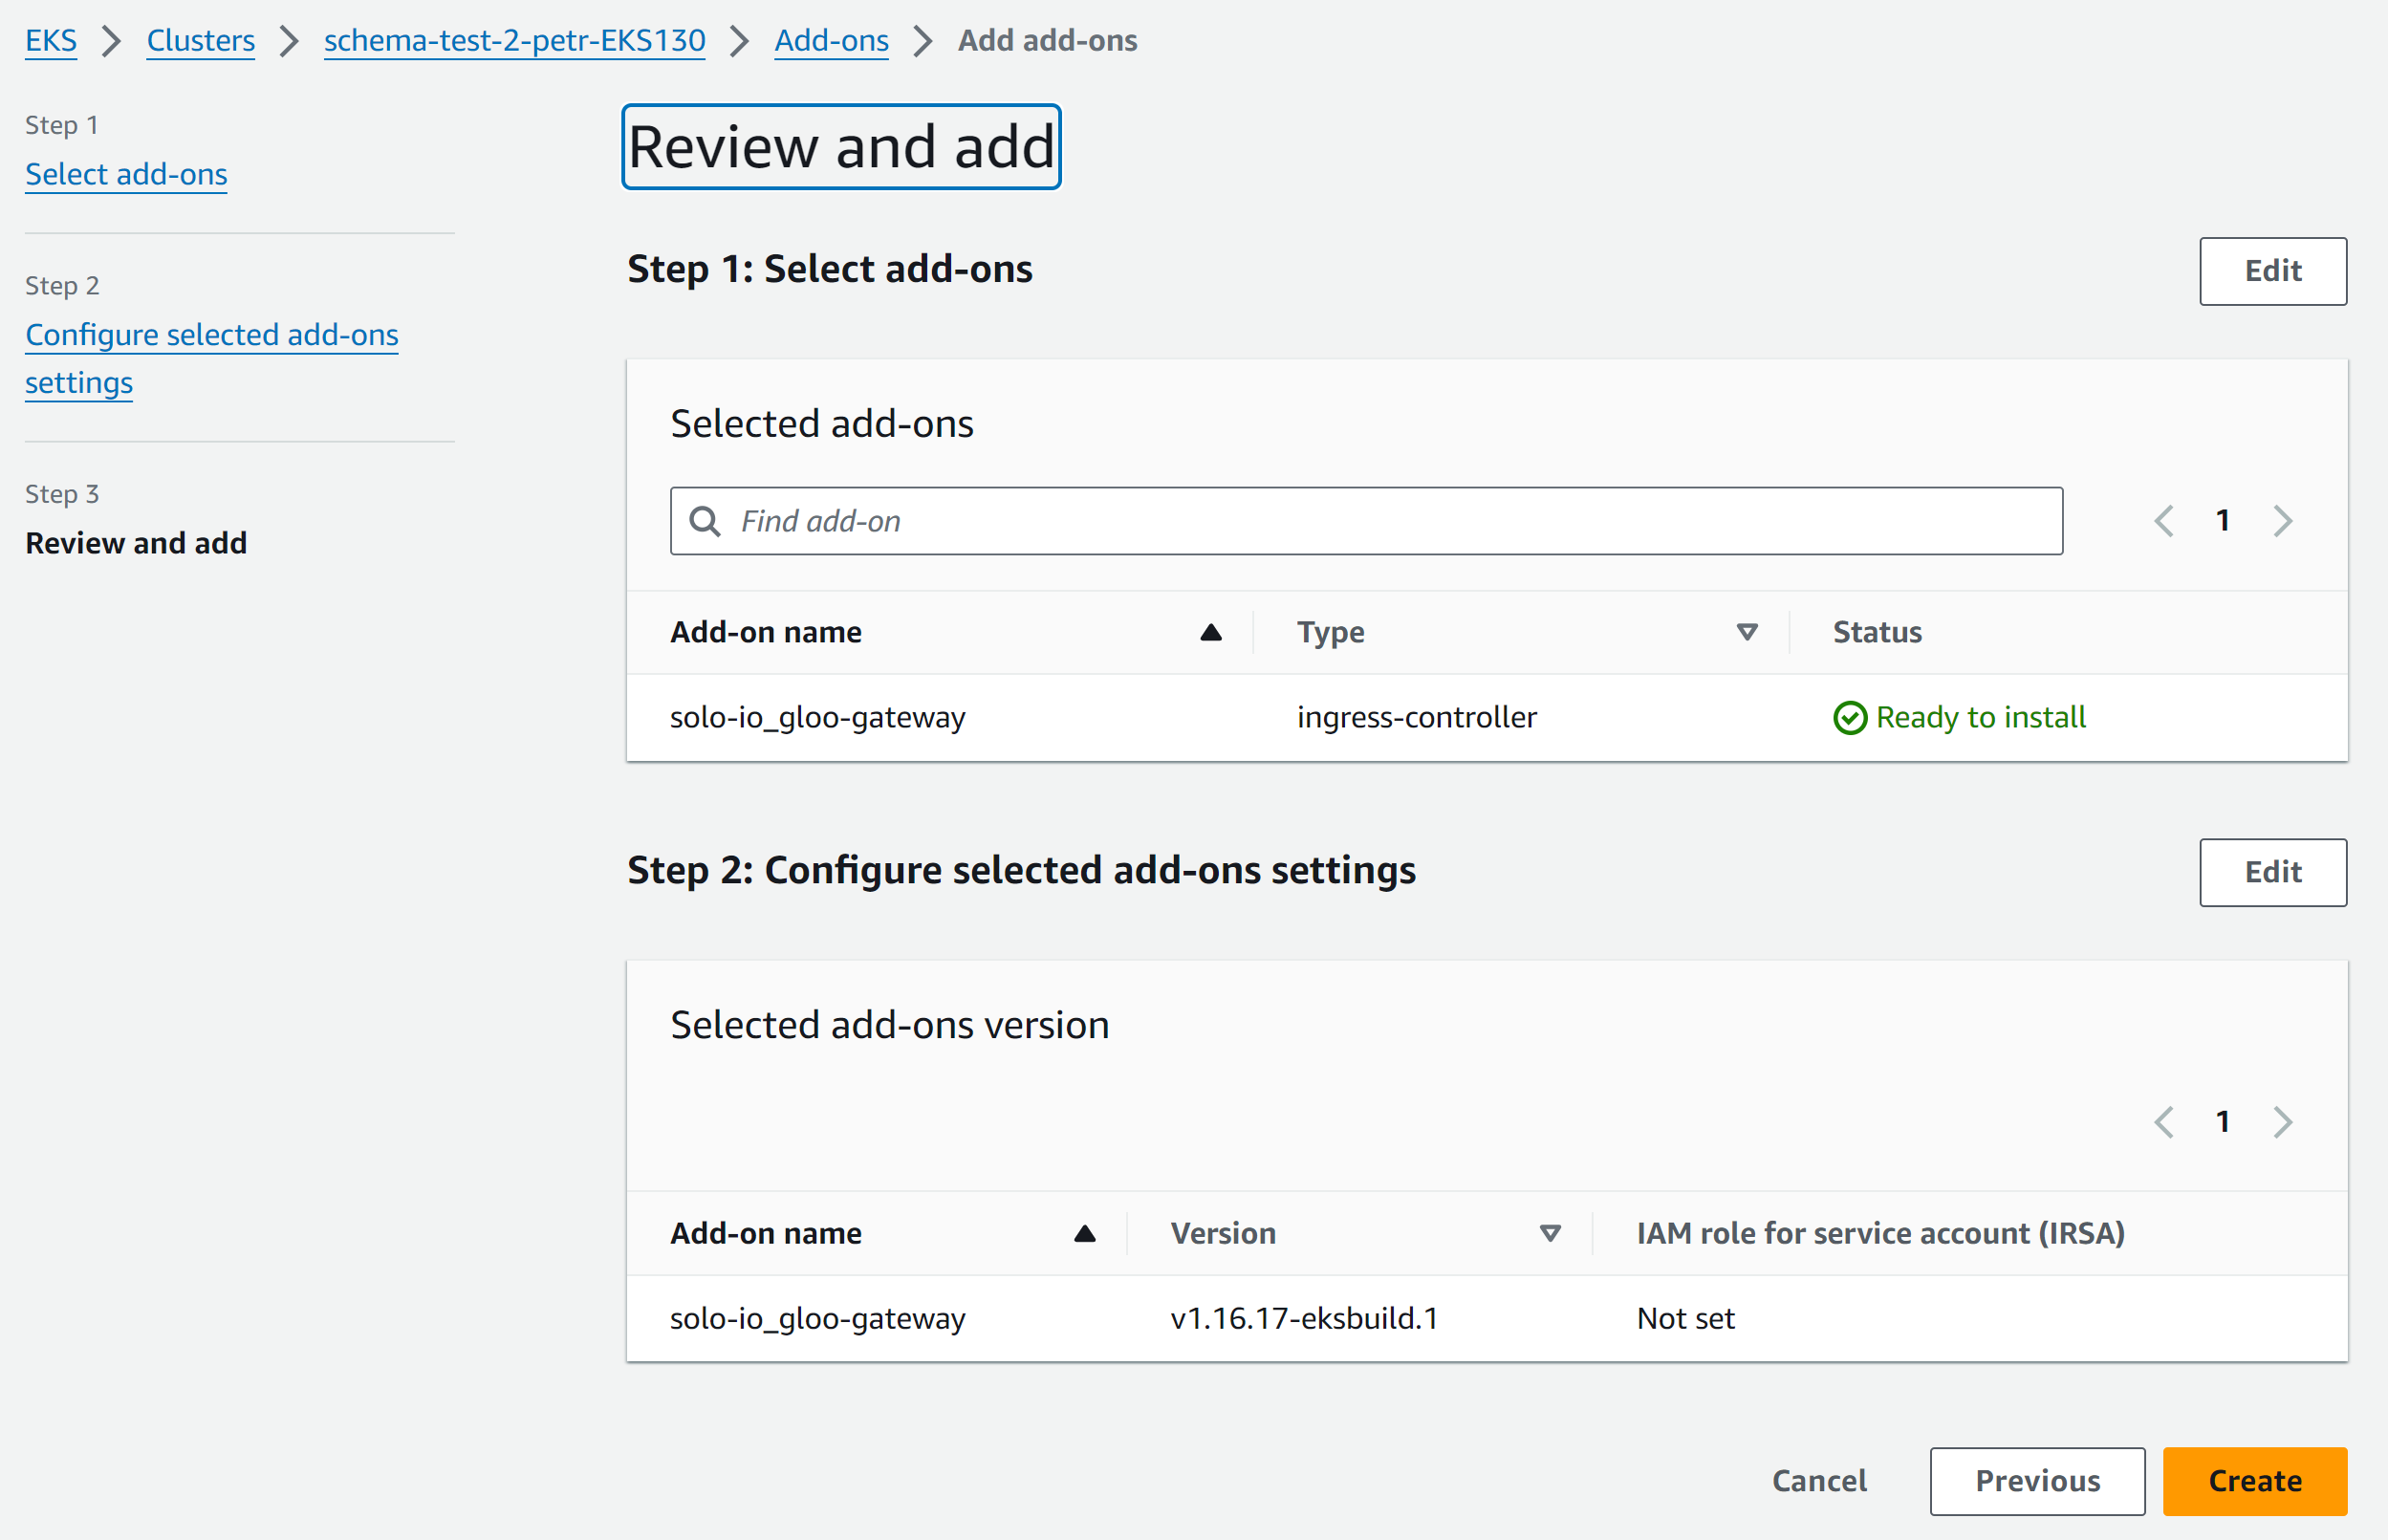
Figure: Review and create the Gloo Gateway add-on for EKS Figure: Review and create the Gloo Gateway add-on for EKS From the cluster details page, click the Add-ons tab and verify that the status is Active. If the installation takes more than a few minutes, review the add-on status. Common issues include a lack of compute resources to run the deployment, such as no nodes.
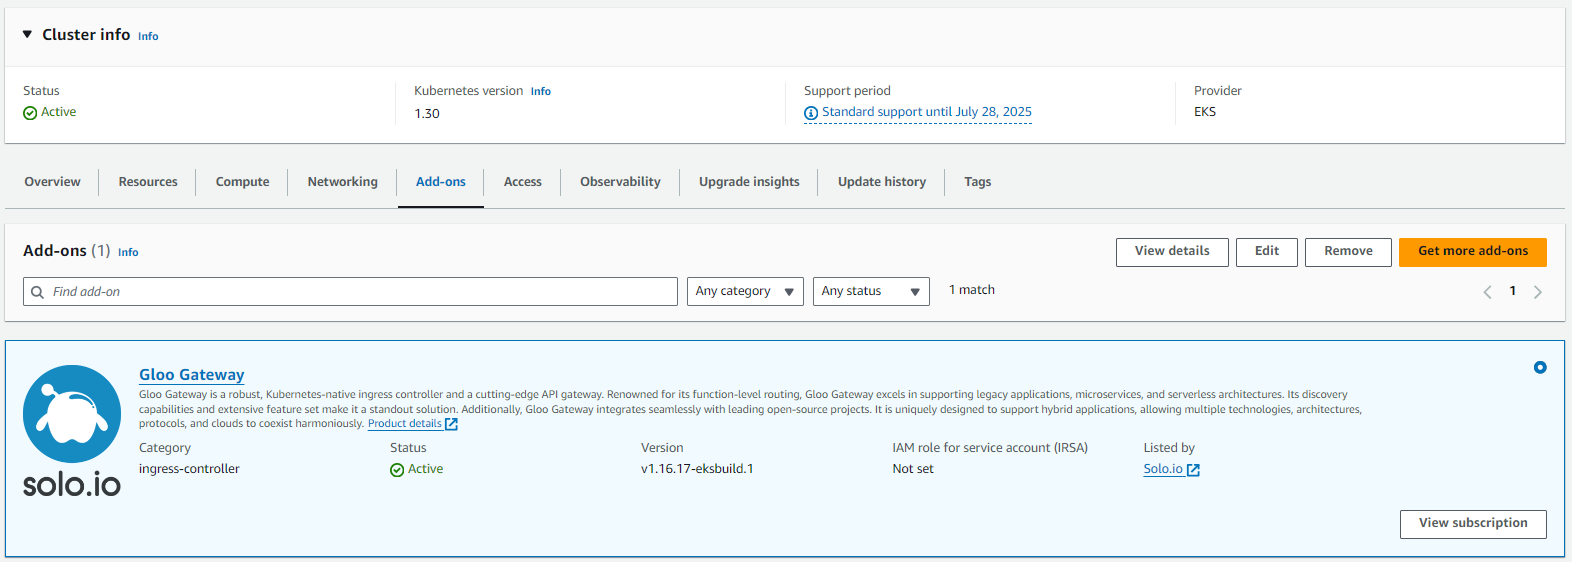
Figure: Active status for Solo add-on for EKS Figure: Active status for Solo add-on for EKS
Install the EKS add-on by using the eksctl command line tool. For complete EKS add-on instructions, see the AWS docs (eksctl Tab).
Get the name and region of the cluster that you want to install the add-on in.
eksctl get clusters -ASet the name and region of the cluster that you want to install the add-on in. Replace
<your-cluster-region>and<name-of-your-EKS-cluster>with the values that you got in the previous step.# Set your cluster region (for example, us-west-2) export REGION=<your-cluster-region> # Set the name of your EKS cluster export CLUSTER=<name-of-your-EKS-cluster>Install the add-on, replacing the cluster and region with the values that you got in the previous step. For more options, such as specific version of the add-on, run
eksctl create addon --help.eksctl create addon --name solo-io_gloo-gateway --cluster $CLUSTER --region $REGION --version v1.17.7-eksbuild.1To pass more parameters, you can create a temporary configuration manifest and apply it using
eksctl. The following example demonstrates how to adjust some commonly modified settings. For a complete list of settings, refer to the Helm reference docs.cat <<EOF | eksctl create addon -f - apiVersion: eksctl.io/v1alpha5 kind: ClusterConfig metadata: name: $CLUSTER region: $REGION addons: - name: solo-io_gloo-gateway configurationValues: |- gloo: gateway: # For multiple gateways: read Gateway config in all 'watchNamespaces', # not just the namespace that the gateway controller is deployed to readGatewaysFromAllNamespaces: true version: v1.17.7-eksbuild.1 EOFCheck that the status of the addon is ACTIVE with
nullissues. If the installation takes more than a few minutes, review the add-on status. Common issues include a lack of compute resources to run the deployment, such as no nodes.eksctl get addon --cluster $CLUSTER --region $REGION -oyamlExample output:
  - ConfigurationValues: |-
    gloo:
      gateway:
        # For multiple gateways: read Gateway config in all 'watchNamespaces',
        # not just the namespace that the gateway controller is deployed to
        readGatewaysFromAllNamespaces: true
  IAMRole: ""
  Issues: null
  Name: solo-io_gloo-gateway
  NewerVersion: ""
  PodIdentityAssociations: null
  Status: ACTIVE
  Version: v1.17.7-eksbuild.1
Install the EKS add-on by using the aws command line tool. For complete AWS command line tool add-on instructions, see the AWS docs (AWS CLI tab).
Specify the region of the cluster and confirm the cluster name where you want to install the add-on. Replace
<your-cluster-region>with the EKS clusters region.# Set your cluster region (for example, us-west-2) export REGION=<your-cluster-region> aws eks list-clusters --region $REGIONSet the name of the cluster that you want to install the add-on in. Replace
<name-of-your-EKS-cluster>with the value that you got in the previous step.# Set the name of your EKS cluster export CLUSTER=<name-of-your-EKS-cluster>Install the add-on. For more options, such as to set a specific version of the add-on, run
eksctl create addon --help.aws eks create-addon --cluster-name $CLUSTER --region $REGION \ --addon-name solo-io_gloo-gateway \ --addon-version v1.17.7-eksbuild.1To pass custom settings to an AWS EKS add-on, convert your YAML configuration to JSON. Then, pass the JSON in the
awscommand, such as in the following example. For a complete list of settings, refer to the Helm reference docs:aws eks create-addon --cluster-name $CLUSTER --region $REGION \ --addon-name solo-io_gloo-gateway \ --addon-version v1.17.7-eksbuild.1 \ --configuration-values '{"gloo":{"gateway":{"readGatewaysFromAllNamespaces":true}}}'Check that the status of the addon is ACTIVE with empty
[]in Issues section. If the installation takes more than a few minutes, review the add-on status. Common issues include a lack of compute resources to run the deployment, such as no nodes.aws eks describe-addon --cluster-name $CLUSTER --region $REGION --addon-name solo-io_gloo-gatewayExample output:
  {
    "addon": {
        "addonName": "solo-io_gloo-gateway",
        "clusterName": "<...omitted...>",
        "status": "ACTIVE",
        "addonVersion": "v1.17.7-eksbuild.1",
        "health": {
            "issues": []
        },
        "addonArn": "arn:aws:eks:us-west-2:123456789012:addon/<...omitted...>/solo-io_gloo-gateway/e6c89977-fb1c-3dda-a2b2-455b239b15ec",
        "createdAt": "2024-08-08TXX:XX:XX.000000-07:00",
        "modifiedAt": "2024-08-08TXX:XX:XX.000000-07:00",
        "tags": {},
        "configurationValues": "{\"gloo\":{\"gateway\":{\"readGatewaysFromAllNamespaces\":true}}}"
    }
}
Install the EKS add-on by using Terraform, such as for a GitOps pipeline.
Get the cluster name, cluster region, and EKS add-on version that you want to install.
Use the following example inside of your Terraform project, or directly by saving the example as
main.tf. Replace theregion,cluster_nameandaddon_versionwith the values that you previously got. (Theconfiguration_valuessub-section is provided as an example. Decide on the values that you want to customize or remove the section entirely if the default values are sufficient.)provider "aws" { region = local.region } terraform { required_version = ">= 1.0.0" required_providers { aws = { source = "hashicorp/aws" version = ">= 4.47" } } } locals { region = "<your-cluster-region>" # Replace with your cluster region (for example, us-west-2) cluster_name = "<name-of-your-EKS-cluster>" # Replace with the name of your EKS cluster addon_version = "v1.17.7-eksbuild.1" # Replace with your desired addon version; for Ambient add extra '0' *(for example, v1.21.20-eksbuild.1) } resource "aws_eks_addon" "solo-io_gloo-gateway" { cluster_name = local.cluster_name addon_name = "solo-io_gloo-gateway" resolve_conflicts_on_update = "OVERWRITE" addon_version = local.addon_version configuration_values = jsonencode({ gloo : { gateway : { readGatewaysFromAllNamespaces : true } } }) }From the directory of the
main.tffile, run the Terraform commands to build the EKS add-on infrastructure.terraform init terraform plan terraform apply -auto-approve
Verify your installation
After the add-on is installed, verify that Gloo Gateway is working.
Verify that the pods have a status of Running and Completed.
kubectl get pods -n gloo-systemExample output:
  NAME                             READY   STATUS      RESTARTS        AGE
discovery-59f5cc8cd8-kbfl7       1/1     Running     0               2m32s
gateway-proxy-7dddf5bc7b-8l9cg   1/1     Running     0               2m32s
gloo-crd-job-k6t6p               0/1     Completed   0               2m32s
gloo-f7cc57c8c-btzq6             1/1     Running     0               2m32s
gloo-resource-rollout-hng4g      0/1     Completed   0               2m32s
If you applied custom configurations, you can verify them within the related components of your EKS cluster.
For example, to confirm the
readGatewaysFromAllNamespacesexample mentioned earlier, check the configuration in the Settings custom resource with the following command.kubectl get settings -n gloo-system -oyaml | grep readGatewaysFromAllNamespaces:Example output:
readGatewaysFromAllNamespaces: falseIf you increased the number of replicas of the gateway proxy, you can verify by using the following command.
kubectl describe deployments.apps -n gloo-system gateway-proxy | grep Replicas:Example output:
Replicas: 2 desired | 2 updated | 2 total | 2 available | 0 unavailable
Next steps
Now that Gloo Gateway is installed in your cluster, review the following next steps you can take.
- Set up an API gateway and a sample app to get started with Gloo Gateway.
- Learn more about Gloo Gateway, its features and benefits.
- Add routing capabilities to your httpbin route by using the Traffic management guides.
- Explore ways to make your routes more resilient by using the Resiliency guides.
- Secure your routes with external authentication and rate limiting policies by using the Security guides.
Uninstall the add-on
You can uninstall Gloo Gateway from your EKS cluster by using AWS. For more information about removing an EKS add-on, see the AWS docs.
Remove the Gloo Gateway add-on for EKS.
Open the Amazon EKS console.
From the cluster list, select your cluster.
Click the Add-ons tab.
In the search box, enter gateway to filter the results for the Gloo Gateway add-on.
Figure: Find the Solo add-on for EKS Figure: Find the Solo add-on for EKS Click the add-on, and then click Remove.
In the pop-up window, type the add-on name and click Remove. You can keep Istio running in your cluster but disable EKS add-on management by toggling Preserve on cluster.
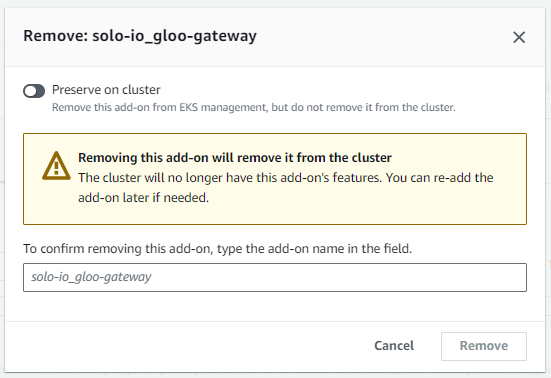
Figure: Remove the Solo add-on for EKS Figure: Remove the Solo add-on for EKS
eksctl delete addon --name solo-io_gloo-gateway --cluster $CLUSTERaws eks delete-addon --cluster-name $CLUSTER --region $REGION --addon-name solo-io_gloo-gatewayterraform destroy -auto-approveClean up the gloo-system namespace in your cluster.
kubectl delete namespace gloo-system