Okta
Set up external auth for your apps by using the Okta OIDC provider.
Use Okta as an OpenID Connect (OIDC) identity provider (IdP) for the apps in your cluster. Then, configure the Gloo Gateway external auth server with the OIDC details. You can adapt these steps for other IdPs.
This feature is an Enterprise-only feature that requires a Gloo Gateway Enterprise license.
Before you begin
Consider increasing the default timeout of the external auth server. When you set up OAuth, the external auth server must communicate with the external OIDC provider’s authorization server. Because of this interaction, the OIDC flow might take longer than the default timeout of 200ms. In such cases, you might noticed failed requests or unexpected behavior. You can increase the default timeout by setting the requestTimeout value on the external auth settings. The external auth settings can be configured on the Gloo Gateway Settings object.
Follow the Get started guide to install Gloo Gateway, set up a gateway resource, and deploy the httpbin sample app.
Get the external address of the gateway and save it in an environment variable.
Step 1: Set up an Okta OIDC app
Configure an Okta OIDC app to get the information that you need to create external auth policies to secure your resources.
Open the Okta dashboard. If you don’t have an Okta account that you can use, sign up for an Okta developer account.
From the Applications menu, click Applications > Create New App. Note that you might see a Create App Integration button instead.
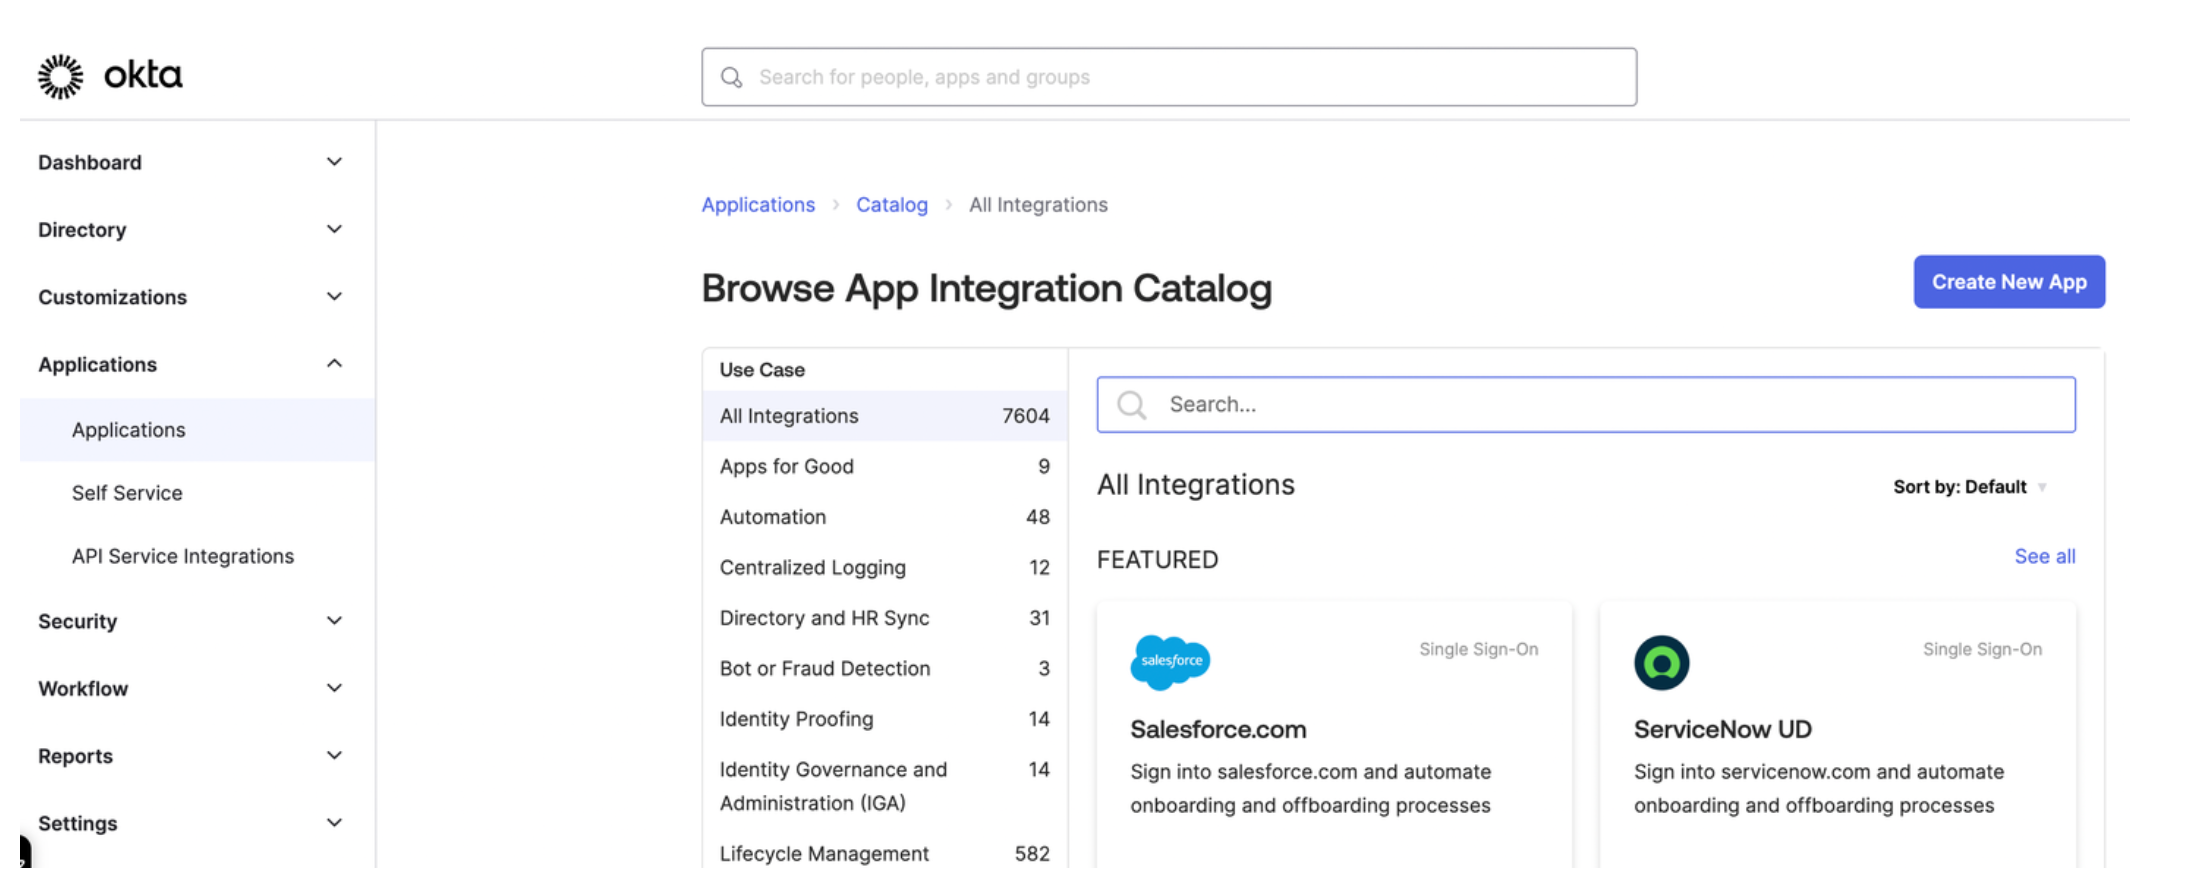
Figure: Okta application dashboard Figure: Okta application dashboard Select OIDC - OpenID Connect as the sign-in method for your app and Single-Page Application as your application type. Then, click Next.
Enter a name for your app and optionally upload a logo.
For Grant type, check both Authorization Code and Refresh Token.
For Sign-in redirect URIs, enter the location from which you want to allow users to log in. The URL is composed of hostname that you set up for your Portal resources and the
/callbackpath. For example, for the developer portal frontend app, you might enter:https://developer.example.comto let a user log in from the secured home page.- React starter app:
https://developer.example.com/apisto let a user log in from the APIs page. - Backstage frontend plug-in:
https://developer.example.com/gloo-platform-portalto let a user log in from the Gloo Portal Backstage plug-in page. https://developer.example.com/callbackfor the callback path.
For the Sign-out redirect URIs, enter the location to redirect the user after logging out, such as the following examples:
- React starter app:
https://developer.example.com/logout. - Backstage frontend plug-in:
https://developer.example.com/gloo-platform-portal/logout
- React starter app:
From the Assignments section, select Allow everyone in your organization to access. This way, you do not need to assign a user or group to this app. Instead, you can use your Okta developer account credentials to test the Okta authentication flow.
Click Save to save your changes. You are redirected to the Okta app details page.
From the General tab on the Okta app details page, note the Client ID.
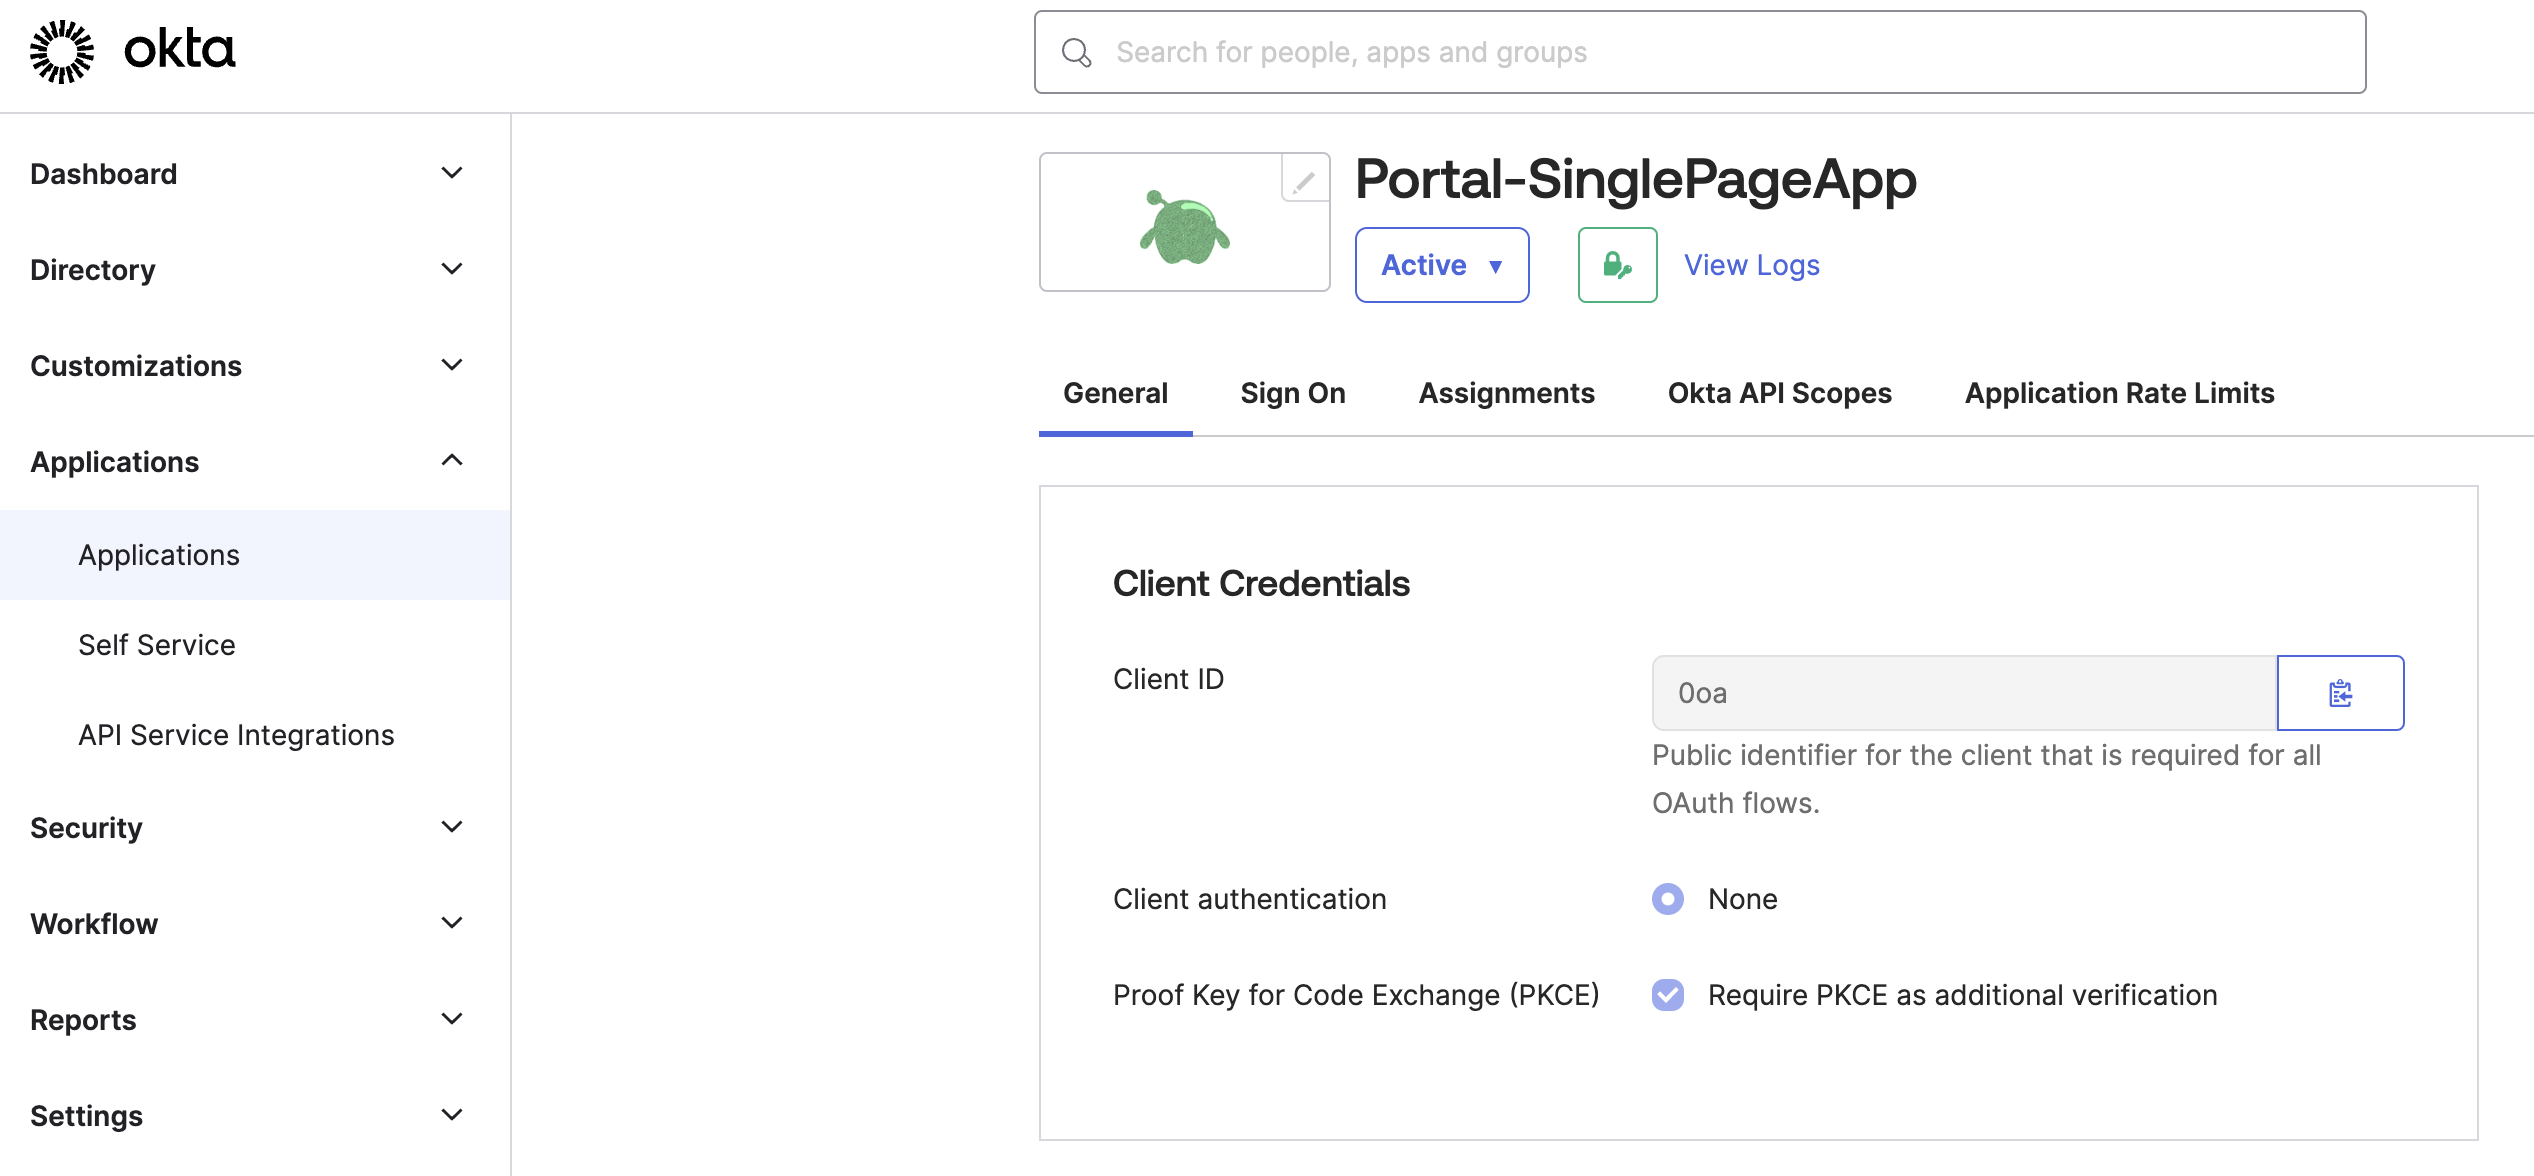
Figure: Okta General tab Figure: Okta General tab Store the Client ID as an environment variable.
export CLIENT_ID=<client-id>
Step 2: Configure other Okta account details
Configure other Okta account details, such as the claims that you want to include in the access token.
From the navigation menu, click Security > API.
Click the Authorization Server that you want to use, such as
default.From the Settings tab, click the Metadata URI. In a new tab, your browser opens to a URL similar to
https://dev-1234567.okta.com/oauth2/default/.well-known/oauth-authorization-server.From the metadata URI, search for and save the endpoints that you need as environment variables.
The
token_endpointis where to get the OAuth token.export TOKEN_ENDPOINT=https://dev-1234567.okta.com/oauth2/default/v1/tokenThe
authorization_endpointis where to get the PKCE authorization code.export AUTH_ENDPOINT=https://dev-1234567.okta.com/oauth2/default/v1/authorizeThe
end_session_endpointis where to end the session.export LOGOUT_ENDPOINT=https://dev-1234567.okta.com/oauth2/default/v1/logout
Get the JSON Web Key Set (JWKS) that you use later for an inline access token external auth policy.
From the metadata URI, find the
jwks_uriendpoint. In a new tab, open this endpoint, such ashttps://dev-1234567.okta.com/oauth2/default/v1/keys.export OKTA_JWKS_URI=<jwks_uri>Copy and save the entire value of these keys as an environment variable.
export CERT_KEYS={"keys":[{"kty":"RSA","alg":"RS256","kid":"sKv...","use":"sig","e":"AQAB","n":"kdhR..."}]}
Return to the authorization server page in Okta.
From the Claims tab, click Add Claim to add any claims that you want the access token to include. Later, you can use these claims in your portal groups. For example, the portal group might require a member of
organization: solo.ioto access certain API products. For more information about claims, see JWT structure. For example, you might configure the following claims:- email: Return the user’s email as configured in the user’s profile.
- organization: Return the user’s organization as configured in the user’s profile.
- group: Include any group (match regex
*) for theopenidscope.
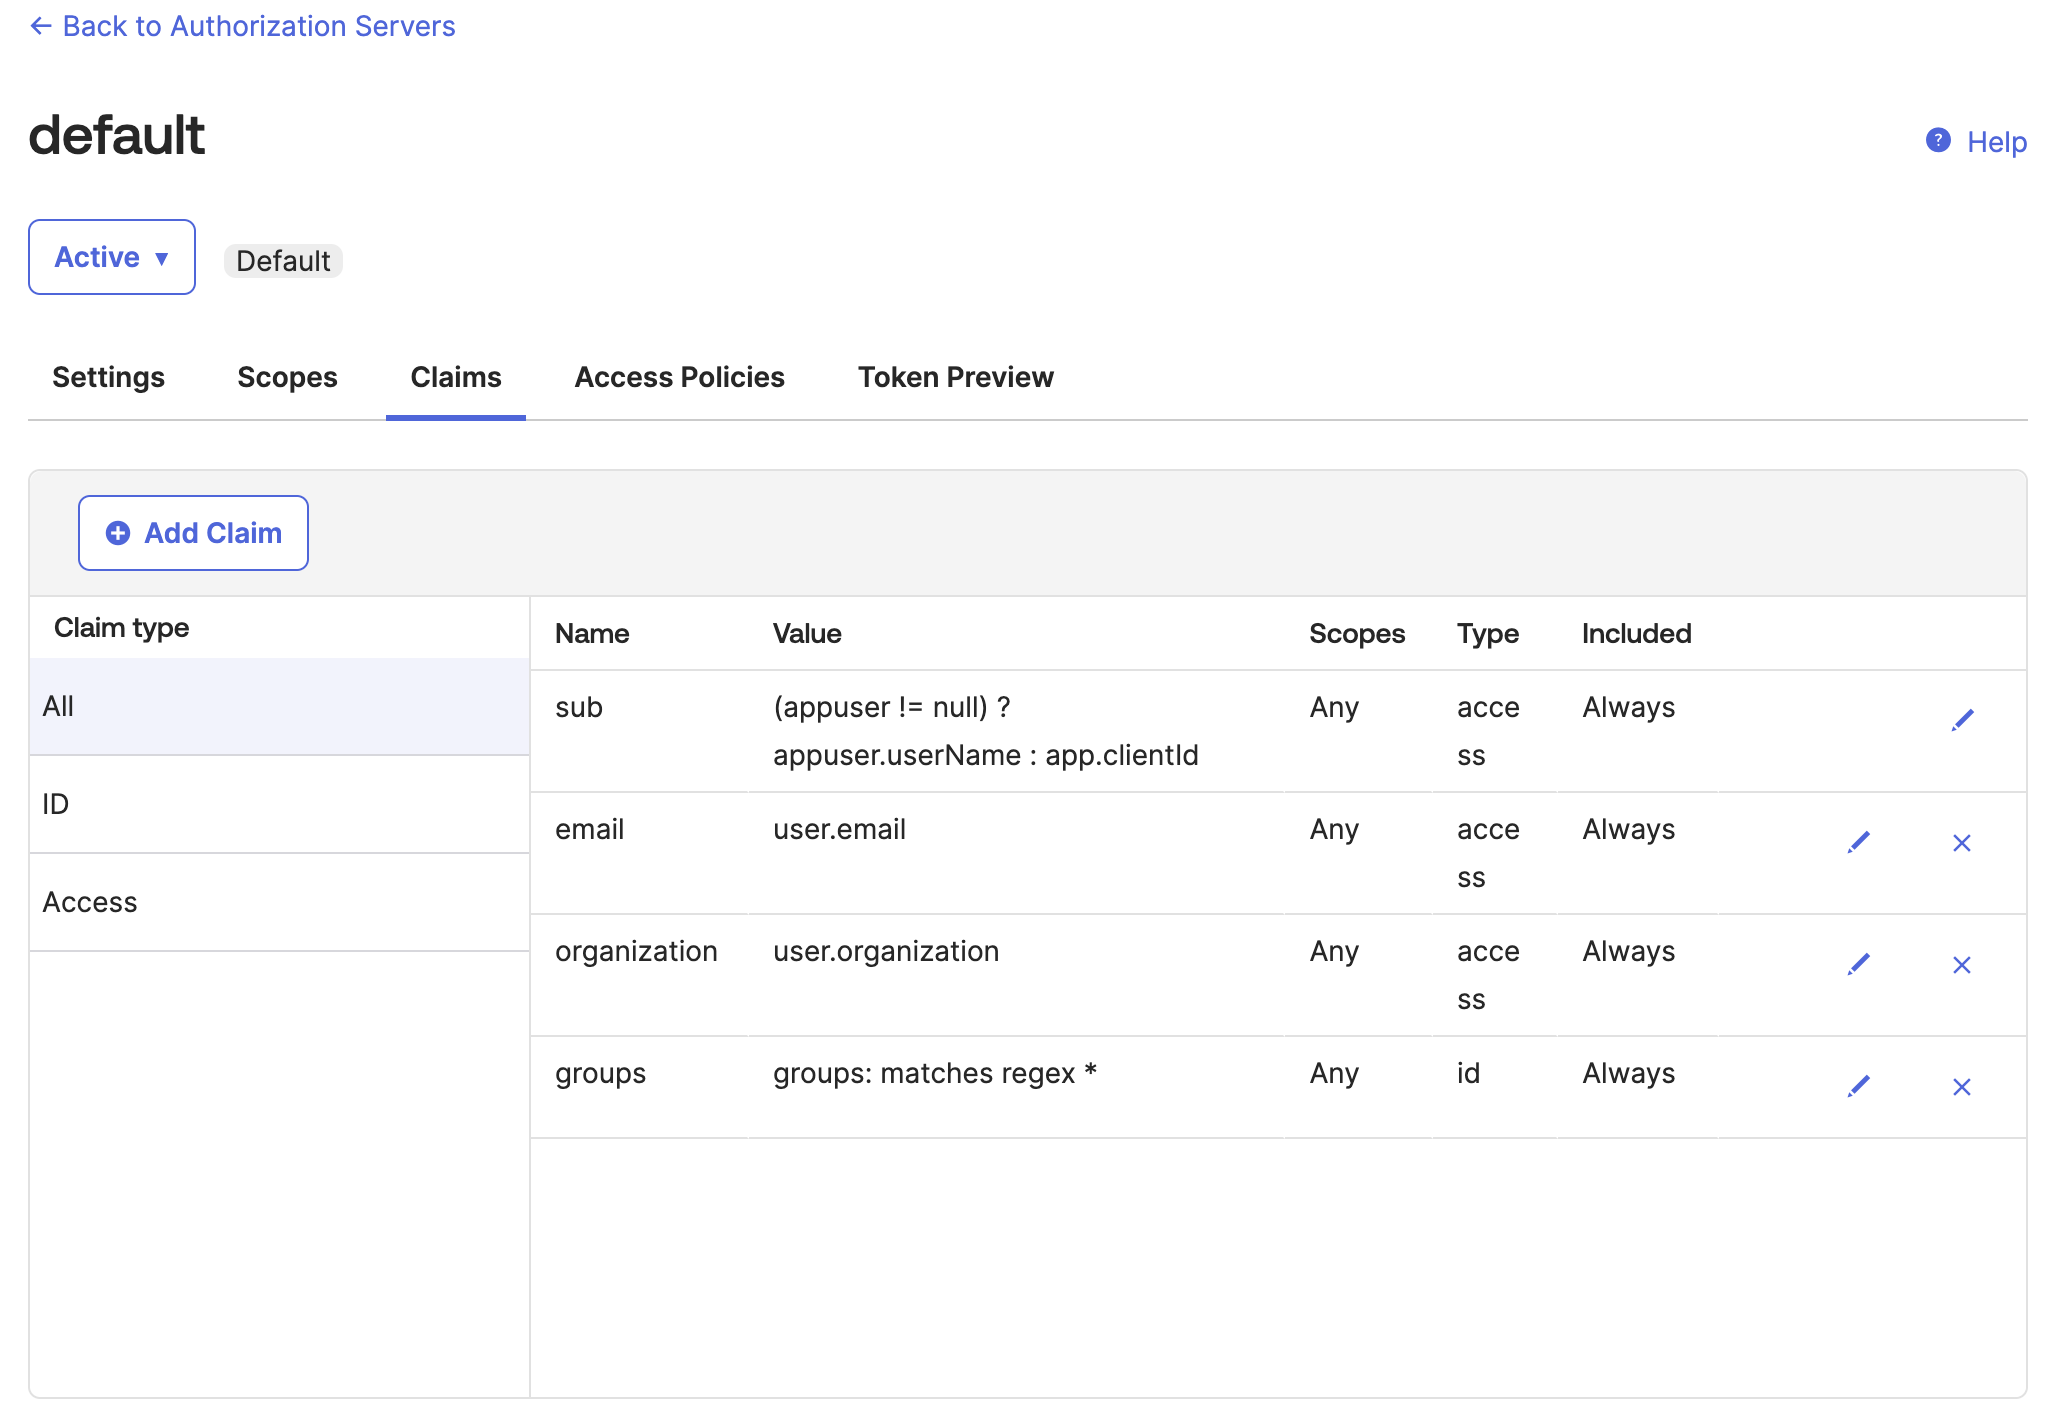
Figure: Okta default auth server Claims tab Figure: Okta default auth server Claims tab From the Token Preview tab, verify that the tokens return the information that you expect, such as the same
kidas$CERT_KEYSvalue that you previously saved and the claims that you configured.- In OAuth/OIDC client, enter the name of your app.
- In Grant type, select Authorization Code.
- In User, enter your username or the name of the user that you want to log in to the frontend developer portal.
- In Scopes, enter
openid. - Click Preview Token, then flip between the
id_tokenandtokenpreviews. - If you do not see the claim information that you expect, click your profile > My settings and review your personal information. For example, you might not have an
organizationorgroupset. You can edit your profile to include this information, then preview the token again.
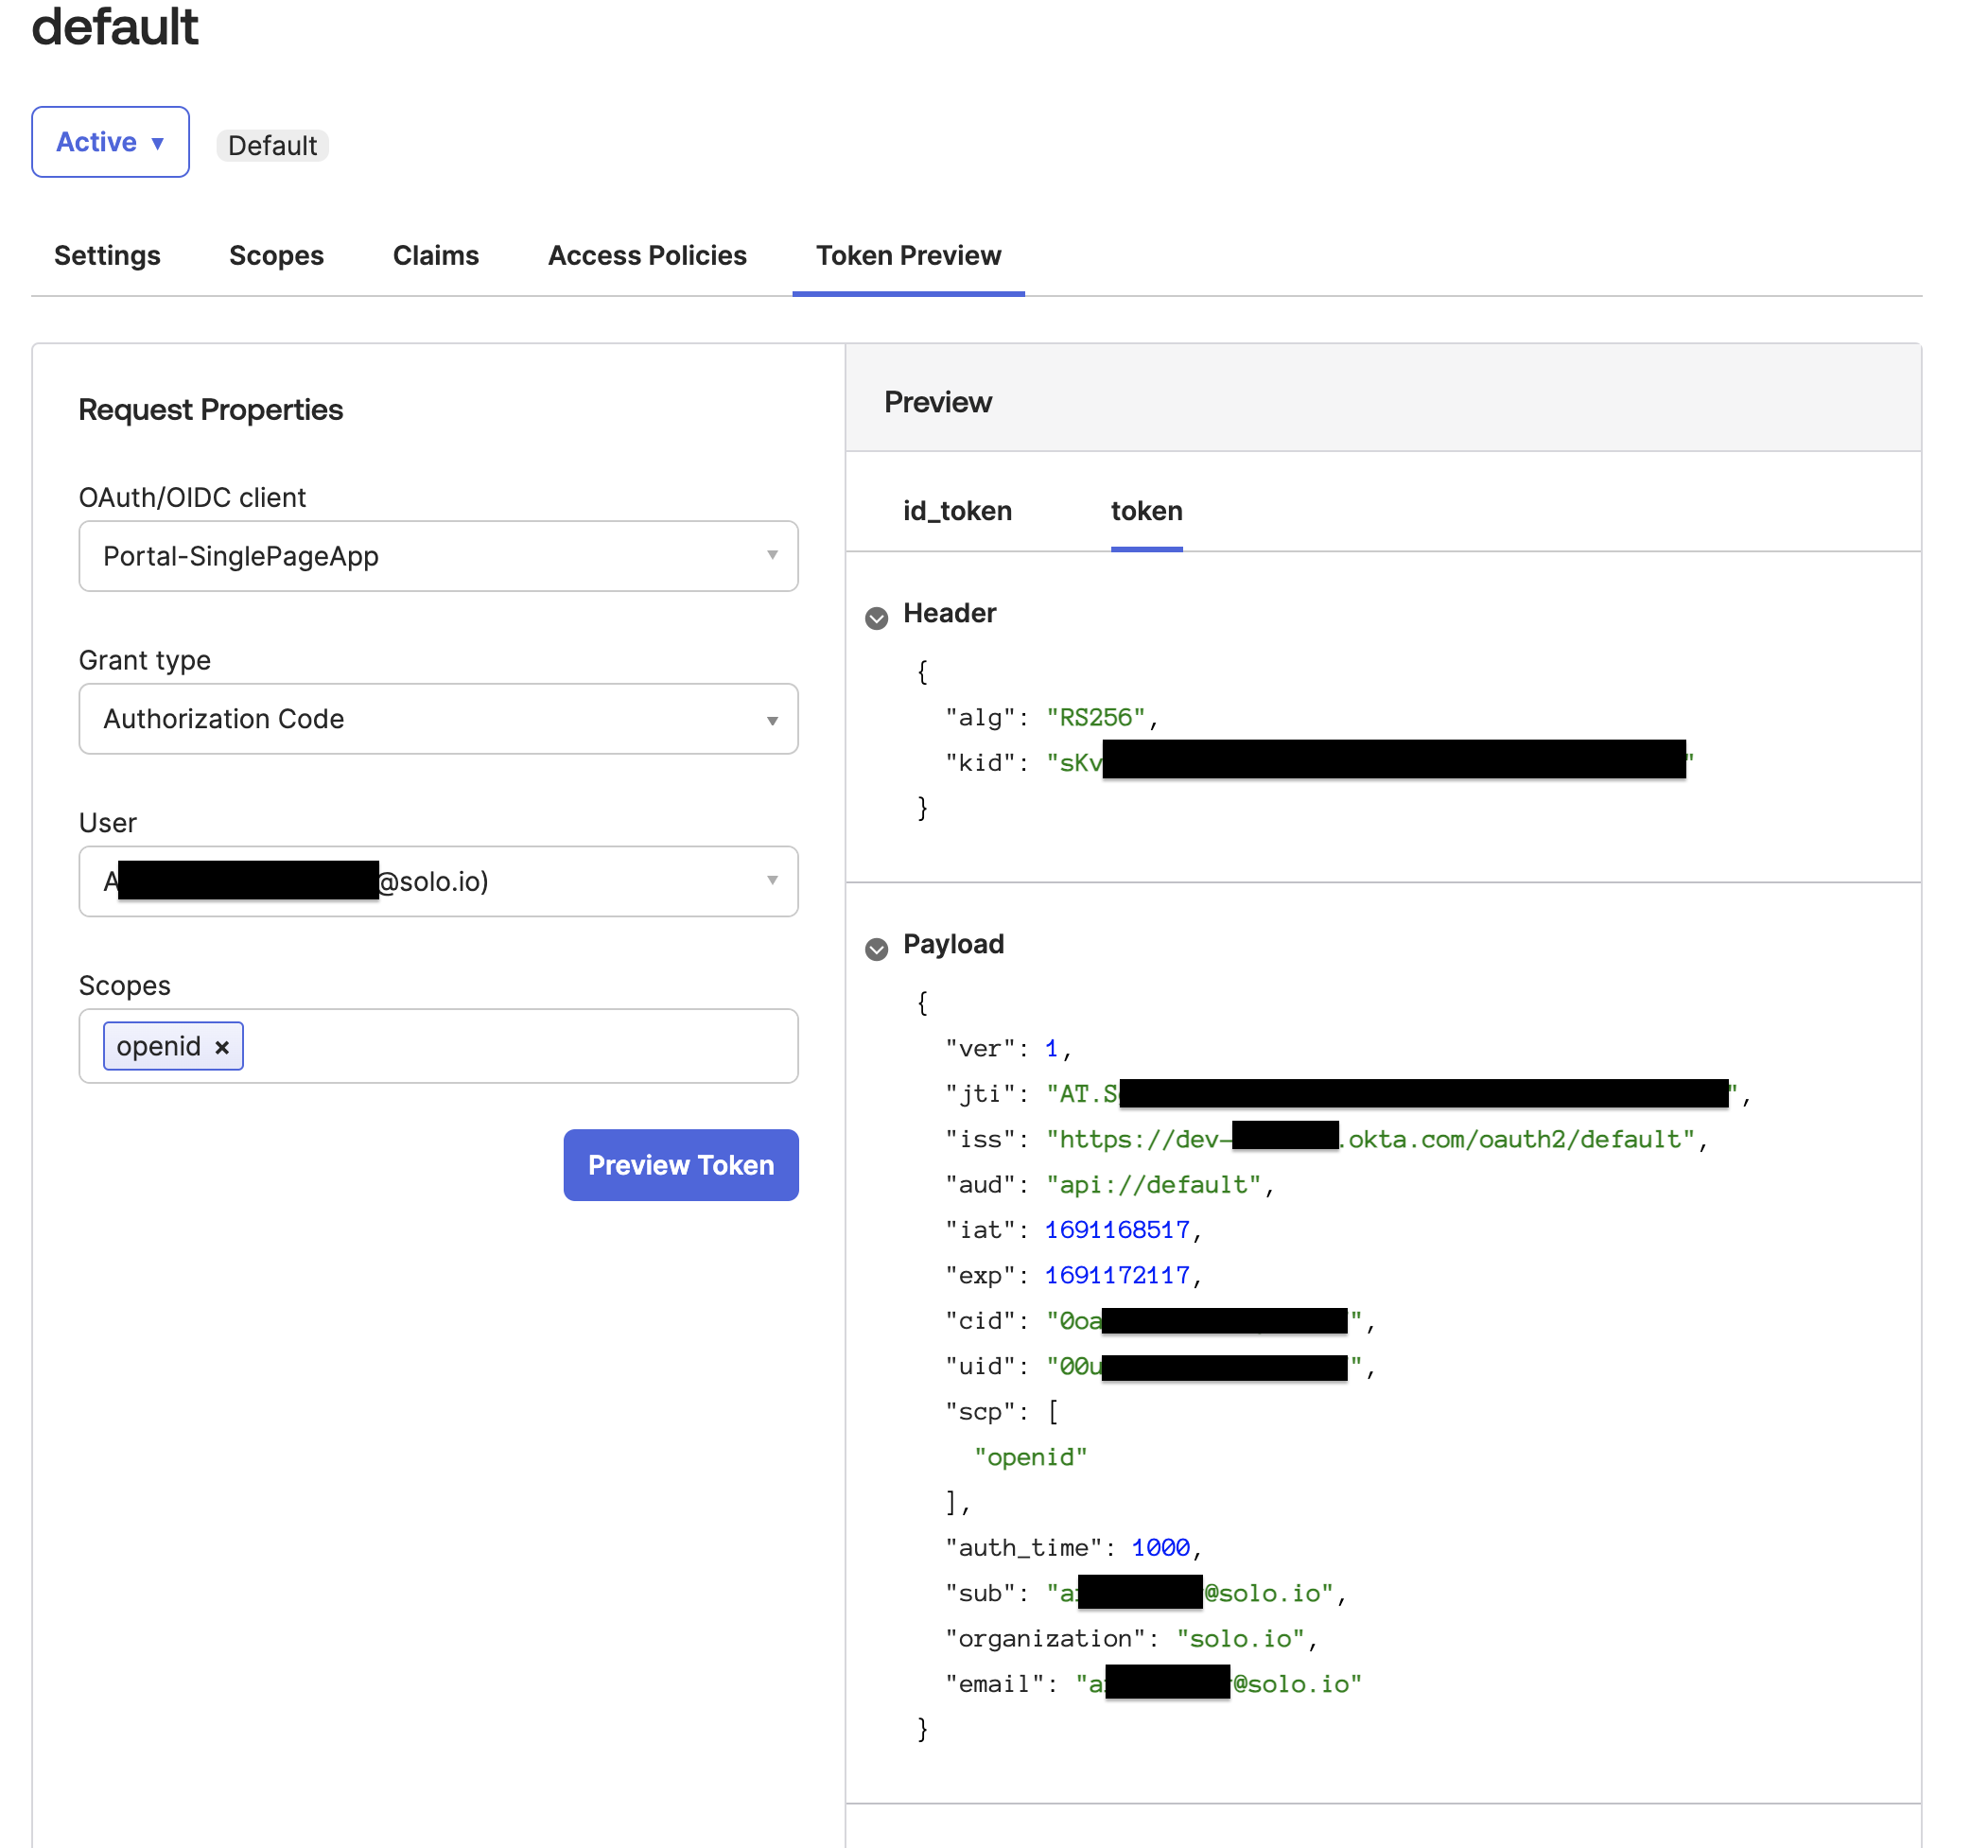
Figure: Okta Token Preview tab Figure: Okta Token Preview tab
Step 3: Add custom claims
Optionally, you can add custom claims to the ID tokens that Okta generates for a user. For example, you might want to create policies that grant access based on custom claims. If you use Gloo Portal, you can use custom claims to authorize users to ApiProducts by creating a PortalGroup.
Gloo Portal includes a sample React frontend app for a developer portal. To protect the frontend app with an OAuth login, the OIDC provider must return access and ID tokens with the following claims. Keep in mind that your OIDC provider might also require the users to have values for these claims in order to return the claim (such as a first and last name, not just a username, configured in the user profile).
Claims required to log in:
emailnamepreferred_usernamesub
Claims required for admin tasks such as managing subscriptions:
group: admin, note that this claim cannot be returned as an array.
Some OIDC providers do not return all of these claims by default. In the AuthConfig, you might be able to request additional scopes, such as openid, profile, and email to get back tokens with these claims. Otherwise, create custom claims and claim mapping for these tokens in your OIDC provider.
In Okta, you must request the openid, email, and profile scopes to get back the required claims to login. For the group: admin claim, group is a reserved claim. You must set this value to admin for the admin users.
The following steps create a group called Users and assign user1@example.com to the group. The group membership is mapped to a X-groups claim in the ID token. For more information, see the Okta docs.
If you are not already, log in to the Okta dashboard.
Create the
Usersgroup.- From the menu, click Directory > Groups.
- Click Add group.
- Enter the name
Users, then click Save. - In the list of groups, click Users.
- From the People tab, click Assign people.
- From the list of people, click the plus + button to assign the person to the
Usersgroup. Then, click Done. - From the Applications tab, click Assign applications.
- Find the application that you use, click Assign, and then click Done.
Configure the custom
X-groupsclaim.From the menu, click Security > API.
From the Authorization Servers tab, find the server that your app uses, such as
default.From the Claims tab, click Add Claim.
Fill in the details for the group claim.
- Name: Enter the name for the claim, such as
X-groups. - Include in token type: Select
ID TokenandAlways. - Value type: Select
Groups. - Filter: Select
Matches regex, and then enter.*to match any group. - Include in: Select
Any scope. - Click Create.
- Name: Enter the name for the claim, such as
From the Token Preview tab, verify that the claim is included in the user’s ID token.
- OAuth/OIDC client: Select your app.
- Grant type: Select
Authorization Code. - User: Select your user, such as
user1@example.com. - Scopes: Enter
openid,profile,email, andgroups. Note that for Gloo Portal, you must include these scopes in the AuthConfig policy that you create later. - Click Preview Token.
Verify that the Payload contains the required
email,name,preferred_username,sub, andgroupsclaims, along with theX-groupscustom claim.{ "sub": "1234...", "name": "user1", "email": "user1@example.com", "ver": 1, "iss": "https://<domain>.okta.com/oauth2/default", "aud": "1234...", "iat": 1732217445, "exp": 1732221045, "jti": "ID.1234...", "amr": [ "pwd" ], "idp": "1234...", "nonce": "nonce", "auth_time": 1000, "at_hash": "preview_at_hash", "X-groups": [ "Everyone", "Users" ] }
Step 4: Create an OAuth policy
Create the resources needed to enforce an OAuth policy that uses Okta as the OIDC provider.
Create an AuthConfig resource with your external authentication rules. The following example sets up access token validation. To validate access tokens, you configure the Gloo Gateway external auth server to use the Okta JWKS server at the address that you previously got when you configured Okta. For more options, see the OAuth2 API docs.
  kubectl apply -f - <<EOF
apiVersion: enterprise.gloo.solo.io/v1
kind: AuthConfig
metadata:
  name: oauth-okta
  namespace: httpbin
spec:
  configs:
    - oauth2:
        accessTokenValidation:
          jwt:
            remoteJwks:
              url: "${OKTA_JWKS_URI}"
EOF
Create a RouteOption resource that refers to the AuthConfig resource that you just created.
  kubectl apply -f- <<EOF
apiVersion: gateway.solo.io/v1
kind: RouteOption
metadata:
  name: httpbin-oauth
  namespace: httpbin
spec:
  options:
    extauth:
      configRef:
        name: oauth-okta
        namespace: httpbin
EOF
Create an HTTPRoute resource for the httpbin app that requires authentication with Okta for requests along the
/status/200path. If the request does not include a valid token, the request is denied with a403 ForbiddenHTTP status code.kubectl apply -f- <<EOF apiVersion: gateway.networking.k8s.io/v1 kind: HTTPRoute metadata: name: httpbin-oauth-okta namespace: httpbin spec: hostnames: - "www.httpbin.org" parentRefs: - name: http namespace: gloo-system rules: - matches: - path: type: Exact value: /status/200 filters: - type: ExtensionRef extensionRef: group: gateway.solo.io kind: RouteOption name: httpbin-oauth backendRefs: - name: httpbin port: 8000 EOF
Step 5: Verify the OAuth policy
Verify that your resources are in an
Acceptedstate. If not, review the messages. Common issues include referencing the wrong RouteOption resource in theextensionReffilter, creating multiple RouteOption resources and attaching them via thetargetRefsoption, or missing ReferenceGrants for resources that are in different namespaces.kubectl describe AuthConfig -n httpbin oauth-okta kubectl describe RouteOption -n httpbin httpbin-oauth kubectl describe HttpRoute -n httpbin httpbin-oauth-oktaSend a request to the protected httpbin route. Verify that you get back a
403error status code.curl -i http://$INGRESS_GW_ADDRESS:8080/status/200 -H "host: www.httpbin.org:8080"Example output:
HTTP/1.1 403 ForbiddenGet an access token for an authorized user of your Okta app. For more information, see the Okta refresh token docs or the Okta developer forum about Using Postman to get an access token.
export ACCESS_TOKEN=<access_token>Repeat the request to your httpbin app. This time, include the access token that you just created as part of the authorization header. Verify that you get back a
200success status code.curl -i http://$INGRESS_GW_ADDRESS:8080/status/200 -H "host: www.httpbin.org:8080" -H "Authorization: Bearer $ACCESS_TOKEN"Example output:
HTTP/1.1 200 OK
Cleanup
You can optionally remove the resources that you set up as part of this guide.Delete the resources that you created for the external auth policy.
  kubectl delete AuthConfig -n httpbin oauth-okta
kubectl delete RouteOption -n httpbin httpbin-oauth
kubectl delete HttpRoute -n httpbin httpbin-oauth-okta
Remove your Okta OIDC app.
- Open the Okta dashboard and select Applications > Applications from the menu.
- Find your Okta OIDC app.
- Click the gear icon and from the drop-down menu, select Deactivate.